Cartech - All About Auto

Showing posts with label maintenance. Show all posts
Textual description of firstImageUrl

Effective Methods to Prevent and Stop Rust on Your Car

All About Auto Image

Rust is one of the most common and frustrating problems car owners face. It can silently eat away at the metal components of your vehicle, compromising its aesthetics, durability, and overall safety. Thankfully, with the right care and preventive measures, you can protect your car from rust and stop it in its tracks if it has already started. This article will guide you through effective methods to prevent and stop rust on your car, ensuring its longevity and preserving its value.

Understanding How Rust Develops on Cars

Before diving into prevention and treatment methods, it's crucial to understand what rust is and why it occurs. Rust forms when iron or steel reacts with oxygen and moisture, leading to corrosion. This chemical reaction accelerates in the presence of salt, which explains why vehicles in coastal areas or regions with salted roads during winter are more prone to rust.

Common Areas Where Rust Appears on Cars

Rust can occur anywhere on your car, but it tends to show up in specific areas first:

• Wheel wells: These areas collect dirt, salt, and moisture.

• Underneath the car: The undercarriage is exposed to road debris, water, and salt.

• Door sills and frames: Water can get trapped in crevices, especially after rain or washing.

• Hood and trunk edges: These areas often accumulate moisture and dirt.

Being aware of these vulnerable spots can help you take targeted action to prevent rust.

Effective Methods to Prevent Rust on Your Car

1. Regular Car Washing

Keeping your car clean is one of the most effective methods to prevent rust. Dirt, salt, and road grime can trap moisture against your car’s metal surfaces, creating a perfect environment for rust to develop.

• Wash your car at least once every two weeks.

• During winter or if you live near the ocean, wash it weekly to remove salt deposits.

• Pay special attention to the undercarriage, wheel wells, and other rust-prone areas.

2. Wax Your Car Regularly

Waxing your car adds a protective layer between the paint and external elements, reducing the chances of rust forming.

• Wax your car every three months for optimal protection.

• Use high-quality car wax or ceramic coatings for long-lasting results.

3. Apply a Rust-Proofing Treatment

Rust-proofing treatments are designed to prevent rust by sealing metal surfaces. They are particularly useful for the undercarriage and other hard-to-reach areas.

• Opt for professional rust-proofing services for thorough application.

• DIY options like rust-prevention sprays are also available for smaller jobs.

4. Inspect and Repair Paint Chips

Even small chips in your car's paint can expose the metal underneath to moisture and oxygen, leading to rust.

• Regularly inspect your car’s body for paint damage.

• Use touch-up paint or a repair kit to seal chips and scratches promptly.

5. Keep Drain Holes Clear

Cars are designed with drain holes to allow water to escape from areas like the doors and trunk. If these holes become clogged, water can accumulate and lead to rust.

• Regularly inspect and clean your car’s drain holes to ensure they’re not blocked by debris.

6. Park in a Covered Area

Exposure to rain, snow, and humidity increases the risk of rust. Whenever possible, park your car in a garage, carport, or covered parking area.

• Use a weatherproof car cover if indoor parking isn’t an option.

7. Apply Protective Coatings

Protective coatings, such as undercoating and clear coat sealants, can provide an additional barrier against moisture and road debris.

• Undercoating protects the undercarriage from road salt and gravel.

• Clear coat sealants preserve the paintwork and prevent scratches.

Effective Methods to Stop Rust on Your Car

If rust has already started forming, it’s essential to address it immediately to prevent further damage. Below are effective methods to stop rust on your car:

1. Identify the Type of Rust

Not all rust is the same, and treatment varies depending on its type:

• Surface rust: Appears as orange or brown discoloration on the paint and is the easiest to treat.

• Scale rust: Penetrates deeper into the metal, causing flaking or bubbling.

• Penetrating rust: Severe rust that creates holes in the metal and requires immediate attention.

2. Remove Surface Rust

Surface rust can be removed relatively easily using the following steps:

• Clean the affected area with soap and water.

• Sand the rusted area using fine-grit sandpaper until you reach bare metal.

• Apply a rust converter to neutralize any remaining rust.

• Prime and repaint the area to restore its appearance and prevent future rust.

3. Treat Scale Rust

Scale rust requires more effort to stop, as it has already penetrated the surface:

• Use a wire brush or grinder to remove loose rust and flaking metal.

• Apply a rust converter to stabilize the remaining rust.

• Seal the area with a high-quality primer and rust-resistant paint.

4. Repair Penetrating Rust

For penetrating rust, professional assistance is often necessary, especially if structural integrity is compromised:

• Cut out the rusted section and replace it with new metal.

• Weld and seal the replacement panel to ensure a secure fit.

• Paint the area to match the rest of the car.

5. Use Rust Inhibitors

Rust inhibitors are chemical products that prevent rust from spreading. They can be applied to affected areas after removing visible rust:

• Choose an inhibitor suitable for automotive use.

• Follow the manufacturer’s instructions for best results.

Additional Tips to Protect Your Car from Rust

Check for Moisture Traps

• Remove mats and carpets periodically to check for trapped moisture inside the cabin.

• Dry out wet areas immediately to prevent rust from forming underneath.

Avoid Driving Through Puddles

Large puddles can splash water and debris onto your car’s undercarriage, increasing the risk of rust. Avoid driving through standing water whenever possible.

Install Mud Flaps

Mud flaps act as a barrier, preventing dirt, gravel, and water from hitting the vulnerable areas around your car’s wheels.

Perform Regular Maintenance

• Schedule regular inspections to identify and address rust early.

• Ask your mechanic to include rust-prone areas in their routine checkups.

Why Preventing Rust is Crucial

Taking the time to prevent and stop rust on your car isn’t just about maintaining its appearance. It’s also essential for:

• Preserving resale value: Rust lowers your car’s market value significantly.

• Ensuring safety: Rust can weaken structural components, posing a safety risk.

• Avoiding costly repairs: Addressing rust early is far more affordable than repairing extensive damage.

Common Myths About Rust Prevention

Myth 1: Rust-Proof Cars Don’t Need Maintenance

While modern cars come with rust-resistant coatings, they are not immune to rust. Regular cleaning and inspections are still necessary.

Myth 2: Washing Your Car Too Often Causes Rust

Washing your car removes dirt and salt that can lead to rust. It does not cause rust as long as the vehicle is dried properly.

Myth 3: Small Rust Spots Are Harmless

Even small rust spots can spread over time, leading to extensive damage if left untreated.

Conclusion

Rust can significantly impact your car’s performance, appearance, and value if left unchecked. By following these effective methods to prevent and stop rust on your car, you can protect your investment and enjoy a vehicle that looks and performs like new for years to come.

Regular maintenance, prompt action against rust, and investing in protective measures are the keys to keeping your car rust-free. Whether it’s through consistent washing, applying rust-proofing treatments, or addressing rust as soon as it appears, these steps will ensure your car stays in excellent condition.

Taking proactive measures today will save you time, money, and stress in the long run. Don’t let rust win—keep your car safe, shiny, and rust-free!


Want more videos all about auto?
Subscribe to our YouTube channel👉Cartech Home
Textual description of firstImageUrl

How Often Should You Change Your Oil in Months? A Complete Guide

All About Auto Image

Regular oil changes are essential for a vehicle’s health, ensuring the engine runs smoothly and remains efficient over time. Many drivers find themselves wondering, How often should you change your oil in months? The answer isn't always straightforward, as it depends on several factors like your driving habits, vehicle type, and the kind of oil you use. In this article, we'll dive deep into understanding how often you should change your oil, how to assess the right oil change interval, and why it's crucial for your vehicle's longevity.

Why Oil Changes Matter

Motor oil is the lifeblood of your engine. It lubricates moving parts, reduces friction, and helps maintain a stable temperature within the engine. As oil circulates, it gathers dirt, debris, and contaminants from the engine and the environment. Over time, the oil breaks down and becomes less effective in lubricating and protecting engine components. Without regular oil changes, your engine can suffer from:

• Increased wear and tear due to friction
• Overheating as a result of reduced lubrication
• Decreased fuel efficiency
• Potential engine damage

Maintaining a regular oil change schedule is critical for avoiding costly repairs and ensuring your vehicle’s performance stays optimal.

Determining Oil Change Intervals

Oil change intervals have evolved over time. Decades ago, the common advice was to change your oil every 3,000 miles or three months. However, with advances in oil technology and modern engines, that rule no longer applies universally.

Today, oil change intervals vary based on multiple factors:

1. Type of Oil: Synthetic oils tend to last longer than conventional oils.

2. Driving Conditions: Frequent stop-and-go driving or short trips in extreme temperatures can shorten oil life.

3. Vehicle Type: Some vehicles have unique needs, requiring more frequent or less frequent oil changes.

4. Manufacturer Recommendations: Your vehicle’s owner manual provides recommended oil change intervals.

Let's break down these factors in more detail to determine how often you should change your oil in months.

The Role of Oil Type in Determining Oil Change Intervals

There are three main types of oil, and each type has different intervals for how often you should change it in months:

1. Conventional Oil: Typically lasts 3-4 months or around 3,000-5,000 miles. It is the most affordable but breaks down faster, especially under intense driving conditions. Many drivers still use conventional oil, but it generally requires more frequent changes.

2. Synthetic Blend Oil: A mixture of conventional and synthetic oil, synthetic blend oil provides better performance and can last 5-7 months or around 5,000-7,500 miles. It’s a middle-ground option, offering longer intervals than conventional oil but at a slightly higher price.

3. Full Synthetic Oil: The most advanced and durable type, full synthetic oil can last 6-12 months or 7,500-15,000 miles. It’s ideal for modern engines and offers superior performance in extreme temperatures. Although more expensive, it requires fewer oil changes over time.

If you’re unsure which oil type is best for your vehicle, check the owner’s manual or consult with a professional mechanic.

Manufacturer Recommendations and Your Vehicle's Manual

Each vehicle manufacturer provides oil change intervals in the owner’s manual based on the vehicle's design, engine type, and expected use. These recommendations are generally given in both miles and months. For example:

• Toyota often recommends oil changes every 6 months or 5,000 miles, whichever comes first.

• Honda suggests changing oil every 12 months or 7,500 miles for newer models with synthetic oil.

• Ford may recommend oil changes every 6-12 months depending on the model and engine.

Following the manufacturer’s guidelines is the safest way to determine how often you should change your oil in months. However, if you drive under “severe” conditions (like extreme weather, frequent towing, or lots of idling), you may need more frequent oil changes.

Driving Habits and Their Impact on Oil Life

Your driving habits can significantly affect how long your oil lasts. Here are some factors to consider:

• Frequent Short Trips: If you frequently drive short distances, the engine may not reach optimal operating temperature, causing oil to degrade faster. In this case, changing oil every 3-6 months is often recommended.

• Stop-and-Go Driving: Driving in heavy traffic, especially in hot weather, can also cause oil to break down faster. For those in urban areas with lots of stop-and-go traffic, an oil change every 4-6 months is advisable.

• Highway Driving: Regular, long-distance highway driving at moderate speeds can actually prolong oil life, allowing you to stick closer to the maximum recommended interval (e.g., every 6-12 months).

Climate and Environmental Conditions

Temperature and climate can impact how often you should change your oil. Here’s how:

• Hot Climates: High temperatures can make the oil thin out faster. Drivers in warmer regions might benefit from changing oil every 4-6 months, especially if they use conventional oil.

• Cold Climates: Extremely cold temperatures cause the oil to thicken, making it harder for the engine to operate efficiently. In cold areas, it’s recommended to change oil every 5-7 months, particularly for drivers who make frequent short trips.

Understanding Oil Change Indicators

Modern vehicles often come equipped with an oil life monitoring system. These systems use algorithms based on engine conditions, driving habits, and time to determine when an oil change is needed. The oil life monitoring system notifies you when it’s time to change your oil, helping extend intervals safely.

If your vehicle has this feature, you may not need to worry about the exact monthly interval, as the system can adapt to your specific driving conditions. However, it’s still wise to avoid exceeding 12 months between oil changes unless otherwise advised by the manufacturer.

Benefits of Changing Your Oil on Time

Following a regular oil change schedule, even if it feels more frequent than necessary, has numerous benefits:

1. Prolongs Engine Life: Fresh oil reduces wear, helping your engine components last longer.

2. Improves Fuel Efficiency: Clean oil reduces friction, allowing the engine to operate more efficiently and use less fuel.

3. Reduces Emissions: Oil that’s in good condition burns cleaner, resulting in lower vehicle emissions.

4. Prevents Engine Overheating: Quality oil keeps the engine temperature regulated, reducing the risk of overheating.

5. Enhances Performance: Regular oil changes keep your engine clean and improve overall performance.

How to Change Your Oil at the Recommended Interval

Knowing how often you should change your oil in months is only half the equation. Here are the steps involved in a basic oil change if you choose to do it yourself:

1. Gather Supplies: You’ll need fresh oil, an oil filter, an oil pan, a funnel, and a wrench.

2. Drain the Old Oil: Place the oil pan under the drain plug, remove the plug, and let the oil drain completely.

3. Replace the Oil Filter: Unscrew the old oil filter, replace it with a new one, and apply a bit of fresh oil to the rubber gasket to ensure a tight seal.

4. Add New Oil: Use a funnel to pour fresh oil into the engine based on the manufacturer’s specifications.

5. Check Oil Level: Use the dipstick to ensure the oil level is within the recommended range.

6. Dispose of Used Oil Properly: Take the old oil to a recycling center.

Even if you opt to have your oil changed professionally, knowing these steps can help you better understand the process and ensure the service is done correctly.

Frequently Asked Questions (FAQs)

1. How often should you change your oil in months if you don't drive often?

If you drive infrequently, you might be able to extend oil changes to every 6-12 months with synthetic oil. However, for conventional oil, changing it every 6 months is advisable to prevent moisture buildup and oil degradation.

2. Can you change oil every 12 months?

Yes, with synthetic oil, some manufacturers recommend oil changes every 12 months or around 7,500-15,000 miles. However, always consult your owner's manual and consider your driving conditions.

3. Does oil expire if you don’t drive your car?

Yes, oil can degrade over time due to exposure to moisture and contaminants even if you don’t drive frequently. For stored or infrequently driven vehicles, changing oil every 6-12 months is a good rule of thumb.

Conclusion

Determining how often you should change your oil in months depends on your oil type, driving habits, and vehicle specifications. As a general guideline:

• Conventional Oil: Every 3-4 months
• Synthetic Blend Oil: Every 5-7 months
• Full Synthetic Oil: Every 6-12 months

Changing your oil regularly helps maintain engine health, improves fuel efficiency, and ensures optimal vehicle performance. When in doubt, consult your owner’s manual and consider talking to a professional mechanic to develop an oil change schedule that suits your needs.

Maintaining a consistent oil change routine is one of the simplest and most effective ways to keep your car running smoothly for years to come. By following these guidelines, you’ll ensure that your vehicle remains reliable and efficient, saving you time, money, and hassle in the long run.


Want more videos all about auto?
Subscribe to our YouTube channel👉Cartech Home
Textual description of firstImageUrl

How to Change Oil in Car: Step-by-Step Guide for Beginners

Cartech image

Changing the oil in your car is one of the essential maintenance tasks that can keep your engine running smoothly. It’s a task you can perform yourself, saving money and providing you with a sense of satisfaction. This article will walk you through the steps on how to change oil in a car, including what tools you need, the process, and tips to make it easy and efficient.

Why is Changing Your Oil Important?

Oil is the lifeblood of your car’s engine. It lubricates the engine components, reduces friction, and helps dissipate heat. Over time, oil becomes contaminated with dirt, metal particles, and other debris, making it less effective. Changing your oil regularly keeps your engine clean and prolongs its lifespan.

Regular oil changes:

• Help your engine run smoothly
• Increase fuel efficiency
• Prevent engine wear and damage
• Enhance overall vehicle performance

When to Change Your Oil

The frequency of oil changes depends on the type of vehicle you have, the type of oil used, and your driving habits. Generally, it’s recommended to change the oil every 3,000 to 5,000 miles, but some modern vehicles can go 7,500 miles or even more. Consult your owner’s manual for the recommended oil change interval for your specific car.

Signs You Need an Oil Change:
• Oil change light is on
• Engine sounds noisier than usual
• Oil is dirty or dark in color
• You smell burning oil

Tools and Materials Needed for an Oil Change

Before you start the oil change, gather the following tools and materials:

• Wrench (usually a 3/8-inch ratchet wrench)
• Oil filter wrench (for removing the oil filter)
• Drain pan (for catching the used oil)
• Funnel (to pour new oil into the engine)
• New oil (check the owner's manual for recommended type and quantity)
• New oil filter (compatible with your vehicle model)
• Car jack and jack stands (if needed, for raising the car)
• Gloves (to protect your hands from hot oil)
• Rags or paper towels (for cleaning up any spills)

Step-by-Step Guide on How to Change Oil in a Car

Now that you have the tools and materials ready, let’s go through the steps to change the oil in your car. Make sure your car is parked on a flat surface, and let the engine cool for a few minutes if it has been running.

Step 1: Prepare Your Vehicle

1. Park the car on a flat surface – Avoid sloped surfaces as this can cause oil spillage.

2. Turn off the engine and let it cool for 5-10 minutes.

3. Engage the parking brake for extra safety.

4. If your vehicle is low to the ground, jack up the car and secure it with jack stands.

Step 2: Locate the Oil Drain Plug

1. Put on your gloves and crawl under the car (use a creeper if you have one).

2. Locate the oil drain plug. It’s typically on the bottom of the engine oil pan. Your car’s owner’s manual should have a diagram.

3. Place the drain pan directly under the drain plug to catch the used oil.

Step 3: Drain the Old Oil

1. Use the wrench to loosen the oil drain plug. Be careful, as the oil can be hot.

2. Once the plug is loose, carefully remove it by hand and let the oil drain into the pan.

3. Allow the oil to drain completely, which usually takes a few minutes.

4. Once all the oil is drained, clean the drain plug with a rag and replace it by hand, then tighten it with a wrench.

Step 4: Remove the Old Oil Filter

1. Locate the oil filter (consult your owner’s manual if needed). It’s usually on the side of the engine.

2. Position the drain pan under the filter, as some oil may leak out when you remove it.

3. Use the oil filter wrench to loosen and remove the old oil filter.

4. Be cautious as it will still contain some oil, which can spill when you remove it.

Step 5: Install the New Oil Filter

1. Take the new oil filter and apply a small amount of fresh oil on the rubber gasket at the top of the filter. This helps ensure a good seal.

2. Screw the new filter onto the engine by hand until it’s snug. Then give it another quarter turn to tighten. Do not overtighten the oil filter.

Step 6: Add New Oil

1. Open the oil filler cap located on top of the engine.

2. Use a funnel to pour the recommended amount of new oil into the engine.

3. After adding the oil, replace the oil filler cap and make sure it’s secure.

Step 7: Check the Oil Level

1. Start the engine and let it run for a minute or two, allowing the new oil to circulate.

2. Turn off the engine and wait a minute, then check the oil level with the dipstick.

3. Pull out the dipstick, wipe it clean, insert it back fully, then pull it out again to check the level. If it’s below the “Full” mark, add a bit more oil and recheck.

Step 8: Dispose of Used Oil Properly

Used motor oil is toxic to the environment, so it must be disposed of responsibly. Most auto parts stores and service stations accept used oil for recycling. Pour the old oil into a sealed container and take it to a recycling facility.

Tips for an Easy Oil Change

• Warm up the engine slightly before changing the oil. Warm oil flows out more quickly.

• Always double-check that you’ve replaced the drain plug and oil filter before adding new oil.

• Take your time – rushing can lead to mistakes and messes.

• Keep a record of the oil change with the date and mileage. This helps you stay on track with future oil changes.

• Make sure you’re using the right type of oil for your car. Check the owner’s manual for the manufacturer’s recommendation.

Common Mistakes to Avoid When Changing Oil in a Car

1. Overfilling or Underfilling the Oil

Adding too much oil can increase the pressure inside the engine and cause leaks, while too little oil won’t provide enough lubrication. Always use the dipstick to check the level after filling.

2. Using the Wrong Type of Oil

Oil type and viscosity are critical for engine performance. Consult your owner’s manual to ensure you’re using the correct type.

3. Not Replacing the Oil Filter

An old oil filter can introduce contaminants into the new oil, reducing its effectiveness. Always replace the oil filter when you change the oil.

4. Not Tightening the Drain Plug or Filter

If the drain plug or filter is too loose, you could end up with an oil leak. However, overtightening can strip the threads or damage the rubber seal on the oil filter.

How Much Does an Oil Change Cost?

The cost of an oil change varies depending on whether you do it yourself or go to a shop. Changing the oil yourself can cost between $20 and $50, depending on the type of oil and filter you buy. Going to a shop or dealership can cost between $35 and $75 or more, depending on the type of vehicle and location.

How Long Does an Oil Change Take?

For beginners, changing the oil may take around 30 to 45 minutes. As you become more experienced, you can complete the process in as little as 20 minutes. Remember, taking your time and being thorough is better than rushing through the steps.

Benefits of Changing Your Own Oil

Changing your own oil offers several benefits:

• Saves Money: Doing it yourself can save you labor costs associated with a professional oil change.

• Increases Knowledge: Performing maintenance helps you learn more about how your vehicle operates.

• Provides Satisfaction: There’s a sense of accomplishment in knowing you did it yourself.

Final Thoughts on How to Change Oil in Car

Learning how to change oil in a car is an essential skill for any car owner. Not only does it save you money, but it also gives you a better understanding of your vehicle and can extend the life of your engine. Whether you’re a beginner or a seasoned DIYer, following these steps will help you change your oil with confidence. Just remember to be cautious, take your time, and always recycle your used oil properly.

Changing the oil regularly will keep your car running smoothly and efficiently for years to come. With this step-by-step guide, you’re well on your way to mastering the art of oil changes and becoming a more confident vehicle owner.

Essential Advice for Starting Work on Your Own Car: A Beginner's Guide

Working on your own car can be an incredibly rewarding and cost-effective hobby. Not only does it save you money on mechanic fees, but it also gives you the satisfaction of knowing how your vehicle works. If you're new to car maintenance, the thought of popping open the hood might feel intimidating, but with the right guidance, you can begin your DIY automotive journey with confidence. In this guide, we'll provide you with essential advice for starting work on your own car, including tools, safety, and basic tasks you can tackle right away.

Why Should You Work on Your Own Car?

Before diving into the details, it's important to understand why working on your own car is beneficial:

1. Cost Savings

One of the biggest reasons people start learning about car repair is to save money. Labor costs at a mechanic’s shop can range from $50 to $150 per hour, depending on the work being done. Performing your own basic repairs and maintenance can save you hundreds, if not thousands, of dollars each year.

2. Self-Sufficiency

When you work on your own car, you become less dependent on mechanics and service centers. If you know how to handle small repairs and routine maintenance, you'll spend less time waiting in line at the shop and more time on the road.

3. Knowledge

Learning how your vehicle works is empowering. The more you know about your car, the better you can maintain it. You'll also be more likely to spot problems before they become serious, saving you even more money and stress in the long run.

4. Enjoyment

Many people find that working on their own cars is a fun and rewarding experience. It can be a relaxing way to spend your free time, and there's a certain sense of pride that comes with fixing something yourself.

Advice for Starting Work on Your Own Car: Where to Begin

Now that you know why working on your car is worth the effort, let’s dive into some practical advice for getting started.

1. Understand the Basics of Your Car

Before you begin working on your vehicle, take the time to understand its basic components. Familiarize yourself with your car’s manual and review key systems such as the engine, brakes, suspension, and electrical components. The owner's manual will provide essential information, such as where certain parts are located and what type of maintenance is recommended.

Key systems and parts to learn include:

Engine: Understand how the engine works, including components like the air filter, fuel injectors, and ignition system.

Brakes: Learn the difference between disc and drum brakes and know how to spot signs of wear.

Tires and suspension: Learn how to change a tire and how your car's suspension system works to ensure a smooth ride.

Fluids: Know which fluids are vital to your car's performance and how to check their levels.

2. Invest in Basic Tools

Having the right tools is critical when working on your car. You don’t need to buy every tool at once, but a basic toolkit will allow you to handle most common maintenance and repair tasks. Here are some essential tools you’ll need to start:

Socket set: A good socket set is one of the most useful tools for working on cars. Look for a set that includes both metric and standard sizes.

Wrenches: Adjustable wrenches and combination wrenches are a must for loosening or tightening bolts.

Screwdrivers: Flathead and Phillips screwdrivers are required for various small tasks.

Jack and jack stands: A hydraulic jack and a set of sturdy jack stands will help you lift your car safely.

Pliers: Needle-nose and regular pliers are helpful for electrical work and dealing with tight spaces.

Torque wrench: Use this tool to tighten bolts to the manufacturer’s specifications without over-tightening.

Oil filter wrench: This is essential for changing your car's oil.

As you advance, you can expand your toolkit with specialized tools for more complex jobs.

3. Start with Simple Jobs

When you're just starting out, it’s best to begin with simple maintenance tasks. These are low-risk jobs that will help you build confidence and familiarize yourself with your vehicle. Some beginner-friendly tasks include:

Changing the Oil

One of the easiest and most important tasks you can perform is changing your car’s oil. Regular oil changes keep your engine running smoothly and extend its lifespan. To change your oil:

1. Use a jack to lift your car and secure it on jack stands.

2. Place an oil pan under the drain plug, then use a wrench to remove the plug and let the oil drain.

3. Replace the oil filter using an oil filter wrench.

4. Reinstall the drain plug and add the correct type of oil, as specified in your owner’s manual.

Replacing the Air Filter

The air filter prevents debris from entering your engine. A dirty air filter can reduce your car's fuel efficiency and performance, so it's important to replace it regularly. Replacing the air filter is one of the simplest car maintenance tasks:

1. Locate the air filter box, usually found near the engine.

2. Remove the cover and take out the old filter.

3. Place the new filter in, ensuring it’s seated properly, and replace the cover.

Replacing Windshield Wipers

This is another easy task that can improve your safety on the road. Worn-out wiper blades don’t clear the windshield properly, which can hinder visibility. Replacing them is as simple as:

1. Lifting the wiper arm and pressing the small tab where the blade attaches to the arm.

2. Sliding the old blade off and snapping the new blade into place.

Changing a Tire

Flat tires happen, and knowing how to change one is a crucial skill. To change a tire:

1. Loosen the lug nuts with a wrench before lifting the car with a jack.

2. Remove the lug nuts and pull off the flat tire.

3. Mount the spare tire and hand-tighten the lug nuts.

4. Lower the car and tighten the lug nuts securely with a wrench.

4. Use Online Resources and Tutorials

One of the best parts about working on your own car today is the wealth of resources available online. There are thousands of YouTube videos, forums, and tutorials that can guide you step by step through nearly any repair or maintenance task. Some popular resources include:

YouTube: Channels like ChrisFix and Scotty Kilmer offer easy-to-follow car repair tutorials for beginners.

Forums: Websites like Reddit's r/mechanics and automotive enthusiast forums can provide advice and answer questions from experienced car owners.

Repair Manuals: Websites like Haynes and Chilton offer detailed repair manuals for most car makes and models.

These resources can be invaluable when you're learning how to work on your own car.

5. Safety First

Safety should always be your top priority when working on your car. Here are some important safety tips to follow:

Use a jack and jack stands properly: Always lift your car on a flat, stable surface and use jack stands to support the vehicle. Never rely on the jack alone to hold the car up while you work.

Wear safety gear: Eye protection, gloves, and sturdy clothing can protect you from debris, burns, and chemical spills.

Disconnect the battery: Before working on any electrical components, disconnect the car's battery to avoid the risk of shock or damage to the electrical system.

Work in a well-ventilated area: If you're running the engine or using chemicals like brake cleaner, make sure you're working in a space with good ventilation to avoid breathing in harmful fumes.

Be cautious with heavy parts: Components like tires, batteries, and certain engine parts can be heavy. Always use proper lifting techniques or get help to avoid injury.

6. Know When to Seek Professional Help

Even though working on your own car is a great skill, there are certain tasks that are best left to the professionals. Complex jobs, like engine rebuilds, transmission repairs, or work that requires specialized tools, should only be attempted by experienced mechanics. When you're not confident in your ability to complete a repair safely, it's better to seek professional help than risk damaging your car or putting yourself in danger.

7. Develop a Maintenance Schedule

One of the best ways to keep your car running smoothly is to stick to a regular maintenance schedule. Your owner’s manual will have a detailed maintenance plan that includes oil changes, tire rotations, brake inspections, and fluid checks.

Here’s a basic timeline for common car maintenance tasks:

Every 3,000 to 5,000 miles: Oil and filter change.

Every 10,000 to 15,000 miles: Replace air filters and inspect brakes.

Every 30,000 miles: Check the battery, replace the fuel filter, and inspect the cooling system.

Every 60,000 miles: Replace brake pads, inspect the timing belt, and flush the transmission fluid.

Sticking to this schedule will prevent breakdowns and extend the life of your car.

8. Practice Patience and Persistence

Working on cars requires patience, especially when you're just starting out. Not every repair will go smoothly, and you’ll likely encounter a few frustrating moments along the way. The key is to stay calm and be persistent. If you get stuck, take a break and consult a guide or video tutorial. Over time, your skills will improve, and tasks that once seemed difficult will become easier.

9. Join a Community of Car Enthusiasts

If you’re serious about working on your own car, consider joining a community of car enthusiasts. These communities can be found online or in person, and they offer a wealth of knowledge and support. You can ask questions, share experiences, and even meet up with other car lovers for DIY repair sessions or automotive events. Being part of a community can make learning about cars even more enjoyable.

10. Track Your Progress and Learn From Mistakes

Keep a log of all the work you’ve done on your car. This can help you track maintenance, learn from your mistakes, and become more organized.

You’ll be able to refer back to your notes if a similar issue arises in the future. Over time, you’ll see how much you’ve learned and how far you’ve come in your car maintenance journey.

Conclusion

Starting work on your own car doesn’t have to be overwhelming. By understanding the basics of your vehicle, investing in essential tools, and taking on simple tasks, you can build your confidence and save money over time. Always prioritize safety, know your limits, and never hesitate to seek professional help when necessary. By following this advice for starting work on your own car, you’ll gain valuable skills that will help you maintain your vehicle for years to come.

Want more videos all about auto?
Subscribe to our YouTube channel👉Cartech Home

Textual description of firstImageUrl

The "Service Engine Soon" Light on Nissan Vehicles

All about auto image

The "Service Engine Soon" light on your Nissan vehicle is an important indicator that something may need attention under the hood. While it’s easy to dismiss a small light on the dashboard, ignoring it can lead to more significant issues down the road. Whether you drive a Nissan Altima, Sentra, or Frontier, understanding what this light means and how to address it can save you time, money, and hassle. In this comprehensive guide, we’ll break down everything you need to know about the "Service Engine Soon" light on Nissan vehicles, with a focus on the Nissan Altima, Sentra, and Frontier.

What Does the "Service Engine Soon" Light Mean?

The "Service Engine Soon" light on a Nissan is a general indicator that something is not functioning as it should. Unlike the "Check Engine" light, which typically signifies more severe issues, the "Service Engine Soon" light often points to minor problems that need attention. These could range from routine maintenance reminders to alerts about parts that are beginning to fail.

In some cases, the light may indicate a problem with the emission system, but it can also signal issues with other components such as the fuel system, ignition system, or even something as simple as a loose gas cap.

Service Engine Soon Light Nissan Altima

For Nissan Altima owners, the "Service Engine Soon" light can be triggered by several factors, from minor maintenance needs to more serious concerns. Common causes include issues with the oxygen sensor, mass airflow sensor, or catalytic converter. In some cases, it may even be related to the spark plugs or ignition coils. If the light comes on in your Nissan Altima, it’s important to diagnose the problem as soon as possible to avoid further damage.

Service Engine Soon Light Nissan Sentra

The Nissan Sentra, like the Altima, can experience a variety of issues that trigger the "Service Engine Soon" light. For Sentra owners, this light might come on due to problems with the fuel system, such as a faulty fuel injector or fuel pump. Other common causes include issues with the exhaust system, such as a malfunctioning catalytic converter or oxygen sensor. As with any vehicle, addressing these issues promptly can prevent more costly repairs down the line.

Service Engine Soon Light on Nissan Frontier

The Nissan Frontier, known for its rugged reliability, isn’t immune to the occasional "Service Engine Soon" light. For Frontier owners, this light could be triggered by issues with the engine’s air intake system, including the air filter or mass airflow sensor. Problems with the exhaust system, such as a failing catalytic converter, are also common culprits. In addition, the light may come on if there’s an issue with the vehicle’s transmission or drivetrain. Given the Frontier’s heavy-duty use, it’s crucial to address these warnings to maintain optimal performance.

Common Reasons for the "Service Engine Soon" Light to Appear

While the specific causes for the "Service Engine Soon" light can vary between Nissan models, there are several common reasons why this light might appear:

1. Loose or Faulty Gas Cap: This is one of the most common and easily fixable reasons for the light to come on. If your gas cap is loose or not sealing properly, it can trigger the light because the fuel system detects a potential leak.

2. Oxygen Sensor Failure: The oxygen sensor monitors the level of oxygen in the exhaust gases and helps the engine control the air-fuel mixture. A failing oxygen sensor can cause the light to come on and may lead to poor fuel economy and higher emissions.

3. Mass Airflow Sensor Issues: The mass airflow (MAF) sensor measures the amount of air entering the engine, which is crucial for proper fuel injection and ignition. If the MAF sensor is faulty, it can lead to performance issues and trigger the "Service Engine Soon" light.

4. Catalytic Converter Problems: The catalytic converter reduces harmful emissions by converting exhaust gases into less harmful substances. A failing catalytic converter can cause the light to come on and may result in poor engine performance and increased emissions.

5. Spark Plug or Ignition Coil Issues: Faulty spark plugs or ignition coils can lead to engine misfires, which may trigger the "Service Engine Soon" light. Replacing these components can often resolve the issue.

6. Exhaust Gas Recirculation (EGR) Valve Problems: The EGR valve helps reduce emissions by recirculating a portion of the exhaust gases back into the engine’s cylinders. If the EGR valve is clogged or malfunctioning, it can cause the light to come on.

7. Fuel System Issues: Problems with the fuel injectors, fuel pump, or fuel pressure regulator can lead to engine performance issues and trigger the light. In some cases, these issues can also cause the engine to run too rich or too lean, leading to poor fuel economy and increased emissions.

What to Do When the "Service Engine Soon" Light Comes On

If the "Service Engine Soon" light comes on in your Nissan Altima, Sentra, or Frontier, here are the steps you should take:

1. Check the Gas Cap: Start by ensuring that your gas cap is tightly secured. If the cap is loose, tighten it and see if the light goes off after driving for a few miles. If the light remains on, it’s time to investigate further.

2. Consult the Owner’s Manual: Your Nissan’s owner’s manual can provide specific guidance on what the "Service Engine Soon" light means for your vehicle. It may also suggest potential causes and solutions.

3. Use an OBD-II Scanner: An OBD-II (On-Board Diagnostics) scanner can read the trouble codes stored in your vehicle’s computer. These codes can provide insight into what’s causing the light to come on. Many auto parts stores offer free code reading services, or you can purchase a scanner for home use.

4. Address the Issue Promptly: Once you know what’s causing the light to come on, it’s important to address the issue as soon as possible. Delaying repairs can lead to more significant problems and higher repair costs.

5. Reset the Light: In some cases, the "Service Engine Soon" light may remain on even after the issue has been resolved. You can reset the light by disconnecting the battery for a few minutes or using an OBD-II scanner to clear the codes.

Preventing the "Service Engine Soon" Light from Coming On

While it’s not always possible to prevent the "Service Engine Soon" light from coming on, regular maintenance can significantly reduce the likelihood of seeing this warning. Here are some tips to keep your Nissan Altima, Sentra, or Frontier running smoothly:

1. Regular Oil Changes: Changing your engine oil and filter regularly is one of the most important things you can do to keep your engine running smoothly. Follow the manufacturer’s recommendations for oil change intervals.

2. Replace Air and Fuel Filters: Keeping your air and fuel filters clean can prevent debris from entering the engine and causing problems. Replace these filters as recommended by Nissan.

3. Monitor Fluid Levels: Regularly check and top off your engine’s fluids, including coolant, transmission fluid, and brake fluid. Low fluid levels can lead to performance issues and trigger the "Service Engine Soon" light.

4. Inspect the Exhaust System: Regularly inspect your exhaust system for leaks or damage. A healthy exhaust system is crucial for maintaining proper engine performance and emissions levels.

5. Check the Battery: A weak or dying battery can cause a variety of electrical issues, including triggering the "Service Engine Soon" light. Test your battery regularly and replace it as needed.

6. Replace Spark Plugs and Ignition Components: Over time, spark plugs and ignition coils can wear out and cause engine misfires. Replacing these components as part of your vehicle’s regular maintenance can prevent issues from arising.

7. Pay Attention to Warning Signs: If you notice any unusual sounds, smells, or changes in your vehicle’s performance, don’t ignore them. Addressing minor issues early can prevent more significant problems down the road.

Diagnosing Specific Issues on Nissan Models

Nissan Altima

The Nissan Altima is a popular midsize sedan known for its comfortable ride and fuel efficiency. However, like any vehicle, it’s not immune to the occasional issue that can trigger the "Service Engine Soon" light.

• Oxygen Sensor Failure: A common issue in the Altima is oxygen sensor failure, which can lead to poor fuel economy and increased emissions. Replacing the oxygen sensor can often resolve the issue and turn off the light.

• Mass Airflow Sensor Problems: The Altima’s mass airflow sensor can become dirty or fail over time, causing the engine to run lean or rich. Cleaning or replacing the sensor can often fix the problem.

• Catalytic Converter Issues: If your Altima’s catalytic converter is failing, you may notice a decrease in engine performance and an increase in emissions. Replacing the catalytic converter is often necessary to resolve the issue.

Nissan Sentra

The Nissan Sentra is a compact sedan that offers a balance of performance and efficiency. However, like the Altima, it can experience issues that trigger the "Service Engine Soon" light.

• Fuel System Problems: Sentra owners may encounter issues with the fuel system, such as a failing fuel pump or clogged fuel injectors. These problems can lead to poor engine performance and trigger the light.

• Exhaust System Issues: A malfunctioning catalytic converter or oxygen sensor can cause the light to come on in a Sentra. Replacing these components can often resolve the issue.

• EGR Valve Malfunction: The EGR valve in the Sentra can become clogged or fail, leading to increased emissions and triggering the "Service Engine Soon" light. Cleaning or replacing the valve is usually necessary.

Nissan Frontier

The Nissan Frontier is a rugged and reliable pickup truck, but it’s not without its potential issues that can trigger the "Service Engine Soon" light.

• Air Intake System Problems: Frontier owners may experience issues with the air intake system, such as a dirty air filter or faulty mass airflow sensor. Addressing these issues can often resolve the light.

• Transmission or Drivetrain Issues: The Frontier’s transmission and drivetrain components are subject to wear and tear, especially with heavy use. Problems in these areas can trigger the light and require attention.

• Catalytic Converter Failure: Like the Altima and Sentra, the Frontier’s catalytic converter can fail over time, leading to increased emissions and decreased engine performance. Replacing the converter is often necessary.

Final Thoughts

The "Service Engine Soon" light on your Nissan vehicle is an important indicator that something needs attention. Whether you drive a Nissan Altima, Sentra, or Frontier, understanding what this light means and how to address it can help you maintain your vehicle’s performance and longevity. By following the tips and guidelines outlined in this article, you can ensure that your Nissan remains in top condition and avoid more costly repairs down the road. Remember, regular maintenance is key to preventing issues that could trigger the "Service Engine Soon" light, so stay on top of your vehicle’s needs and address any issues promptly.


Want more videos all about auto?
Subscribe to our YouTube channel👉Cartech Home
Textual description of firstImageUrl

Guide to Changing Brake Fluid: Everything You Need to Know

All about auto page

Maintaining your vehicle's braking system is crucial for safety and optimal performance. One of the key components in this system is the brake fluid. Often overlooked, brake fluid plays a critical role in ensuring that your brakes function properly. In this guide, we'll explore everything you need to know about brake fluid, including when and how to change it, the costs involved, and why flushing the brake fluid might be necessary.

👉Understanding Brake Fluid

Brake fluid is a type of hydraulic fluid that is used in your vehicle's brake system. When you press down on the brake pedal, the brake fluid transmits the force from your foot to the brakes, enabling the car to slow down or stop. Without adequate brake fluid, or with degraded brake fluid, the braking system may not function correctly, leading to reduced stopping power or even brake failure.

All about auto image

Types of Brake Fluid

Before diving into how to change brake fluid, it's essential to understand the different types of brake fluid available. There are primarily two categories:

1. DOT 3 and DOT 4: These are glycol-based fluids and are the most common types used in vehicles. DOT 3 is the standard for most vehicles, while DOT 4 is used in high-performance or heavy-duty applications. The main difference between them is their boiling points, with DOT 4 having a higher boiling point, making it more resistant to heat.

2. DOT 5: This is a silicone-based fluid and is not compatible with DOT 3 or DOT 4 systems. It is primarily used in classic cars or vehicles that are not driven frequently, as it does not absorb moisture as glycol-based fluids do.

👉Why Is Changing Brake Fluid Important?

Over time, brake fluid can become contaminated with moisture, dirt, and debris, which can lead to a decrease in braking efficiency. Moisture is particularly problematic because it can lower the boiling point of the fluid. When the brake fluid boils, it can create air bubbles in the system, leading to a spongy brake pedal or even complete brake failure.

Regularly changing your brake fluid ensures that your braking system remains responsive and safe. It also helps prevent corrosion and wear on the brake system components.

👉When to Change Brake Fluid

Knowing when to change brake fluid is just as important as knowing how to do it. The recommended interval for changing brake fluid varies depending on the vehicle and the type of brake fluid used. However, a general rule of thumb is to change the brake fluid every two years or every 30,000 miles, whichever comes first.

Signs That It's Time to Change Brake Fluid

Even if you are not tracking the mileage or time, certain signs can indicate that it's time to change the brake fluid:

1. Spongy Brake Pedal: If the brake pedal feels soft or spongy when you press it, this could indicate that the brake fluid is contaminated or has absorbed moisture.

2. Reduced Braking Power: If you notice that your vehicle takes longer to stop or that the brakes are less effective, it might be due to old or degraded brake fluid.

3. Brake Fluid Color: Brake fluid should be clear or slightly yellow. If it appears dark or murky, it's time for a change.

4. Brake Warning Light: Some vehicles are equipped with sensors that detect low brake fluid levels or other issues. If the brake warning light on your dashboard comes on, it's essential to check the brake fluid.

👉How Often to Flush Brake Fluid?

A brake fluid flush involves completely replacing the old fluid with fresh fluid, ensuring that the entire braking system is clean. While changing the brake fluid should be done every two years, a brake fluid flush is typically recommended every 3 to 5 years, depending on driving conditions and vehicle usage.

Regularly flushing the brake fluid is crucial for maintaining the overall health of the braking system. It helps remove any contaminants that might have accumulated and ensures that the brake fluid remains effective.

👉How to Change Brake Fluid

Changing brake fluid might sound like a daunting task, but with the right tools and a bit of patience, it can be done at home. Here's a step-by-step guide on how to change brake fluid:

Tools and Materials Needed

• Brake fluid (check your vehicle's manual for the correct type)

• A turkey baster or brake fluid siphon

• A wrench (for the bleeder screws)

• A clear plastic tube

• A container for old brake fluid

• A jack and jack stands (if needed)

• A lug wrench (if you need to remove the wheels)

👉Step-by-Step Guide

1. Park the Vehicle: Ensure your vehicle is parked on a flat surface and the engine is off. Engage the parking brake.

2. Locate the Master Cylinder: The master cylinder is usually found near the firewall on the driver's side of the engine bay. Remove the cap from the master cylinder reservoir.

3. Siphon Out Old Fluid: Use a turkey baster or a brake fluid siphon to remove as much old brake fluid as possible from the reservoir. Be careful not to spill any fluid, as brake fluid is corrosive.

4. Refill with Fresh Fluid: Pour fresh brake fluid into the reservoir until it reaches the "full" line. Do not overfill.

5. Bleed the Brakes: Bleeding the brakes is essential to remove any air bubbles from the system. Start with the brake furthest from the master cylinder (usually the rear passenger side) and work your way to the closest.

• Locate the bleeder screw on the brake caliper or drum brake.

• Attach a clear plastic tube to the bleeder screw, with the other end submerged in a container of brake fluid.

• Have an assistant press the brake pedal several times and hold it down.

• Loosen the bleeder screw with a wrench. You should see old fluid and possibly air bubbles come out.

• Tighten the bleeder screw and have your assistant release the brake pedal.

• Repeat this process until fresh fluid comes out and there are no air bubbles.

• Move on to the next brake and repeat.

6. Check the Fluid Level: After bleeding all the brakes, check the master cylinder reservoir and top it off with fresh fluid if needed.

7. Test the Brakes: Before driving, pump the brake pedal a few times to ensure it feels firm. If it still feels spongy, there may be air in the system, and you may need to bleed the brakes again.

8. Dispose of Old Brake Fluid Properly: Brake fluid is hazardous and should be disposed of at a designated recycling center.

Professional Brake Fluid Change vs. DIY

While changing brake fluid at home can save you money, there are advantages to having it done professionally. A professional mechanic will have the necessary equipment to perform a brake fluid flush, which ensures that all old fluid is completely removed from the system. Additionally, they can inspect the braking system for any other issues that may need attention.

👉Change Brake Fluid Price: What to Expect

The cost of changing brake fluid can vary depending on whether you do it yourself or have it done at a shop. Here's a breakdown of what you might expect to pay:

DIY Brake Fluid Change

If you decide to change the brake fluid yourself, the cost will primarily be for the brake fluid itself. A bottle of brake fluid typically costs between $5 and $20, depending on the type and brand. You may also need to purchase tools like a brake fluid siphon or bleeder kit, which can cost anywhere from $10 to $30.

Professional Brake Fluid Change

If you choose to have a professional change your brake fluid, the price can range from $70 to $150. This cost includes labor and the brake fluid itself. While this is more expensive than doing it yourself, the peace of mind that comes with knowing the job was done correctly might be worth the cost.

Brake Fluid Flush Price

A brake fluid flush is more comprehensive than a simple brake fluid change, and as such, it tends to be more expensive. On average, a brake fluid flush can cost between $100 and $200. This service ensures that all old fluid is removed from the system, which can help prolong the life of your brakes and prevent future issues.

👉Is a Brake Fluid Flush Necessary?

One common question among vehicle owners is whether a brake fluid flush is necessary. The answer depends on the condition of your brake fluid and the overall health of your braking system.

Why You Might Need a Brake Fluid Flush

• Contaminated Fluid: Over time, brake fluid can become contaminated with moisture, dirt, and debris. If your brake fluid appears dark or murky, a flush might be necessary to remove these contaminants.

• Air in the System: If air has entered the brake lines, it can cause a spongy brake pedal and reduce braking efficiency. A brake fluid flush can help remove this air.

• Manufacturer Recommendation: Some vehicle manufacturers recommend a brake fluid flush at certain intervals as part of regular maintenance.

How Often Should You Flush Brake Fluid?

As mentioned earlier, a brake fluid flush is generally recommended every 3 to 5 years. However, if you notice any of the signs mentioned above, it might be necessary to perform a flush sooner.

💬Final Thoughts: The Importance of Regular Brake Fluid Maintenance

Changing and flushing brake fluid is an essential part of vehicle maintenance that should not be overlooked. Whether you choose to do it yourself or have it done by a professional, keeping your brake fluid fresh ensures that your braking system remains in optimal condition.

By understanding the importance of brake fluid, knowing when and how to change it, and being aware of the costs involved, you can take proactive steps to maintain your vehicle's safety and performance. Regular brake fluid changes and flushes are small investments that can have a significant impact on your vehicle's longevity and your peace of mind.

So, the next time you're performing routine maintenance on your car, don't forget to check the brake fluid. A little attention now can prevent bigger problems down the road, keeping you and your passengers safe on every journey.


Want more videos all about auto?
Subscribe to our YouTube channel 👉Cartech Home
Textual description of firstImageUrl

How Often to Change Brake Fluid: A Comprehensive Guide

All about auto image

Maintaining your vehicle's braking system is crucial for your safety on the road. One of the key aspects of brake maintenance is knowing how often to change brake fluid. Brake fluid plays a vital role in the performance of your braking system, but it’s often overlooked. In this comprehensive guide, we’ll answer several important questions: how often should you change brake fluid, how much brake fluid change costs, and more. By the end of this article, you’ll have a clear understanding of why brake fluid changes are necessary, how often they should be performed, and what to expect when you take your car in for this essential service.

What is Brake Fluid and Why is it Important?

Before diving into how often you should change brake fluid, it's important to understand what brake fluid is and why it is so crucial. Brake fluid is a hydraulic fluid that transfers the force from your foot pressing the brake pedal to the brake pads, which then press against the brake rotors to slow down or stop your vehicle. Without brake fluid, your car's braking system wouldn't function properly.

Brake fluid is designed to withstand high temperatures and pressure. However, over time, brake fluid can absorb moisture from the air, leading to a decrease in its boiling point. This can result in reduced braking performance, increased stopping distances, and even complete brake failure in extreme cases. Therefore, knowing how often to change brake fluid is critical for ensuring your vehicle remains safe to drive.

👉How Often Should You Change Brake Fluid?

Manufacturer Recommendations

Most vehicle manufacturers recommend changing the brake fluid every 2 to 3 years or every 30,000 to 45,000 miles, whichever comes first. However, this can vary depending on the make and model of your vehicle. It's essential to consult your owner's manual for the specific recommendations for your car.

Driving Conditions Matter

While the manufacturer's guidelines provide a good starting point, your driving conditions can also impact how often you should change brake fluid. If you frequently drive in harsh conditions, such as mountainous terrain, heavy traffic, or areas with high humidity, you may need to change your brake fluid more frequently. These conditions can cause the brake fluid to absorb moisture more quickly, reducing its effectiveness.

Signs That Your Brake Fluid Needs to be Changed

Even if you're not close to the recommended interval for changing your brake fluid, there are some warning signs that indicate it might be time for a change. These include:

Spongy Brake Pedal: If your brake pedal feels soft or spongy when you press it, this could be a sign that your brake fluid has absorbed too much moisture and is no longer providing adequate pressure to the braking system.

Warning Light: Some vehicles are equipped with a brake fluid warning light on the dashboard. If this light comes on, it’s a clear indication that you need to check your brake fluid.

Unusual Noises: If you hear grinding or squealing noises when you apply the brakes, it could be a sign that your brake fluid is contaminated or that there is an issue with the brake pads or rotors.

Discolored Brake Fluid: Brake fluid should be a clear, amber color. If you notice that it has turned dark brown or black, it’s a sign that it’s time to change it.

👉How Often Does Brake Fluid Need to Be Changed in Older Vehicles?

If you own an older vehicle, you might need to change your brake fluid more frequently. Older cars tend to have more wear and tear on their braking systems, which can lead to more contamination in the brake fluid. In some cases, you might need to change the brake fluid every 1 to 2 years.

👉How Much Brake Fluid Change Costs

Factors Affecting the Cost

When considering how much brake fluid change will cost, several factors come into play:

1. Vehicle Make and Model: The cost of changing brake fluid can vary depending on the make and model of your vehicle. Luxury or high-performance vehicles might require more expensive brake fluid, which can increase the cost.

2. Location: Labor costs can vary significantly depending on where you live. In urban areas, the cost of labor is typically higher than in rural areas.

3. Service Provider: The cost can also vary depending on where you get the service done. Dealerships generally charge more than independent mechanics or chain auto service centers.

Average Cost of Brake Fluid Change

On average, how much does it cost to change brake fluid? You can expect to pay between $70 and $150 for a brake fluid change. This cost typically includes the brake fluid itself, labor, and any necessary disposal fees. However, if your vehicle requires a specific type of brake fluid or if additional work is needed, the cost could be higher.

Is it Worth Doing It Yourself?

Some car owners might consider changing the brake fluid themselves to save money. While this is possible, it's important to note that changing brake fluid is a more complex task than some other DIY car maintenance jobs. It requires specific tools and knowledge to ensure that the job is done correctly. If done incorrectly, you could compromise your vehicle's braking system, leading to unsafe driving conditions.

If you have experience working on cars and feel confident in your ability to perform the job, you could save money by doing it yourself. However, for most people, it's best to leave this task to a professional to ensure it’s done correctly.

👉The Process of Changing Brake Fluid

Step-by-Step Guide

To give you a better understanding of what happens when you change brake fluid, here’s a step-by-step overview of the process:

1. Prepare the Vehicle: The car is raised using a jack, and the wheels are removed to access the brake calipers.

2. Drain the Old Fluid: The mechanic will locate the brake fluid reservoir and remove the old brake fluid using a suction device. The brake lines are then bled to remove any remaining old fluid from the system.

3. Inspect the Braking System: While the brake fluid is being changed, the mechanic will inspect the entire braking system, including the brake pads, rotors, and calipers, to ensure everything is in good working order.

4. Add New Brake Fluid: The mechanic will then add new brake fluid to the reservoir and bleed the brake lines to remove any air bubbles. This step ensures that the brake fluid is evenly distributed throughout the system and that the brakes are functioning correctly.

5. Test the Brakes: After the new brake fluid has been added, the mechanic will test the brakes to ensure they are working properly.

How Long Does the Process Take?

The entire process of changing brake fluid typically takes about 30 minutes to an hour, depending on the condition of your vehicle and whether any additional repairs are needed.

👉Why Regular Brake Fluid Changes Are Essential

Safety First

Your vehicle’s braking system is arguably its most important safety feature. Neglecting to change your brake fluid at the recommended intervals can lead to decreased braking performance, which could put you and others at risk on the road. By keeping your brake fluid in good condition, you ensure that your brakes will function properly when you need them most.

Prevent Costly Repairs

Regular brake fluid changes can also help you avoid more expensive repairs down the road. Contaminated or degraded brake fluid can cause corrosion in the braking system, leading to damage to the brake lines, calipers, and other components. By changing the brake fluid regularly, you can prevent these issues and extend the life of your braking system.

Improved Braking Performance

Fresh brake fluid helps maintain the optimal performance of your braking system. When you press the brake pedal, you want a quick and responsive reaction from your brakes. Old or contaminated brake fluid can cause a delay in this response, leading to longer stopping distances and reduced control over your vehicle. By changing your brake fluid regularly, you ensure that your brakes are always at their best.

👉Common Myths About Brake Fluid Changes

Myth 1: You Only Need to Change Brake Fluid If There’s a Problem

One of the most common myths is that you only need to change your brake fluid if there’s a noticeable problem with your brakes. However, this isn’t true. Brake fluid degrades over time, even if your braking system appears to be working fine. Waiting until there’s a problem can put you at risk for brake failure.

Myth 2: Brake Fluid Never Needs to Be Changed

Another myth is that brake fluid never needs to be changed. Some people believe that as long as their brakes are working, the brake fluid is fine. However, as mentioned earlier, brake fluid can absorb moisture over time, reducing its effectiveness. Regular changes are necessary to maintain the integrity of your braking system.

Myth 3: Any Brake Fluid Will Do

Not all brake fluids are created equal. Different vehicles require different types of brake fluid, and using the wrong type can cause damage to your braking system. Always use the brake fluid recommended by your vehicle’s manufacturer.

👉How Much Does Changing Brake Fluid Cost Over Time?

Cost vs. Safety

While the cost of changing brake fluid may seem like an unnecessary expense, it’s important to weigh this against the potential cost of brake failure. The safety of you and your passengers should always be the top priority. Spending a little money on regular brake fluid changes can help you avoid more significant expenses and risks in the future.

Comparing Costs with Other Maintenance

When compared to other routine maintenance tasks, changing brake fluid is relatively inexpensive. For example, the cost of replacing brake pads or rotors can be several times higher than the cost of changing brake fluid. By keeping up with your brake fluid changes, you can reduce the likelihood of needing these more costly repairs.

💬Final Thoughts

Understanding how often to change brake fluid and how often should you change brake fluid is essential for maintaining the safety and performance of your vehicle. While the general recommendation is to change your brake fluid every 2 to 3 years or every 30,000 to 45,000 miles, your specific needs may vary based on your vehicle and driving conditions.

When considering how much brake fluid change will cost, it’s important to factor in the make and model of your vehicle, your location, and whether you choose to do the job yourself or hire a professional. On average, how much does it cost to change brake fluid is between $70 and $150.

Regular brake fluid changes are an essential part of vehicle maintenance. They help ensure your brakes work correctly, prevent costly repairs, and keep you safe on the road. Don’t wait until there’s a problem to address your brake fluid. By staying on top of this critical maintenance task, you’ll enjoy peace of mind knowing that your vehicle is in good hands.

Always remember to consult your vehicle’s owner manual for the most accurate information regarding your specific car. And if in doubt, don’t hesitate to seek the advice of a professional mechanic who can provide personalized recommendations based on your driving habits and the condition of your vehicle’s braking system. Safe driving starts with a well-maintained braking system, so make brake fluid changes a regular part of your car care routine.


Want more videos all about auto?
Subscribe to our YouTube channel 👉Cartech Home
Textual description of firstImageUrl

How to Check Oil Level: A Complete Guide

All about Auto

When it comes to maintaining your vehicle, one of the most crucial tasks is regularly checking the oil level. This simple yet vital routine can prevent engine damage, improve fuel efficiency, and extend the life of your car. In this comprehensive guide, we will walk you through everything you need to know about "how to check oil level," ensuring your engine remains in optimal condition.

👉Understanding the Importance of Checking Oil Level

Before diving into the step-by-step process of checking the oil level, it’s essential to understand why this task is so important. Engine oil plays a crucial role in your vehicle's operation. It lubricates the engine's moving parts, reduces friction, prevents overheating, and cleans contaminants. Without the proper amount of oil, your engine could suffer serious damage, leading to costly repairs.

Regularly checking the oil level ensures that your engine has enough lubrication to function correctly. If the oil level is too low, it can lead to increased friction, overheating, and ultimately, engine failure. On the other hand, overfilling the oil can cause foaming, leading to inadequate lubrication and potential engine damage.

👉How Often Should You Check the Oil Level?

A common question among vehicle owners is, "How often should I check my oil level?" The answer varies depending on your car's make, model, and driving conditions. However, as a general rule of thumb, it's recommended to check your oil level at least once a month. If you drive long distances frequently, or under severe conditions such as extreme temperatures, dusty environments, or heavy towing, you should check it more often.

It's also a good practice to check the oil level before long trips to ensure your engine is adequately protected throughout your journey.

👉Preparing to Check the Oil Level

Before you begin checking the oil level, it's important to ensure that the car is on level ground. Checking the oil level on an incline can give you inaccurate readings, either showing too much or too little oil.

Here’s what you need to do to prepare:

1. Park on Level Ground. Make sure your car is parked on a flat, level surface. This ensures an accurate reading.

2. Turn Off the Engine. The engine should be turned off and allowed to cool for at least 10-15 minutes. Checking the oil immediately after driving can give you a falsely low reading because some oil will still be circulating in the engine.

3. Gather Your Tools. While checking the oil level is a simple task, having a few basic tools on hand can make the process easier. You'll need a clean rag or paper towel and, if necessary, a flashlight to help you see in the engine bay.

👉Step-by-Step Guide: How to Check Oil Level

Now that you’re prepared, follow these steps to check the oil level accurately:

1. Locate the Dipstick. The dipstick is a long, thin metal rod that extends into the oil pan. It’s usually located near the front of the engine and has a brightly colored handle, often yellow or orange, making it easy to spot. If you’re unsure where the dipstick is located, consult your vehicle’s owner’s manual.

All about auto image

2. Remove the Dipstick and Clean It. Once you've located the dipstick, carefully pull it out from its tube. You'll notice that it's coated in oil, making it difficult to get an accurate reading right away. This is why the next step is crucial: take your clean rag or paper towel and wipe the dipstick from the top to the bottom.

All about auto image

3. Reinsert the Dipstick. After cleaning the dipstick, insert it back into the tube all the way. Make sure it's fully seated, as this ensures you get an accurate reading. Once inserted, pull the dipstick out again carefully.

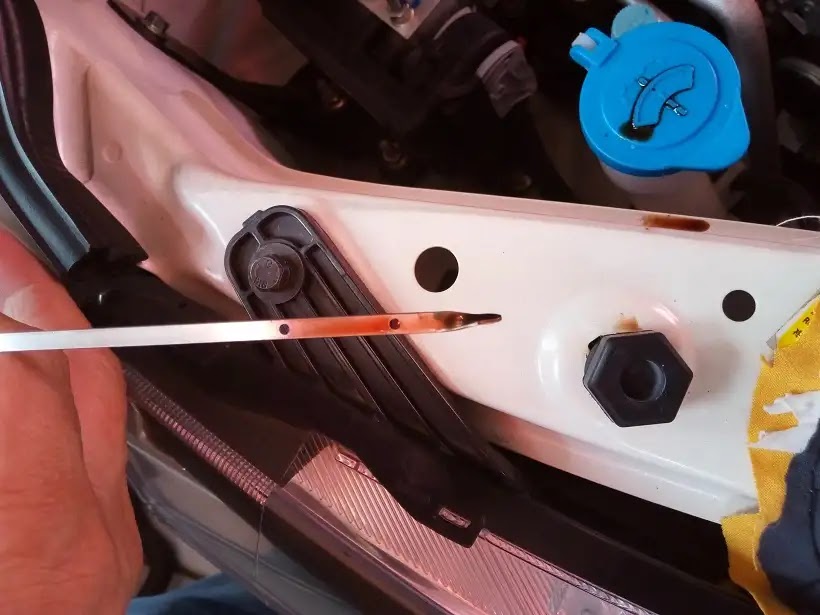
4. Check the Oil Level. Now that you've pulled the dipstick out for the second time, look closely at the tip. You’ll notice markings on the dipstick, typically consisting of two lines, holes, or a crosshatch pattern. The lower mark indicates the minimum oil level, while the upper mark indicates the maximum. The oil on the dipstick should fall between these two marks.

All about auto image

If the oil level is between the marks, your oil level is good. If it’s below the lower mark, you need to add oil as soon as possible to prevent engine damage. Conversely, if the oil level is above the upper mark, you should remove some oil to avoid potential issues.

5. Inspect the Oil's Condition. While checking the oil level, it's also a good idea to assess the oil's condition. Fresh oil is typically amber or light brown. If the oil appears dark, dirty, or has a burnt smell, it may be time for an oil change. Additionally, if the oil has a milky appearance, it could indicate coolant leakage into the oil, a sign of serious engine problems that require immediate attention.

6. Reinsert the Dipstick. Once you’ve checked the oil level and condition, wipe the dipstick clean again and reinsert it into its tube, ensuring it’s securely in place. This step is often overlooked but is important for keeping the dipstick in good condition and preventing contaminants from entering the engine.

👉Adding Oil If Necessary

If your oil level is low, it’s important to add the correct type and amount of oil to your engine. Here’s how to do it:

1. Consult Your Owner’s Manual: Before adding oil, check your vehicle’s owner’s manual to determine the recommended oil type and viscosity (e.g., 5W-30). Using the wrong oil can harm your engine.

Locate the Oil Filler Cap: The oil filler cap is usually labeled with the word “Oil” or an oil can symbol. It’s typically located on the top of the engine.

Add Oil: Remove the oil filler cap and carefully pour the oil into the engine. Use a funnel to avoid spills. Start by adding a small amount, as it’s easier to add more oil than to remove excess. After adding oil, wait a few minutes to allow the oil to settle in the oil pan, then recheck the level using the dipstick.

4. Recheck the Oil Level: Follow the same steps as before to check the oil level. Ensure the oil level falls between the minimum and maximum marks on the dipstick. If necessary, add more oil until you reach the correct level.

Return the Oil Filler Cap: Once the oil level is correct, return the oil filler cap and ensure it’s securely tightened.

👉Common Mistakes to Avoid

While checking the oil level is a straightforward process, there are a few common mistakes that can lead to inaccurate readings or engine damage. Here’s what to avoid:

1. Not Allowing the Engine to Cool: Checking the oil level immediately after driving can give you a falsely low reading. Always allow the engine to cool for 10-15 minutes before checking the oil level.

2. Not Wiping the Dipstick Clean: Failing to wipe the dipstick clean before rechecking the oil level can result in inaccurate readings. Always wipe the dipstick clean before reinserting it.

3. Overfilling the Oil: Adding too much oil can cause foaming, which leads to inadequate lubrication and potential engine damage. Add oil slowly and check the level frequently to avoid overfilling.

Using the Wrong Oil: Using the incorrect type or viscosity of oil can harm your engine. Always consult your owner’s manual to ensure you’re using the right oil for your vehicle.

Ignoring Oil Condition: Checking the oil level is important, but so is inspecting the oil's condition. Dark, dirty, or milky oil can indicate that your engine needs an oil change or has other issues that need attention.

👉Troubleshooting: What to Do If the Oil Level Is Too Low

If you find that your oil level is consistently low, even after topping it off, it could indicate an underlying issue. Here are some common reasons for low oil levels and what you can do about them:

1. Oil Leaks. One of the most common reasons for low oil levels is an oil leak. Check for oil spots under your car or on the engine. Common places for leaks include the oil pan, valve cover gaskets, and oil filter. If you suspect a leak, it's best to take your vehicle to a mechanic for a thorough inspection and repair.

2. Burning Oil. If your car is burning oil, you may notice blue smoke coming from the exhaust or a decrease in oil levels without visible leaks. Burning oil can be caused by worn piston rings, valve seals, or other internal engine components. This issue requires professional diagnosis and repair.

3. Faulty Oil Filter. A clogged or damaged oil filter can restrict oil flow, leading to low oil levels. If you’ve recently changed your oil and filter, make sure the filter was installed correctly and is functioning properly.

4. High Mileage Engine. As engines age, they can consume more oil due to wear and tear. If you have a high-mileage vehicle, you may need to check the oil level more frequently and top it off as needed. Using high-mileage motor oil can help reduce oil consumption in older engines.

👉The Role of Engine Oil in Vehicle Maintenance

Understanding the role of engine oil in vehicle maintenance is crucial for every car owner. Beyond lubricating moving parts, engine oil also plays several other vital roles:

• Cooling: Engine oil helps dissipate heat from the engine components, preventing overheating and maintaining optimal operating temperatures.

• Cleaning: Oil circulates through the engine, picking up dirt, debris, and metal particles. These contaminants are then trapped in the oil filter, preventing them from causing engine wear.

• Sealing: Engine oil helps seal the gaps between the piston rings and cylinder walls, maintaining compression and preventing the engine from losing power.

• Corrosion Protection: Engine oil contains additives that protect engine components from rust and corrosion, extending the engine's life.

👉How to Prolong Engine Life Through Regular Oil Checks

Regularly checking the oil level is a simple yet effective way to prolong your engine's life. By maintaining the correct oil level and using the right type of oil, you can reduce engine wear, prevent overheating, and avoid costly repairs. Here are some additional tips to help you get the most out of your engine:

1. Follow the Manufacturer's Oil Change Schedule

Every vehicle has a recommended oil change interval, typically based on mileage or time. Following this schedule ensures that your engine always has fresh, clean oil to protect its components.

2. Use High-Quality Oil

Using high-quality motor oil can make a significant difference in your engine's performance and longevity. Look for oils that meet or exceed your vehicle manufacturer’s specifications.

3. Replace the Oil Filter Regularly

The oil filter plays a crucial role in keeping the oil clean and free of contaminants. Replacing the oil filter at every oil change is a good practice to ensure your engine receives clean oil.

4. Address Oil Leaks Promptly

If you notice an oil leak, don't ignore it. Even a small leak can lead to significant oil loss over time, potentially causing engine damage. Have leaks repaired as soon as possible to maintain the correct oil level.

5. Monitor Oil Consumption

If you find that your vehicle is consuming oil more quickly than usual, it’s important to monitor the situation closely. Frequent oil top-offs may indicate an underlying issue that needs to be addressed.

💬Final thoughts: Why Knowing How to Check Oil Level Matters

Knowing how to check the oil level is a fundamental skill that every vehicle owner should possess. It's a quick and easy task that can save you from costly repairs and keep your engine running smoothly. By following the steps outlined in this guide, you can confidently check your oil level, add oil when necessary, and ensure your engine remains in top condition.

Remember, regular maintenance is key to prolonging the life of your vehicle. By making oil checks a routine part of your car care regimen, you’ll be taking a significant step toward protecting your investment and enjoying a reliable, efficient vehicle for years to come.

• Regularly checking the oil level is essential for engine health and performance.

• Always park on level ground and allow the engine to cool before checking the oil.

• Use your vehicle’s owner’s manual to determine the correct type of oil for your engine.

• Avoid common mistakes like overfilling the oil or using the wrong oil type.

• Address any oil leaks or consumption issues promptly to prevent engine damage.

By mastering the process of checking the oil level, you can keep your engine in excellent condition and avoid the headaches of unexpected breakdowns or costly repairs. So, take a few minutes each month to check your oil level—it’s a small task that can make a big difference in your vehicle’s longevity and performance.


Want more videos all about auto?
Subscribe to our YouTube channel 👉Cartech Home