Cartech - All About Auto

Showing posts with label fluid. Show all posts

Where to Put Transmission Fluid: A Complete Guide

Transmission fluid is crucial for maintaining the proper functioning of your vehicle’s transmission system, whether it’s automatic or manual. Knowing where to put transmission fluid and understanding how it works can save you from costly repairs and help keep your car running smoothly. This article will walk you through everything you need to know about transmission fluid, including where transmission fluid goes, how to check and fill it, and common signs of low fluid levels.

By the end of this guide, you will have a clear understanding of where to put transmission fluid and be better equipped to maintain your vehicle.

What is Transmission Fluid?

Transmission fluid serves several important functions. It lubricates the internal components of your transmission, cools it down, and helps maintain the hydraulic pressure needed for proper gear shifting in automatic transmissions. In manual transmissions, transmission fluid acts as a lubricant to reduce wear and tear on gears.

In automatic transmissions, the fluid also works as a coolant to prevent overheating. Regularly checking and refilling transmission fluid is a simple task that helps avoid transmission failure and prolongs your car’s lifespan.

Types of Transmission Fluid

Before diving into where transmission fluid goes, it’s essential to know that not all transmission fluids are the same. There are different types for various transmission systems. Using the wrong type of fluid can lead to transmission damage.


• Automatic Transmission Fluid (ATF): Specifically formulated for automatic transmissions, ATF is one of the most commonly used transmission fluids. It has additives that improve its ability to reduce heat and friction while also helping with hydraulic pressure.

• Manual Transmission Fluid (MTF): Typically used in manual transmission vehicles, MTF is thicker and specifically designed for manual gearbox systems.

• Continuously Variable Transmission Fluid (CVT): This fluid is used for cars with continuously variable transmissions and ensures smooth operation of the belt-driven systems.

Always check your vehicle’s manual to determine the correct type of transmission fluid for your car.

Where to Put Transmission Fluid in an Automatic Car

If you own an automatic car, the transmission fluid is vital for the hydraulic system to operate correctly. So, where do you put transmission fluid in an automatic car?

Here are the steps:

1. Locate the Transmission Fluid Dipstick: In most vehicles, the transmission fluid dipstick is found near the engine bay, typically closer to the back of the engine. It often has a brightly colored handle (usually red or yellow) to make it easy to spot.

2. Check Fluid Levels First: Before adding more fluid, check the current fluid level. Pull out the dipstick, wipe it clean, and reinsert it fully. Then, pull it out again to observe the fluid level. There should be markings on the dipstick indicating whether the fluid is low, optimal, or too high.

3. Add Transmission Fluid: If the fluid level is low, you will need to add more transmission fluid. To do this:

• Place a funnel at the dipstick opening to avoid spillage.

• Slowly pour the recommended type of transmission fluid into the funnel.

• Add small amounts at a time and continuously check the fluid level to avoid overfilling.

4. Check Fluid Levels Again: After adding the fluid, insert the dipstick again and check to ensure the fluid level is within the recommended range. Be careful not to overfill, as this can cause transmission issues.

5. Start the Engine: After adding the fluid, start your vehicle and let it run for a few minutes. Check the dipstick one more time to confirm the level is appropriate.

Where to Put Transmission Fluid in a Manual Car

Manual cars do not have a dipstick like automatic cars, so where transmission fluid goes in a manual transmission differs slightly. Manual transmissions generally have a fill plug located on the transmission casing itself. Here’s how you add transmission fluid to a manual car:

1. Locate the Fill Plug: First, locate the fill plug on your car's transmission. This is usually a bolt located on the side of the transmission. You will likely need to raise the car to access the fill plug, so use a jack and jack stands or a ramp for safety.

2. Remove the Fill Plug: Use a wrench or socket set to remove the fill plug. Be sure to have a container or rag nearby, as some fluid might leak out when you remove the plug.

3. Check the Fluid Level: The fluid should be level with the bottom of the fill hole. If it is low, you’ll need to add more fluid.

4. Add Transmission Fluid: Using a fluid pump or funnel, add the appropriate type of transmission fluid until it reaches the correct level (just below the fill hole). Be sure to add it slowly and avoid overfilling.

5. Reinstall the Fill Plug: After adding the transmission fluid, reinstall the fill plug securely.

6. Test Drive: After refilling, drive the vehicle around to make sure the transmission shifts smoothly and there are no leaks.

How Often Should You Add Transmission Fluid?

Now that you know where to put transmission fluid, the next question is how often you should check and add it. Transmission fluid doesn’t burn off like oil, so under normal circumstances, you shouldn’t need to add fluid unless there’s a leak. However, it’s a good idea to check your transmission fluid regularly, such as during oil changes or every 30,000 to 60,000 miles, depending on your car’s make and model.

Always refer to your vehicle’s owner manual for the recommended transmission fluid change interval, as well as what type of transmission fluid to use.

Common Signs of Low Transmission Fluid

Being proactive about transmission fluid levels can help you avoid serious issues down the road. Here are some common signs that your vehicle might be low on transmission fluid:

Transmission Slipping: If your transmission shifts unexpectedly or “slips” in and out of gears, low fluid might be the cause.

• Rough or Delayed Shifting: A delay or roughness when changing gears is another potential indicator of low transmission fluid.

• Transmission Overheating: Transmission fluid helps cool your transmission, so if the fluid level is low, your transmission may overheat.

• Strange Noises: Grinding or clunking noises when shifting gears could indicate low transmission fluid.

• Fluid Leaks: If you see red or brown fluid underneath your vehicle, it could be a sign of a transmission fluid leak.

How to Check for Transmission Fluid Leaks

If you find that your transmission fluid levels are consistently low, you might have a leak. Detecting a transmission fluid leak early can prevent significant damage. Here’s how to check for leaks:

1. Inspect the Transmission Pan: Look under your vehicle for wet spots or puddles of red, brown, or dark fluid. Transmission fluid is typically a reddish color when new and turns darker as it ages.

2. Check Seals and Gaskets: Worn or damaged seals and gaskets are common sources of leaks. Check around the transmission casing and near the transmission fluid lines for signs of leaking fluid.

3. Inspect the Cooler Lines: Transmission cooler lines, which carry fluid to and from the transmission cooler, can crack or develop leaks over time.

4. Examine the Dipstick Tube: The dipstick tube where you check your transmission fluid can also be a source of leaks.

5. Check the Torque Converter: In automatic transmissions, the torque converter can develop leaks due to cracks or worn seals.

How to Prevent Transmission Fluid Leaks

Preventing transmission fluid leaks can help you avoid costly repairs. Here are some preventive measures:

• Regular Maintenance: Stick to a regular maintenance schedule and check your transmission fluid level often.

• Use the Correct Fluid: Always use the transmission fluid recommended in your car’s owner manual. Using the wrong type of fluid can cause leaks and other transmission problems.

• Avoid Overfilling: Overfilling your transmission can lead to excess pressure, which can cause seals to break and leaks to occur.

• Check Seals and Gaskets: Regularly inspect seals and gaskets for wear or damage and replace them as needed.

Final Thoughts

Knowing where to put transmission fluid and how to maintain it is crucial for the health of your vehicle’s transmission. Whether you drive a manual or automatic car, properly maintaining your transmission fluid levels can prevent overheating, ensure smooth gear shifts, and avoid costly repairs. Always use the correct type of fluid for your vehicle, and regularly check for leaks or signs of low fluid levels. By taking the time to understand where transmission fluid goes and following proper maintenance procedures, you can ensure a long-lasting and efficient transmission system.

Following these guidelines will not only keep your vehicle running smoothly but also save you from the headache of dealing with more serious transmission issues down the line.

Textual description of firstImageUrl

Low Brake Fluid Noise : Causes, Symptoms and Solutions

All about auto image

When it comes to vehicle maintenance, brakes are among the most critical systems. The braking system is essential for safety, allowing you to control the vehicle effectively and avoid accidents. One common but often overlooked issue in this system is "low brake fluid noise." If you're hearing unusual sounds when you press the brake pedal, it could be a sign of low brake fluid. In this article, we'll explore what low brake fluid noise is, why it happens, and what you can do about it.

👉What is Low Brake Fluid Noise?

Low brake fluid noise is the sound your vehicle makes when there isn't enough brake fluid in the braking system. Brake fluid is a hydraulic fluid that transfers the force from your foot on the brake pedal to the brake pads, causing them to clamp down on the rotors and slow the vehicle. When the brake fluid is low, air can enter the brake lines, which reduces the system's effectiveness and can cause unusual noises.

👉Common Types of Low Brake Fluid Noise

When brake fluid levels drop, you might hear various noises that indicate something is wrong. Here are the most common types of low brake fluid noise:

1. Squealing. A high-pitched squeal when you press the brake pedal is often a sign of low brake fluid. This noise is usually caused by air bubbles in the brake lines, which disrupt the normal flow of fluid.

2. Grinding. A grinding noise may occur if the brake fluid is too low, and the brake pads are worn down, causing metal-to-metal contact between the pads and rotors. This can be a dangerous situation and requires immediate attention.

3. Hissing. If you hear a hissing sound when pressing the brake pedal, it could be due to a leak in the brake lines or a vacuum hose. While this noise isn't directly caused by low brake fluid, it can lead to low brake fluid levels if not addressed.

4. Spongy Pedal Feel. While not a noise, a spongy or soft brake pedal is a common symptom of low brake fluid. This can be accompanied by a slight whooshing sound as air moves through the brake lines.

👉Causes of Low Brake Fluid

Understanding the causes of low brake fluid can help you prevent low brake fluid noise. Here are some common reasons why your brake fluid levels might drop:

1. Brake Fluid Leaks. The most common cause of low brake fluid is a leak in the system. Leaks can occur in the brake lines, calipers, wheel cylinders, or master cylinder. Over time, these components can wear out or become damaged, leading to a loss of brake fluid.

2. Worn Brake Pads. As brake pads wear down, the caliper pistons extend further to maintain contact with the rotors. This causes the brake fluid to move into the brake lines, which can lower the fluid level in the reservoir. If the pads are worn out completely, it can cause metal-to-metal contact, leading to the grinding noise mentioned earlier.

3. Air in the Brake Lines. If air enters the brake lines, it can cause low brake fluid noise. Air can enter the system due to a leak or during improper brake maintenance. Since air compresses more than brake fluid, it can create a spongy brake pedal and reduce braking efficiency.

4. Brake Fluid Evaporation. Over time, brake fluid can evaporate, especially if the brake fluid reservoir cap is not sealed properly. While evaporation is a slow process, it can lead to a gradual reduction in brake fluid levels, eventually causing low brake fluid noise.

👉Symptoms of Low Brake Fluid

Apart from the noises described earlier, several symptoms can indicate low brake fluid.

1. Brake Warning Light. Most modern vehicles have a brake warning light on the dashboard. If this light comes on, it could indicate low brake fluid. However, it could also be a sign of other brake-related issues, so it's essential to investigate further.

2. Increased Stopping Distance. If your vehicle takes longer to stop than usual, it could be due to low brake fluid. The lack of fluid reduces the braking system's efficiency, making it harder to bring the vehicle to a complete stop.

3. Unresponsive Brakes. If the brakes don't respond as quickly as they should, or if the brake pedal feels soft or spongy, low brake fluid could be the cause. This is a serious issue that requires immediate attention.

4. Visible Brake Fluid Leak. If you notice a puddle of fluid under your vehicle near the wheels or engine compartment, it could be brake fluid. Brake fluid is usually clear or slightly yellow and has a slightly oily texture. A leak is a clear sign that your brake fluid levels are low.

👉How to Check Brake Fluid Levels

Checking your brake fluid levels is a relatively simple task that can help you avoid low brake fluid noise and other related issues. Here's how you can do it:

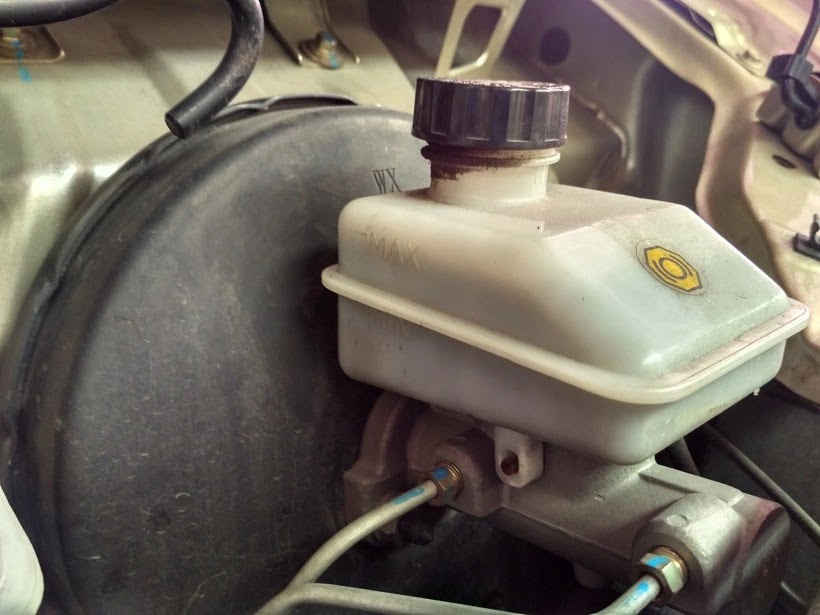
1. Locate the Brake Fluid Reservoir. The brake fluid reservoir is usually located near the back of the engine bay on the driver's side. It's a small, translucent container with a screw-on cap.

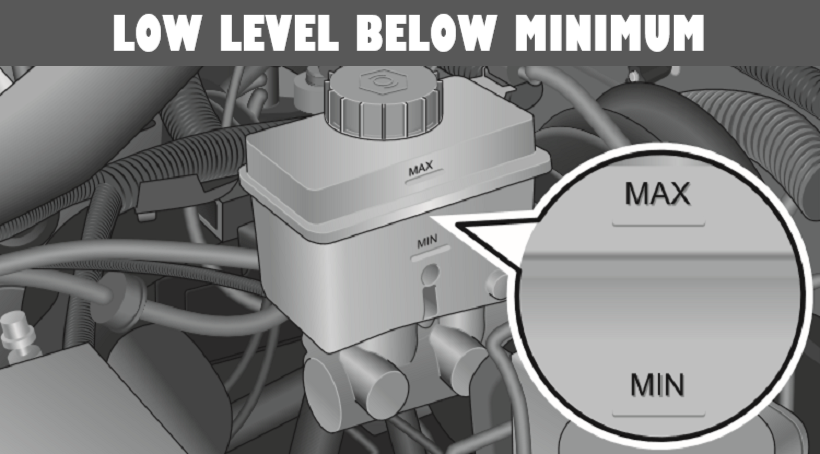
2. Check the Fluid Level. The reservoir has "Min" and "Max" markings. The brake fluid level should be between these two marks. If the fluid is below the "Min" mark, it's time to add more.


All about image

3. Inspect the Fluid Condition. While checking the fluid level, take a moment to inspect the fluid's condition. Brake fluid should be clear or slightly yellow. If it's dark or has debris in it, it may be time to replace the fluid.

4. Add Brake Fluid. If the fluid is low, add the recommended type of brake fluid for your vehicle. Be careful not to overfill the reservoir, as this can cause the fluid to overflow when the brakes are applied.

👉Solutions to Low Brake Fluid Noise

If you experience low brake fluid noise, addressing the issue promptly is essential to ensure your safety on the road. Here are some solutions: If you experience low brake fluid noise, addressing the issue promptly is essential to ensure your safety on the road. Here are some solutions:

1. Top Up Brake Fluid. If the brake fluid is low, topping it up might temporarily solve the problem. However, it's crucial to find out why the fluid was low in the first place.


2. Fix Leaks. If you suspect a brake fluid leak, it's essential to locate and repair it as soon as possible. Depending on the severity of the leak, this might involve replacing brake lines, calipers, or other components.

3. Replace Worn Brake Pads. If your brake pads are worn out, replacing them will not only stop the grinding noise but also help maintain the correct brake fluid levels.

4. Bleed the Brake System. If air has entered the brake lines, bleeding the brake system can remove the air and restore proper braking function. This process involves opening the bleeder valves on each brake caliper to allow the air to escape, and then topping up the fluid as needed.

5. Regular Maintenance. The best way to prevent low brake fluid noise is through regular maintenance. Check your brake fluid levels regularly, and inspect your brake pads and lines for wear and damage. Regular brake fluid replacement is also recommended, as old fluid can absorb moisture, leading to corrosion and reduced braking efficiency.

💬Final Thoughts

Low brake fluid noise is a warning sign that something is wrong with your braking system. Ignoring this noise can lead to decreased braking performance and even brake failure, risking your safety. By understanding the causes, symptoms, and solutions to low brake fluid noise, you can keep your vehicle's brakes in top condition and ensure a safe driving experience. Always prioritize regular maintenance and address any issues as soon as they arise to avoid costly repairs and maintain your peace of mind on the road.


Want more videos all about auto?
Subscribe to our YouTube channel 👉Cartech Home
Textual description of firstImageUrl

Guide to Changing Brake Fluid: Everything You Need to Know

All about auto page

Maintaining your vehicle's braking system is crucial for safety and optimal performance. One of the key components in this system is the brake fluid. Often overlooked, brake fluid plays a critical role in ensuring that your brakes function properly. In this guide, we'll explore everything you need to know about brake fluid, including when and how to change it, the costs involved, and why flushing the brake fluid might be necessary.

👉Understanding Brake Fluid

Brake fluid is a type of hydraulic fluid that is used in your vehicle's brake system. When you press down on the brake pedal, the brake fluid transmits the force from your foot to the brakes, enabling the car to slow down or stop. Without adequate brake fluid, or with degraded brake fluid, the braking system may not function correctly, leading to reduced stopping power or even brake failure.

All about auto image

Types of Brake Fluid

Before diving into how to change brake fluid, it's essential to understand the different types of brake fluid available. There are primarily two categories:

1. DOT 3 and DOT 4: These are glycol-based fluids and are the most common types used in vehicles. DOT 3 is the standard for most vehicles, while DOT 4 is used in high-performance or heavy-duty applications. The main difference between them is their boiling points, with DOT 4 having a higher boiling point, making it more resistant to heat.

2. DOT 5: This is a silicone-based fluid and is not compatible with DOT 3 or DOT 4 systems. It is primarily used in classic cars or vehicles that are not driven frequently, as it does not absorb moisture as glycol-based fluids do.

👉Why Is Changing Brake Fluid Important?

Over time, brake fluid can become contaminated with moisture, dirt, and debris, which can lead to a decrease in braking efficiency. Moisture is particularly problematic because it can lower the boiling point of the fluid. When the brake fluid boils, it can create air bubbles in the system, leading to a spongy brake pedal or even complete brake failure.

Regularly changing your brake fluid ensures that your braking system remains responsive and safe. It also helps prevent corrosion and wear on the brake system components.

👉When to Change Brake Fluid

Knowing when to change brake fluid is just as important as knowing how to do it. The recommended interval for changing brake fluid varies depending on the vehicle and the type of brake fluid used. However, a general rule of thumb is to change the brake fluid every two years or every 30,000 miles, whichever comes first.

Signs That It's Time to Change Brake Fluid

Even if you are not tracking the mileage or time, certain signs can indicate that it's time to change the brake fluid:

1. Spongy Brake Pedal: If the brake pedal feels soft or spongy when you press it, this could indicate that the brake fluid is contaminated or has absorbed moisture.

2. Reduced Braking Power: If you notice that your vehicle takes longer to stop or that the brakes are less effective, it might be due to old or degraded brake fluid.

3. Brake Fluid Color: Brake fluid should be clear or slightly yellow. If it appears dark or murky, it's time for a change.

4. Brake Warning Light: Some vehicles are equipped with sensors that detect low brake fluid levels or other issues. If the brake warning light on your dashboard comes on, it's essential to check the brake fluid.

👉How Often to Flush Brake Fluid?

A brake fluid flush involves completely replacing the old fluid with fresh fluid, ensuring that the entire braking system is clean. While changing the brake fluid should be done every two years, a brake fluid flush is typically recommended every 3 to 5 years, depending on driving conditions and vehicle usage.

Regularly flushing the brake fluid is crucial for maintaining the overall health of the braking system. It helps remove any contaminants that might have accumulated and ensures that the brake fluid remains effective.

👉How to Change Brake Fluid

Changing brake fluid might sound like a daunting task, but with the right tools and a bit of patience, it can be done at home. Here's a step-by-step guide on how to change brake fluid:

Tools and Materials Needed

• Brake fluid (check your vehicle's manual for the correct type)

• A turkey baster or brake fluid siphon

• A wrench (for the bleeder screws)

• A clear plastic tube

• A container for old brake fluid

• A jack and jack stands (if needed)

• A lug wrench (if you need to remove the wheels)

👉Step-by-Step Guide

1. Park the Vehicle: Ensure your vehicle is parked on a flat surface and the engine is off. Engage the parking brake.

2. Locate the Master Cylinder: The master cylinder is usually found near the firewall on the driver's side of the engine bay. Remove the cap from the master cylinder reservoir.

3. Siphon Out Old Fluid: Use a turkey baster or a brake fluid siphon to remove as much old brake fluid as possible from the reservoir. Be careful not to spill any fluid, as brake fluid is corrosive.

4. Refill with Fresh Fluid: Pour fresh brake fluid into the reservoir until it reaches the "full" line. Do not overfill.

5. Bleed the Brakes: Bleeding the brakes is essential to remove any air bubbles from the system. Start with the brake furthest from the master cylinder (usually the rear passenger side) and work your way to the closest.

• Locate the bleeder screw on the brake caliper or drum brake.

• Attach a clear plastic tube to the bleeder screw, with the other end submerged in a container of brake fluid.

• Have an assistant press the brake pedal several times and hold it down.

• Loosen the bleeder screw with a wrench. You should see old fluid and possibly air bubbles come out.

• Tighten the bleeder screw and have your assistant release the brake pedal.

• Repeat this process until fresh fluid comes out and there are no air bubbles.

• Move on to the next brake and repeat.

6. Check the Fluid Level: After bleeding all the brakes, check the master cylinder reservoir and top it off with fresh fluid if needed.

7. Test the Brakes: Before driving, pump the brake pedal a few times to ensure it feels firm. If it still feels spongy, there may be air in the system, and you may need to bleed the brakes again.

8. Dispose of Old Brake Fluid Properly: Brake fluid is hazardous and should be disposed of at a designated recycling center.

Professional Brake Fluid Change vs. DIY

While changing brake fluid at home can save you money, there are advantages to having it done professionally. A professional mechanic will have the necessary equipment to perform a brake fluid flush, which ensures that all old fluid is completely removed from the system. Additionally, they can inspect the braking system for any other issues that may need attention.

👉Change Brake Fluid Price: What to Expect

The cost of changing brake fluid can vary depending on whether you do it yourself or have it done at a shop. Here's a breakdown of what you might expect to pay:

DIY Brake Fluid Change

If you decide to change the brake fluid yourself, the cost will primarily be for the brake fluid itself. A bottle of brake fluid typically costs between $5 and $20, depending on the type and brand. You may also need to purchase tools like a brake fluid siphon or bleeder kit, which can cost anywhere from $10 to $30.

Professional Brake Fluid Change

If you choose to have a professional change your brake fluid, the price can range from $70 to $150. This cost includes labor and the brake fluid itself. While this is more expensive than doing it yourself, the peace of mind that comes with knowing the job was done correctly might be worth the cost.

Brake Fluid Flush Price

A brake fluid flush is more comprehensive than a simple brake fluid change, and as such, it tends to be more expensive. On average, a brake fluid flush can cost between $100 and $200. This service ensures that all old fluid is removed from the system, which can help prolong the life of your brakes and prevent future issues.

👉Is a Brake Fluid Flush Necessary?

One common question among vehicle owners is whether a brake fluid flush is necessary. The answer depends on the condition of your brake fluid and the overall health of your braking system.

Why You Might Need a Brake Fluid Flush

• Contaminated Fluid: Over time, brake fluid can become contaminated with moisture, dirt, and debris. If your brake fluid appears dark or murky, a flush might be necessary to remove these contaminants.

• Air in the System: If air has entered the brake lines, it can cause a spongy brake pedal and reduce braking efficiency. A brake fluid flush can help remove this air.

• Manufacturer Recommendation: Some vehicle manufacturers recommend a brake fluid flush at certain intervals as part of regular maintenance.

How Often Should You Flush Brake Fluid?

As mentioned earlier, a brake fluid flush is generally recommended every 3 to 5 years. However, if you notice any of the signs mentioned above, it might be necessary to perform a flush sooner.

💬Final Thoughts: The Importance of Regular Brake Fluid Maintenance

Changing and flushing brake fluid is an essential part of vehicle maintenance that should not be overlooked. Whether you choose to do it yourself or have it done by a professional, keeping your brake fluid fresh ensures that your braking system remains in optimal condition.

By understanding the importance of brake fluid, knowing when and how to change it, and being aware of the costs involved, you can take proactive steps to maintain your vehicle's safety and performance. Regular brake fluid changes and flushes are small investments that can have a significant impact on your vehicle's longevity and your peace of mind.

So, the next time you're performing routine maintenance on your car, don't forget to check the brake fluid. A little attention now can prevent bigger problems down the road, keeping you and your passengers safe on every journey.


Want more videos all about auto?
Subscribe to our YouTube channel 👉Cartech Home
Textual description of firstImageUrl

How Often to Change Brake Fluid: A Comprehensive Guide

All about auto image

Maintaining your vehicle's braking system is crucial for your safety on the road. One of the key aspects of brake maintenance is knowing how often to change brake fluid. Brake fluid plays a vital role in the performance of your braking system, but it’s often overlooked. In this comprehensive guide, we’ll answer several important questions: how often should you change brake fluid, how much brake fluid change costs, and more. By the end of this article, you’ll have a clear understanding of why brake fluid changes are necessary, how often they should be performed, and what to expect when you take your car in for this essential service.

What is Brake Fluid and Why is it Important?

Before diving into how often you should change brake fluid, it's important to understand what brake fluid is and why it is so crucial. Brake fluid is a hydraulic fluid that transfers the force from your foot pressing the brake pedal to the brake pads, which then press against the brake rotors to slow down or stop your vehicle. Without brake fluid, your car's braking system wouldn't function properly.

Brake fluid is designed to withstand high temperatures and pressure. However, over time, brake fluid can absorb moisture from the air, leading to a decrease in its boiling point. This can result in reduced braking performance, increased stopping distances, and even complete brake failure in extreme cases. Therefore, knowing how often to change brake fluid is critical for ensuring your vehicle remains safe to drive.

👉How Often Should You Change Brake Fluid?

Manufacturer Recommendations

Most vehicle manufacturers recommend changing the brake fluid every 2 to 3 years or every 30,000 to 45,000 miles, whichever comes first. However, this can vary depending on the make and model of your vehicle. It's essential to consult your owner's manual for the specific recommendations for your car.

Driving Conditions Matter

While the manufacturer's guidelines provide a good starting point, your driving conditions can also impact how often you should change brake fluid. If you frequently drive in harsh conditions, such as mountainous terrain, heavy traffic, or areas with high humidity, you may need to change your brake fluid more frequently. These conditions can cause the brake fluid to absorb moisture more quickly, reducing its effectiveness.

Signs That Your Brake Fluid Needs to be Changed

Even if you're not close to the recommended interval for changing your brake fluid, there are some warning signs that indicate it might be time for a change. These include:

Spongy Brake Pedal: If your brake pedal feels soft or spongy when you press it, this could be a sign that your brake fluid has absorbed too much moisture and is no longer providing adequate pressure to the braking system.

Warning Light: Some vehicles are equipped with a brake fluid warning light on the dashboard. If this light comes on, it’s a clear indication that you need to check your brake fluid.

Unusual Noises: If you hear grinding or squealing noises when you apply the brakes, it could be a sign that your brake fluid is contaminated or that there is an issue with the brake pads or rotors.

Discolored Brake Fluid: Brake fluid should be a clear, amber color. If you notice that it has turned dark brown or black, it’s a sign that it’s time to change it.

👉How Often Does Brake Fluid Need to Be Changed in Older Vehicles?

If you own an older vehicle, you might need to change your brake fluid more frequently. Older cars tend to have more wear and tear on their braking systems, which can lead to more contamination in the brake fluid. In some cases, you might need to change the brake fluid every 1 to 2 years.

👉How Much Brake Fluid Change Costs

Factors Affecting the Cost

When considering how much brake fluid change will cost, several factors come into play:

1. Vehicle Make and Model: The cost of changing brake fluid can vary depending on the make and model of your vehicle. Luxury or high-performance vehicles might require more expensive brake fluid, which can increase the cost.

2. Location: Labor costs can vary significantly depending on where you live. In urban areas, the cost of labor is typically higher than in rural areas.

3. Service Provider: The cost can also vary depending on where you get the service done. Dealerships generally charge more than independent mechanics or chain auto service centers.

Average Cost of Brake Fluid Change

On average, how much does it cost to change brake fluid? You can expect to pay between $70 and $150 for a brake fluid change. This cost typically includes the brake fluid itself, labor, and any necessary disposal fees. However, if your vehicle requires a specific type of brake fluid or if additional work is needed, the cost could be higher.

Is it Worth Doing It Yourself?

Some car owners might consider changing the brake fluid themselves to save money. While this is possible, it's important to note that changing brake fluid is a more complex task than some other DIY car maintenance jobs. It requires specific tools and knowledge to ensure that the job is done correctly. If done incorrectly, you could compromise your vehicle's braking system, leading to unsafe driving conditions.

If you have experience working on cars and feel confident in your ability to perform the job, you could save money by doing it yourself. However, for most people, it's best to leave this task to a professional to ensure it’s done correctly.

👉The Process of Changing Brake Fluid

Step-by-Step Guide

To give you a better understanding of what happens when you change brake fluid, here’s a step-by-step overview of the process:

1. Prepare the Vehicle: The car is raised using a jack, and the wheels are removed to access the brake calipers.

2. Drain the Old Fluid: The mechanic will locate the brake fluid reservoir and remove the old brake fluid using a suction device. The brake lines are then bled to remove any remaining old fluid from the system.

3. Inspect the Braking System: While the brake fluid is being changed, the mechanic will inspect the entire braking system, including the brake pads, rotors, and calipers, to ensure everything is in good working order.

4. Add New Brake Fluid: The mechanic will then add new brake fluid to the reservoir and bleed the brake lines to remove any air bubbles. This step ensures that the brake fluid is evenly distributed throughout the system and that the brakes are functioning correctly.

5. Test the Brakes: After the new brake fluid has been added, the mechanic will test the brakes to ensure they are working properly.

How Long Does the Process Take?

The entire process of changing brake fluid typically takes about 30 minutes to an hour, depending on the condition of your vehicle and whether any additional repairs are needed.

👉Why Regular Brake Fluid Changes Are Essential

Safety First

Your vehicle’s braking system is arguably its most important safety feature. Neglecting to change your brake fluid at the recommended intervals can lead to decreased braking performance, which could put you and others at risk on the road. By keeping your brake fluid in good condition, you ensure that your brakes will function properly when you need them most.

Prevent Costly Repairs

Regular brake fluid changes can also help you avoid more expensive repairs down the road. Contaminated or degraded brake fluid can cause corrosion in the braking system, leading to damage to the brake lines, calipers, and other components. By changing the brake fluid regularly, you can prevent these issues and extend the life of your braking system.

Improved Braking Performance

Fresh brake fluid helps maintain the optimal performance of your braking system. When you press the brake pedal, you want a quick and responsive reaction from your brakes. Old or contaminated brake fluid can cause a delay in this response, leading to longer stopping distances and reduced control over your vehicle. By changing your brake fluid regularly, you ensure that your brakes are always at their best.

👉Common Myths About Brake Fluid Changes

Myth 1: You Only Need to Change Brake Fluid If There’s a Problem

One of the most common myths is that you only need to change your brake fluid if there’s a noticeable problem with your brakes. However, this isn’t true. Brake fluid degrades over time, even if your braking system appears to be working fine. Waiting until there’s a problem can put you at risk for brake failure.

Myth 2: Brake Fluid Never Needs to Be Changed

Another myth is that brake fluid never needs to be changed. Some people believe that as long as their brakes are working, the brake fluid is fine. However, as mentioned earlier, brake fluid can absorb moisture over time, reducing its effectiveness. Regular changes are necessary to maintain the integrity of your braking system.

Myth 3: Any Brake Fluid Will Do

Not all brake fluids are created equal. Different vehicles require different types of brake fluid, and using the wrong type can cause damage to your braking system. Always use the brake fluid recommended by your vehicle’s manufacturer.

👉How Much Does Changing Brake Fluid Cost Over Time?

Cost vs. Safety

While the cost of changing brake fluid may seem like an unnecessary expense, it’s important to weigh this against the potential cost of brake failure. The safety of you and your passengers should always be the top priority. Spending a little money on regular brake fluid changes can help you avoid more significant expenses and risks in the future.

Comparing Costs with Other Maintenance

When compared to other routine maintenance tasks, changing brake fluid is relatively inexpensive. For example, the cost of replacing brake pads or rotors can be several times higher than the cost of changing brake fluid. By keeping up with your brake fluid changes, you can reduce the likelihood of needing these more costly repairs.

💬Final Thoughts

Understanding how often to change brake fluid and how often should you change brake fluid is essential for maintaining the safety and performance of your vehicle. While the general recommendation is to change your brake fluid every 2 to 3 years or every 30,000 to 45,000 miles, your specific needs may vary based on your vehicle and driving conditions.

When considering how much brake fluid change will cost, it’s important to factor in the make and model of your vehicle, your location, and whether you choose to do the job yourself or hire a professional. On average, how much does it cost to change brake fluid is between $70 and $150.

Regular brake fluid changes are an essential part of vehicle maintenance. They help ensure your brakes work correctly, prevent costly repairs, and keep you safe on the road. Don’t wait until there’s a problem to address your brake fluid. By staying on top of this critical maintenance task, you’ll enjoy peace of mind knowing that your vehicle is in good hands.

Always remember to consult your vehicle’s owner manual for the most accurate information regarding your specific car. And if in doubt, don’t hesitate to seek the advice of a professional mechanic who can provide personalized recommendations based on your driving habits and the condition of your vehicle’s braking system. Safe driving starts with a well-maintained braking system, so make brake fluid changes a regular part of your car care routine.


Want more videos all about auto?
Subscribe to our YouTube channel 👉Cartech Home
Textual description of firstImageUrl

Leaking Brake Fluid from Rear Wheel: Causes and Solutions

All about auto image

Experiencing a leaking brake fluid from the rear wheel of your vehicle is a serious issue that demands immediate attention. This problem not only compromises the effectiveness of your braking system but also poses significant safety risks. In this comprehensive guide, we will explore the causes, symptoms, and solutions for leaking brake fluid from the rear wheel. Understanding these aspects will help you maintain your vehicle’s safety and performance, and it will also provide insight into when to seek professional assistance.

👉Understanding Brake Fluid and Its Importance

Before diving into the specifics of leaking brake fluid from the rear wheel, it’s essential to understand what brake fluid is and why it’s critical to your vehicle's braking system. Brake fluid is a hydraulic fluid that transfers force from the brake pedal to the brake components at each wheel. It plays a crucial role in the overall functioning of your brakes, ensuring that your vehicle stops safely and efficiently.

👉The Role of Brake Fluid

• Hydraulic Pressure: When you press the brake pedal, brake fluid is forced through the brake lines to the brake calipers or wheel cylinders, which in turn apply pressure to the brake pads or shoes, slowing the vehicle down.

• Heat Absorption: Brake fluid is designed to withstand the high temperatures generated by friction between the brake pads and rotors or the brake shoes and drums. It helps prevent the brake system from overheating and losing efficiency.

• Lubrication: The fluid also lubricates the moving parts within the braking system, reducing wear and tear.

👉Types of Brake Fluid

There are different types of brake fluid, primarily distinguished by their chemical composition:

• DOT 3: Glycol-based, commonly used in older vehicles.

• DOT 4: Glycol-based with a higher boiling point than DOT 3, suitable for modern vehicles.

• DOT 5: Silicone-based, used in specialty vehicles where moisture absorption is a concern.

• DOT 5.1: Glycol-based with a high boiling point, used in high-performance vehicles.

👉The Dangers of Brake Fluid Leaks

Leaking brake fluid from the rear wheel or any other part of the braking system is a critical problem that can lead to:

• Reduced Braking Power: Without sufficient brake fluid, the hydraulic pressure necessary for effective braking diminishes, making it harder to stop the vehicle.

• Brake Failure: In severe cases, a complete loss of brake fluid can result in total brake failure, leading to potentially catastrophic accidents.

• Damage to Brake Components: Brake fluid leaks can cause damage to other parts of the braking system, including brake pads, rotors, and lines, leading to costly repairs.

👉Causes of Leaking Brake Fluid from Rear Wheel

Several factors can contribute to brake fluid leaking from the rear wheel. Identifying the root cause is essential for effective repairs.

1. Worn-Out Wheel Cylinders. Wheel cylinders are part of drum brake systems, typically found on the rear wheels of many vehicles. They contain pistons that press the brake shoes against the drum to create friction and stop the vehicle. Over time, the seals within the wheel cylinders can wear out, leading to brake fluid leaks.

All about auto image

• Symptoms: A soft or spongy brake pedal, fluid around the rear wheels, or brake fluid on the inside of the wheel.

• Solution: The wheel cylinders need to be rebuilt or replaced.

2. Damaged Brake Lines. Brake lines carry brake fluid from the master cylinder to the brakes at each wheel. These lines are typically made of steel, but they can corrode or be damaged by road debris, leading to leaks.

• Symptoms: Visible brake fluid on the ground near the rear wheel, a drop in brake fluid levels, or a spongy brake pedal.

• Solution: The damaged brake line must be repaired or replaced.

3. Faulty Brake Calipers. In vehicles with disc brakes on the rear wheels, brake calipers squeeze the brake pads against the rotor to stop the vehicle. If the caliper seals wear out or the caliper itself becomes damaged, it can lead to brake fluid leaks.

All about auto image

• Symptoms: Fluid around the brake caliper, uneven braking, or a loss of braking power.

• Solution: Replace the faulty brake caliper.

4. Worn Brake Hoses. Brake hoses connect the rigid brake lines to the brake calipers or wheel cylinders. These hoses are flexible to accommodate the movement of the wheels. However, they can wear out over time, leading to cracks and leaks.

• Symptoms: Fluid leaking near the rear wheel, a soft brake pedal, or reduced braking effectiveness.

• Solution: The worn brake hose needs to be replaced.

5. Loose or Damaged Bleeder Valves. Bleeder valves are small screws found on brake calipers or wheel cylinders. They are used to release air from the brake system. If these valves are not tightened properly or become damaged, they can cause brake fluid to leak.

• Symptoms: Fluid around the bleeder valve, air in the brake lines, or a spongy brake pedal.

• Solution: Tighten or replace the bleeder valve as needed.

6. Faulty Master Cylinder. The master cylinder is the heart of the braking system, responsible for pressurizing the brake fluid and sending it to the brakes at each wheel. If the master cylinder is faulty, it can cause leaks that may show up near the rear wheels.

All about auto image

• Symptoms: Brake fluid leaking from the rear of the vehicle, a sinking brake pedal, or a complete loss of braking power.

• Solution: Replace the master cylinder.

7. Overfilled Brake Fluid Reservoir. While not a common cause, overfilling the brake fluid reservoir can lead to excess fluid being pushed out through the brake lines, potentially causing leaks.

• Symptoms: Brake fluid leaking from the rear wheels after recent brake fluid addition.

• Solution: Correct the fluid level in the reservoir.

8. Corroded Brake Components. Corrosion is a common issue, especially in areas where road salt is used. Corroded brake lines, calipers, or wheel cylinders can lead to leaks.

• Symptoms: Rust or corrosion on brake components, fluid leaks, or reduced braking performance.

• Solution: Replace the corroded components and consider rust-proofing to prevent future issues.

👉Symptoms of Leaking Brake Fluid from Rear Wheel

Recognizing the symptoms of a brake fluid leak from the rear wheel is crucial for timely intervention. Early detection can prevent further damage and ensure your safety on the road.

1. Soft or Spongy Brake Pedal. A soft or spongy brake pedal is often one of the first signs of a brake fluid leak. This occurs because the brake system is unable to maintain proper hydraulic pressure, leading to a reduction in braking power.

2. Visible Fluid Leaks. Brake fluid leaks are often visible around the rear wheels. The fluid may appear as a light yellow or brownish liquid, depending on its age. If you notice fluid on the ground or on the inside of your wheels, it’s a clear sign of a leak.

3. Low Brake Fluid Levels. If you regularly check your brake fluid levels and notice they are consistently low, it could be a sign of a leak somewhere in the system, potentially from the rear wheel.

4. Brake Warning Light. Many modern vehicles are equipped with a brake warning light that illuminates when there’s a problem with the braking system. A leak in the rear wheel could trigger this warning.

5. Unusual Noises. If air enters the brake lines due to a leak, you might hear unusual noises when pressing the brake pedal, such as a hissing sound or grinding noises from the rear wheels.

6. Uneven Braking. If one of your rear wheels is leaking brake fluid, you might experience uneven braking, where one side of the vehicle brakes more effectively than the other. This can cause the vehicle to pull to one side during braking.

7. Brake Pedal Sinks to the Floor. In severe cases, a significant brake fluid leak can cause the brake pedal to sink to the floor when pressed. This indicates a serious issue that requires immediate attention.

👉Diagnosing the Cause of a Brake Fluid Leak

Diagnosing the exact cause of a brake fluid leak from the rear wheel requires a systematic approach. Here’s a step-by-step guide:

1. Visual Inspection. Start by visually inspecting the area around the rear wheels. Look for signs of fluid leaks, such as wet spots on the ground or on the wheel itself. Check the brake lines, hoses, wheel cylinders, and calipers for visible damage or wear.

2. Check Brake Fluid Levels. Open the brake fluid reservoir and check the fluid level. If it’s low, it could indicate a leak. However, don’t just top it off; investigate further to find the source of the leak.

3. Examine the Wheel Cylinder or Caliper. If your vehicle has drum brakes, remove the drum to inspect the wheel cylinder for leaks. If you have disc brakes, check the brake caliper for any signs of fluid around the seals or bleeder valves.

4. Inspect the Brake Lines and Hoses. Follow the brake lines and hoses from the master cylinder to the rear wheels. Look for any signs of corrosion, cracks, or other damage that could lead to leaks.

5. Bleed the Brakes. Bleeding the brakes can help you determine if there’s air in the system, which may indicate a leak. It can also help identify if the bleeder valves are the source of the leak.

6. Check the Master Cylinder. If you’ve ruled out other potential causes, inspect the master cylinder. Look for leaks around the unit and check if it’s functioning properly.

👉Solutions for Leaking Brake Fluid from Rear Wheel

Once you’ve diagnosed the cause of the leak, the next step is to address the issue. Here are some common solutions based on the cause:

1. Replace Worn-Out Wheel Cylinders. If the wheel cylinders are the source of the leak, they will need to be rebuilt or replaced. This involves removing the drum, disconnecting the brake lines, and installing a new or rebuilt cylinder.

2. Repair or Replace Damaged Brake Lines. Damaged brake lines must be repaired or replaced. This might involve bending and flaring new lines to fit your vehicle or using pre-made lines that match your vehicle’s specifications.

3. Install New Brake Calipers. If the brake calipers are leaking, they will need to be replaced. This involves removing the old caliper, installing a new one, and bleeding the brakes to remove any air from the system.

4. Replace Worn Brake Hoses. Replacing worn brake hoses is a straightforward process. The old hose is disconnected, a new one is installed, and the brakes are bled to ensure proper function.

5. Tighten or Replace Bleeder Valves. If the bleeder valves are the source of the leak, they should be tightened or replaced. Afterward, the brake system should be bled to remove any trapped air.

6. Replace the Master Cylinder. A faulty master cylinder should be replaced by a professional. This involves disconnecting the brake lines, removing the old master cylinder, installing a new one, and bleeding the entire brake system.

7. Correct the Brake Fluid Level. If overfilling the brake fluid reservoir caused the leak, simply correct the fluid level. Be sure to check for any residual leaks that might have occurred due to the excess pressure.

8. Rust-Proofing Brake Components. If corrosion caused the leak, replace the affected parts and consider applying rust-proofing products to protect the new components from future corrosion.

👉Preventive Maintenance Tips

Preventing brake fluid leaks from the rear wheel is possible with regular maintenance and careful attention to your vehicle’s braking system. Here are some tips to keep your brakes in top condition:

1. Regular Brake Inspections. Schedule regular brake inspections to catch potential issues before they become serious. A mechanic can check for signs of wear and tear, corrosion, and leaks.

2. Brake Fluid Replacement. Brake fluid absorbs moisture over time, which can lead to corrosion and a reduction in braking efficiency. Regularly replace your brake fluid according to your vehicle’s maintenance schedule.

3. Keep an Eye on Brake Performance. If you notice any changes in your vehicle’s braking performance, such as a soft pedal or unusual noises, have your brakes inspected immediately.

4. Avoid Harsh Driving Conditions. Avoiding harsh driving conditions, such as frequent stops and starts, can reduce the wear and tear on your brake components, helping to prevent leaks.

5. Use Quality Brake Components. When replacing brake components, always use high-quality parts that meet or exceed the manufacturer’s specifications. This ensures better performance and longevity.

👉When to Seek Professional Help

While some brake repairs can be done at home by experienced DIYers, a leaking brake fluid from the rear wheel is a serious issue that often requires professional attention. If you’re not confident in diagnosing and fixing the problem yourself, it’s best to take your vehicle to a trusted mechanic. They have the tools and expertise to accurately diagnose the issue and make the necessary repairs to ensure your safety.

💬Final Thoughts

Leaking brake fluid from the rear wheel is a critical problem that should never be ignored. It compromises the safety and efficiency of your vehicle’s braking system, potentially leading to severe accidents. By understanding the causes, symptoms, and solutions for this issue, you can take proactive steps to address it and maintain your vehicle’s performance. Regular maintenance and prompt attention to any signs of brake fluid leaks will help keep you and your passengers safe on the road.


Want more videos all about auto?
Subscribe to our YouTube channel 👉Cartech Home
Textual description of firstImageUrl

Symptoms of Low Brake Fluid Every Car Owner Needs to Know

All About Auto Image

Brakes are one of the most crucial components of your vehicle. They ensure your safety by allowing you to stop or slow down your car when necessary. However, the effectiveness of your braking system heavily relies on brake fluid. Understanding the symptoms of low brake fluid can help you prevent accidents and costly repairs. This article will focus on the keyword "low brake fluid symptoms" and explain everything an ordinary car owner needs to know.

👉 What is Brake Fluid and Why is it Important?

Brake fluid is a hydraulic fluid that transfers the force from your foot on the brake pedal to the brakes themselves. It plays a critical role in the functioning of your vehicle’s braking system. Without adequate brake fluid, your brakes won’t function correctly, putting you and others on the road at risk.


All About Auto Image

👉 Common Low Brake Fluid Symptoms

Understanding the symptoms of low brake fluid can help you identify problems early and take action before your braking system fails. Here are the most common low brake fluid symptoms you should watch out for:

1. Spongy or Soft Brake Pedal. One of the first low brake fluid symptoms you may notice is a spongy or soft brake pedal. When you press the brake pedal, it should feel firm and responsive. If it feels soft or spongy, it could indicate that there’s not enough brake fluid in the system. This symptom occurs because air gets into the brake lines when fluid levels are low, leading to a decrease in hydraulic pressure.

2. Increased Stopping Distance. If you find that your car is taking longer to stop than usual, it could be a sign of low brake fluid. Brake fluid is essential for generating the necessary pressure to stop your vehicle. When the fluid level is low, the braking system may struggle to generate the required pressure, leading to a longer stopping distance. This is one of the most dangerous low brake fluid symptoms and should be addressed immediately.

3. Brake Warning Light. Modern vehicles are equipped with a brake warning light on the dashboard. This light is designed to alert you to potential issues with your braking system, including low brake fluid levels. If the brake warning light comes on, it’s essential to check the brake fluid level as soon as possible. Ignoring this warning can lead to severe brake failure.

All About Auto Image

4. Noisy Brakes. Another common symptom of low brake fluid is noisy brakes. If you hear a squealing, grinding, or scraping noise when you apply the brakes, it could indicate that the brake pads are not getting enough hydraulic pressure due to low fluid levels. This lack of pressure can cause the brake pads to wear unevenly, leading to noise and potentially more severe damage if left unchecked.

5. ABS Malfunction. The Anti-lock Braking System (ABS) relies on brake fluid to function correctly. If the brake fluid level is low, the ABS may not work as intended, leading to an ABS warning light on your dashboard. An ABS malfunction can be a serious safety issue, especially in emergency braking situations where the ABS is crucial for maintaining control of the vehicle.

👉 Causes of Low Brake Fluid

Understanding the causes of low brake fluid can help you prevent this issue from occurring. Here are some common reasons why your brake fluid might be low:

1. Leaks in the Brake System. Leaks are the most common cause of low brake fluid. Over time, the brake lines, calipers, or master cylinder can develop leaks, leading to a gradual loss of brake fluid. It’s essential to inspect your brake system regularly and address any leaks immediately to prevent a drop in brake fluid levels.

2. Worn Brake Pads. As brake pads wear down, the brake calipers need to extend further to make contact with the rotors. This increased movement can cause the brake fluid level to drop slightly. While this is normal to some extent, severely worn brake pads can lead to a more significant drop in brake fluid levels.

3. Evaporation. Brake fluid can evaporate over time, especially if the brake fluid reservoir cap is not sealed correctly. Although this is less common, it can still lead to low brake fluid levels if not addressed.


👉 How to Check and Maintain Brake Fluid Levels

Regularly checking and maintaining your brake fluid levels is crucial for the proper functioning of your vehicle’s braking system. Here’s how you can do it:

1. Locate the Brake Fluid Reservoir. The brake fluid reservoir is typically located near the back of the engine bay, close to the firewall. It’s usually a small, translucent plastic container with a cap labeled “Brake Fluid.” If you’re unsure where to find it, consult your vehicle’s owner’s manual.


All About Auto Image

2. Check the Fluid Level. Once you’ve located the reservoir, check the fluid level against the “MIN” and “MAX” markings on the side of the container. The brake fluid should be between these two marks. If it’s below the “MIN” mark, you’ll need to add more brake fluid.


All About Auto Image

3. Top Off with the Correct Brake Fluid. If your brake fluid level is low, you’ll need to top it off with the correct type of brake fluid. Most vehicles use DOT 3 or DOT 4 brake fluid, but it’s essential to check your owner’s manual to ensure you’re using the right type. Open the cap carefully, as brake fluid can be corrosive, and pour the fluid into the reservoir until it reaches the “MAX” mark.

4. Inspect for Leaks. After topping off the brake fluid, inspect the brake lines, calipers, and master cylinder for any signs of leaks. If you notice any wet spots or drips, it’s crucial to have your brake system inspected by a professional mechanic.

💬 Final Thoughts

Low brake fluid symptoms are not something to take lightly. A spongy brake pedal, increased stopping distance, brake warning light, noisy brakes, and ABS malfunctions are all signs that your brake fluid level may be low. Understanding these symptoms can help you catch problems early and ensure your vehicle’s braking system remains in top condition.

Regularly checking and maintaining your brake fluid levels is a simple yet effective way to prevent brake failure and keep your vehicle safe on the road. If you’re ever in doubt about your brake fluid levels or notice any of the symptoms mentioned above, don’t hesitate to consult a professional mechanic. Your safety and the safety of others on the road depend on it.


Want more videos all about auto?
Subscribe to our YouTube channel👉Cartech Home

Textual description of firstImageUrl

5 Warning Signs of Low Brake Fluid

As a driver, ensuring your car's safety is of utmost importance. Among the essential components of your vehicle is the brake system. It's crucial to keep tabs on the brake fluid level to maintain proper braking function. Low brake fluid can lead to disastrous consequences, making it essential to pay attention to the warning signs. In this article, we'll explore five warning signs of low brake fluid that you shouldn't ignore. From spongy brakes to warning lights, we'll cover everything you need to know to keep your brake system in optimal condition. Whether you're a seasoned driver or a new one, understanding the warning signs of low brake fluid can help you avoid costly repairs and ensure your safety on the road. So, buckle up and read on to learn more about this critical aspect of car maintenance.

👉What is brake fluid and what does it do?

Before we delve into the warning signs of low brake fluid, let's first understand what brake fluid is and its function. Brake fluid is a hydraulic fluid that transfers force from the brake pedal to the brake calipers or wheel cylinders. It's a non-compressible substance that is essential for the proper function of the brake system. Without brake fluid, the hydraulic pressure required to apply the brakes will not be generated, and your car will not stop.

Brake fluid is typically made of glycol-ether or silicone-based substances, which can withstand high temperatures and pressure. It's a critical component of the brake system, and its level must be maintained for optimal braking performance.

👉The importance of maintaining brake fluid levels

Maintaining the proper brake fluid level is crucial for your safety and the longevity of your brake system. Low brake fluid can cause your brakes to fail, leading to accidents, injuries, or worse. Additionally, low brake fluid levels can cause damage to the brake system, leading to costly repairs.

Brake fluid can also absorb moisture over time, reducing its efficacy and damaging the brake system's components. Regular brake fluid flushes can prevent the accumulation of moisture and ensure that your brake system performs optimally.

Warning sign #1: Spongy or soft brake pedal

One of the most common warning signs of low brake fluid is a spongy or soft brake pedal. If you press the brake pedal and it feels spongy or soft, it's most likely due to low brake fluid. When there's not enough brake fluid to generate hydraulic pressure, the brake pedal will feel soft or spongy.

A soft brake pedal can also be a sign of air in the brake lines, which can occur when there's a leak in the brake system. However, low brake fluid is one of the most common causes of a soft brake pedal.

If you notice a spongy or soft brake pedal, it's essential to check the brake fluid level immediately and add more fluid if necessary. Ignoring this warning sign can lead to brake failure and potentially catastrophic consequences.

Warning sign #2: Illuminated brake warning light

Another warning sign of low brake fluid is an illuminated brake warning light on your dashboard. The brake warning light is usually lit in red and looks like an exclamation mark inside a circle. It's a crucial warning sign that indicates a problem with the brake system, including low brake fluid levels.

The brake warning light can also be illuminated when the parking brake is engaged or when there's a problem with the ABS system. However, if the brake warning light is on, it's essential to check the brake fluid level and add more fluid if necessary.

Warning sign #3: Grinding or squealing noises when applying brakes

If you hear grinding or squealing noises when applying the brakes, it can be a sign of low brake fluid levels. When there's not enough brake fluid, the brake pads or shoes can wear down and make grinding or squealing noises when applied.

Grinding or squealing noises can also be a sign of worn-out brake pads or shoes, a damaged brake rotor, or caliper. However, low brake fluid levels can cause premature wear and tear on the brake system, leading to costly repairs.

If you hear grinding or squealing noises when applying the brakes, it's vital to check the brake fluid level and add more fluid if necessary. Additionally, have your brake system inspected by a professional mechanic to diagnose and fix the problem.

Warning sign #4: Longer stopping distances

Low brake fluid levels can also cause longer stopping distances, which is a significant safety concern. When there's not enough brake fluid, the hydraulic pressure required to apply the brakes will not be generated, leading to longer stopping distances.

Longer stopping distances can cause accidents and injuries, especially in emergency situations. If you notice that your car takes longer to stop than usual, it's essential to check the brake fluid level and add more fluid if necessary.

Warning sign #5: Burning smell coming from brakes

If you notice a burning smell coming from your brakes, it can be a sign of low brake fluid levels. When there's not enough brake fluid, the brake system can overheat, causing a burning smell.

A burning smell can also be a sign of worn-out brake pads or shoes, a damaged brake rotor, or caliper. However, low brake fluid levels can cause the brake system to overheat, leading to costly repairs.

If you notice a burning smell coming from your brakes, it's essential to check the brake fluid level and add more fluid if necessary. Additionally, have your brake system inspected by a professional mechanic to diagnose and fix the problem.

👉How to check brake fluid levels

Checking the brake fluid level is a simple process that you can do at home. Follow these steps to check your brake fluid level:

1. Park your car on a level surface and turn off the engine.

2. Open the hood and locate the brake fluid reservoir. It's usually located near the firewall on the driver's side of the engine compartment.

3. Check the brake fluid level. The reservoir has a minimum and maximum level indicator. The brake fluid level should be between the minimum and maximum indicators.

4. If the brake fluid level is below the minimum indicator, add more brake fluid to bring it to the maximum level.

👉What to do if you suspect low brake fluid

If you suspect low brake fluid levels, it's essential to check the brake fluid level immediately and add more fluid if necessary. Additionally, have your brake system inspected by a professional mechanic to diagnose and fix the problem.

Ignoring the warning signs of low brake fluid can lead to brake failure and potentially catastrophic consequences. Regular brake fluid flushes can prevent low brake fluid levels and ensure that your brake system performs optimally.

Conclusion

Maintaining the proper brake fluid level is crucial for your safety and the longevity of your brake system. Low brake fluid can cause your brakes to fail, leading to accidents, injuries, or worse. In this article, we've explored five warning signs of low brake fluid that you shouldn't ignore, from spongy brakes to warning lights and burning smells.

If you notice any of these warning signs, it's essential to check the brake fluid level immediately and add more fluid if necessary. Additionally, have your brake system inspected by a professional mechanic to diagnose and fix the problem. Regular brake fluid flushes can prevent low brake fluid levels and ensure that your brake system performs optimally, providing you with peace of mind and a safe driving experience.


Want more videos all about auto?
Subscribe to our YouTube channel👉Cartech Home
Textual description of firstImageUrl

Low Brake Fluid Makes the Brake Light Comes On and Off

If the brake warning lights come on and off while driving, the possible reason is that that the car has low brake fluid. Because there is a sensor located on the top of the fluid reservoir that causes the brake warning light to go on when the brake fluid low or level is below the minimum.

All About Auto Image

When there is slightly low brake fluid or below the minimum requirement, there is still a tendency that the fluid touches the sensor especially when the car runs on humps or a dip which causes the fluid to touch the sensor which resulted from warning light coming on and off, because the fluid will slosh to the sensor.

Possible cause of brake warning light that comes on and off

Low brake fluid or brake fluid level is slightly low.

How to fix brake warning lights that come on and off
To fix this problem, since the car has low brake fluid you have to add enough amount of brake fluid in the reservoir. Open the hood of the car and locate the brake fluid reservoir. Usually, it is located above the brake master cylinder.

All About Auto Image

High-Quality brake fluid will do, usually DOT3 or DOT 4. When adding the amount of brake fluid never leaves the reservoir open for a longer period because it can cause the brake fluid to become contaminated with moisture coming from the air and may cause more problems. Also never allow the brake fluid to make contact with the painted surface of your car because only a small amount of brake fluid can damage your car.

What Causes Brake Light on Dash to Stay on
What causes brake light on dash to Stay on. Brake system fault, low brake fluid, slightly engaged parking brake, imbalance pressure on the brake. Read more: What Causes Brake Light on Dash to Stay on


Want more videos?
Subscribe to my channel!

Textual description of firstImageUrl

How to Check Transmission Fluid

All About Auto Image

Automatic transmission fluid is as important as engine oil. Like the engine it is also necessary to check the ATF, someone asks us how do I read transmission fluid dipstick? Well, there are readings you need to be done when the engine is cold and when the engine is hot.


How to read transmission fluid dipstick

All About Auto Image

Step 1. To read transmission fluid dipstick, park the car on level ground than wait for the engine to warm up. While warming up the engine, look around the transmission and check for any leakage of transmission fluid.

Step 2. After the engine warmed up to locate the transmission dipstick and check the fluid at fluid temperatures of 86 to 122 °F using the “COLD” range on the dipstick.

Step 3. Start the engine and move the selector lever on every gear position, then leave the selector lever in the park “P” position. Usually, this is located at the back of the engine and is shorter than the engine oil dipstick.

Step 4. Check the fluid level with the engine idling. Remove the dipstick and take note of the reading, wipe with a clean rag and re-insert again the dipstick on the charging pipe.

Step 5. Remove the dipstick and take note of the reading, if the reading is at the low side of either range, add automatic transmission fluid on the charging pipe, do not overfill.

Step 6. Drive your car for about 5 minutes, and recheck the fluid level at fluid temperatures of 122 to 176 °F using the “Hot” range or dipstick.

You can also check the A/T fluid condition, if the fluid is very dark or smells burned, check the transmission for any problems and repair if necessary.


Want more videos all about auto?
Subscribe to our Cartechhome Channel on Youtube