Cartech - All About Auto

Textual description of firstImageUrl

17 Effective Ways to Lower Your Car Insurance

All about auto image

Car insurance is a necessary expense for every driver, but that doesn't mean you have to overpay. With the right strategies, you can significantly reduce your car insurance premiums without sacrificing coverage. This comprehensive guide explores various ways to lower your car insurance, helping you save money while ensuring you're adequately protected on the road.

17 Effective Ways to Lower Your Car Insurance

1. Shop Around for the Best Rates. One of the most effective ways to lower your car insurance is by shopping around. Insurance companies use different methods to calculate premiums, so rates can vary significantly between providers. Here's how you can do it:

a. Compare Quotes Online. There are numerous online platforms where you can compare quotes from multiple insurers. These tools allow you to enter your details once and receive offers from various companies. This comparison shopping is a crucial step in finding the best deal.

b. Consult an Independent Insurance Agent. Independent insurance agents work with multiple companies and can help you find the best policy for your needs. They can provide personalized advice and help you navigate the complexities of car insurance.

c. Revisit Your Policy Annually. Even if you're satisfied with your current provider, it's wise to review your policy annually. Insurance rates can change due to various factors, including your driving record and changes in the insurance market. Regularly checking your options ensures you're always getting the best deal.

2. Increase Your Deductible. Your deductible is the amount you pay out of pocket before your insurance kicks in after a claim. By increasing your deductible, you can lower your monthly premium. Here's what to consider:

a. Calculate the Savings. Raising your deductible can lead to substantial savings on your premiums. For example, increasing your deductible from $500 to $1,000 could reduce your premium by 10% to 20%. However, make sure you have enough savings to cover the higher deductible in case of an accident.

b. Balance Risk and Reward. While a higher deductible can save you money, it also means you'll pay more out of pocket if you need to file a claim. Consider your financial situation and risk tolerance before making this decision.

3. Bundle Your Policies. Many insurance companies offer discounts if you purchase multiple policies from them. This is known as bundling. For example, you can bundle your car insurance with homeowners or renters insurance to receive a discount. Here's how bundling works:

a. Ask About Multi-Policy Discounts. When shopping for insurance, inquire about multi-policy discounts. Some insurers offer substantial savings when you combine your car insurance with other types of coverage.

b. Evaluate the Overall Cost. While bundling can save you money, it's essential to compare the total cost of the bundled policies with purchasing them separately. Sometimes, the combined price might still be higher than buying from different providers, even after the discount.

4. Take Advantage of Discounts. Insurance companies offer various discounts that can significantly lower your premiums. Some of the most common discounts include:

a. Safe Driver Discount. If you have a clean driving record, you're likely eligible for a safe driver discount. Insurers reward drivers who have no accidents or traffic violations on their records.

b. Low Mileage Discount. If you don't drive much, you may qualify for a low mileage discount. Insurance companies often provide lower rates to drivers who use their cars infrequently, as they are considered less risky.

c. Good Student Discount. For young drivers, maintaining good grades can lead to discounts. Many insurers offer reduced rates to students with a GPA of 3.0 or higher.

d. Defensive Driving Course Discount. Completing a defensive driving course can also lower your premiums. These courses teach safe driving techniques and may help you avoid accidents, making you a lower risk to insure.

e. Loyalty Discounts. Staying with the same insurer for several years can sometimes earn you a loyalty discount. However, this should be balanced against the potential savings from switching providers.

f. Group Discounts. Some insurers offer discounts to members of certain organizations, employers, or alumni associations. Check if any groups you're associated with have negotiated discounts with insurance providers.

5. Maintain a Good Credit Score. In many states, your credit score can impact your car insurance rates. Insurers use credit-based insurance scores to predict the likelihood of you filing a claim. Here's how to improve your credit score and potentially lower your insurance premiums:

a. Pay Bills on Time. Your payment history is a significant factor in your credit score. Paying your bills on time, including credit cards, loans, and utilities, can help improve your score over time.

b. Reduce Debt. Lowering your debt-to-income ratio can also boost your credit score. Focus on paying down high-interest debt first and avoid taking on new debt unnecessarily.

c. Monitor Your Credit Report. Regularly check your credit report for errors and discrepancies. If you find any mistakes, dispute them with the credit bureau to have them corrected. A higher credit score can lead to lower insurance premiums.

6. Choose Your Car Wisely. The type of car you drive plays a significant role in determining your insurance rates. Here's how to select a car that can help you save on insurance:

a. Consider the Cost of Insurance When Buying a Car. Before purchasing a vehicle, research its insurance costs. Some cars are more expensive to insure due to factors like repair costs, safety ratings, and theft rates. Choosing a car with a lower insurance risk profile can save you money.

b. Opt for a Safer Vehicle. Cars with advanced safety features like anti-lock brakes, airbags, and electronic stability control are often cheaper to insure. Vehicles with high safety ratings are less likely to be involved in accidents, making them a lower risk for insurers.

c. Avoid High-Performance Cars. High-performance vehicles, such as sports cars, typically come with higher insurance premiums. These cars are more expensive to repair and are often involved in accidents, leading to higher insurance costs.

7. Consider Usage-Based Insurance. Usage-based insurance (UBI) is a relatively new option that allows you to pay premiums based on your driving habits. This type of insurance can be a great way to lower your car insurance, especially if you're a safe driver.

a. How Usage-Based Insurance Works. UBI policies use telematics devices or smartphone apps to track your driving behavior, including factors like speed, braking, and mileage. If you demonstrate safe driving habits, you can earn discounts on your premiums.

b. Benefits of Usage-Based Insurance. Usage-based insurance can be especially beneficial for low-mileage drivers or those with excellent driving habits. By proving that you're a responsible driver, you can potentially reduce your insurance costs significantly.

c. Consider the Privacy Trade-Off. While UBI can save you money, it also involves sharing your driving data with your insurer. If you're concerned about privacy, weigh the benefits against the potential drawbacks.

8. Drop Unnecessary Coverage. Reviewing your car insurance policy periodically can help you identify coverage you no longer need. Dropping unnecessary coverage can lead to substantial savings.

a. Evaluate Your Coverage Needs. As your car ages, you may no longer need certain types of coverage, such as comprehensive or collision insurance. If your car's value is low, it might not make financial sense to pay for coverage that exceeds the vehicle's worth.

b. Consider Liability-Only Coverage. If your car is older and not worth much, switching to liability-only coverage can save you money. Liability insurance covers damage you cause to others but doesn't pay for repairs to your own vehicle.

c. Reassess After Major Life Changes. Life changes, such as paying off your car loan or moving to a safer neighborhood, can affect your insurance needs. Reassess your coverage after such events to ensure you're not paying for unnecessary protection.

9. Pay Your Premiums Annually. While many drivers opt for monthly payments, paying your car insurance premiums annually can save you money. Here's how:

a. Avoid Monthly Service Fees. Many insurance companies charge service fees for monthly payments. By paying your premium in full each year, you can avoid these extra charges.

b. Potential Discounts for Annual Payments. Some insurers offer discounts for drivers who pay their premiums annually. This discount can add up to significant savings over the life of your policy.

c. Budgeting for an Annual Payment. If you're considering switching to annual payments, make sure you budget accordingly. Setting aside money each month can help ensure you have the funds available when it's time to pay your premium.

10. Keep Your Driving Record Clean. Your driving record is one of the most critical factors in determining your car insurance rates. Maintaining a clean driving record can help you secure lower premiums over time.

a. Avoid Traffic Violations. Traffic violations, such as speeding tickets or running red lights, can lead to higher insurance premiums. Obeying traffic laws and driving responsibly can help you avoid these costly penalties.

b. Take a Defensive Driving Course. As mentioned earlier, completing a defensive driving course can not only earn you a discount but also reinforce safe driving habits. These courses can be particularly beneficial if you have minor infractions on your record.

c. Accident Forgiveness Programs. Some insurance companies offer accident forgiveness programs, which prevent your first accident from increasing your premium. If you qualify for such a program, it can protect your rates even if you're involved in a minor accident.

11. Install Anti-Theft Devices. Installing anti-theft devices in your car can reduce the risk of theft, leading to lower insurance premiums. Here’s how:

a. Types of Anti-Theft Devices. Common anti-theft devices include steering wheel locks, car alarms, GPS tracking systems, and immobilizers. These devices can deter thieves and make your car less appealing as a target.

b. Notify Your Insurer. If you've installed anti-theft devices, be sure to inform your insurance company. Many insurers offer discounts for cars equipped with these devices, as they reduce the likelihood of theft.

c. Consider Comprehensive Coverage. If you live in an area with a high rate of car theft, maintaining comprehensive coverage with anti-theft discounts can provide peace of mind while keeping your premiums manageable.

12. Maintain Continuous Coverage. Lapses in car insurance coverage can lead to higher premiums when you renew your policy or switch providers. Here's why continuous coverage matters:

a. Insurers View Gaps as Risky. Insurance companies view gaps in coverage as a risk factor. They may assume you're more likely to file a claim if you've had periods without insurance, leading to higher rates.

b. Avoid Penalties and Fines. In many states, driving without insurance is illegal and can result in fines, license suspension, and higher premiums when you reinstate your coverage. Maintaining continuous coverage ensures you avoid these penalties.

c. Consider Non-Owner Insurance. If you don't currently own a car but plan to drive occasionally, consider non-owner car insurance. This type of policy provides liability coverage and keeps you insured, preventing a lapse in coverage.

13. Choose the Right Coverage Limits. Choosing the right coverage limits is essential for balancing cost and protection. Here’s how to determine the appropriate limits for your needs:

a. Understand State Requirements. Each state has minimum insurance requirements, which typically include liability coverage for bodily injury and property damage. However, the minimum required limits might not be enough to cover you in a severe accident.

b. Evaluate Your Assets. Consider your assets, such as your home, savings, and investments, when choosing your coverage limits. Higher limits can protect your assets in the event of a costly accident.

c. Consider Umbrella Insurance. If you have significant assets, consider purchasing an umbrella insurance policy. This coverage provides additional liability protection beyond your standard car insurance, often at a relatively low cost.

14. Review Your Policy After Life Changes. Life events can significantly impact your car insurance needs and premiums. It's essential to review your policy after any major changes to ensure you're adequately covered without overpaying.

a. Getting Married. Married drivers often qualify for lower insurance rates than single drivers. If you get married, notify your insurer to see if you qualify for a discount.

b. Moving to a New Location. Your location affects your car insurance rates. Moving to a safer neighborhood with lower crime rates or less traffic can result in lower premiums. Conversely, moving to a higher-risk area might increase your rates.

c. Changing Jobs. Your daily commute impacts your car insurance. If you switch jobs and have a shorter commute or start working from home, you may qualify for a low mileage discount.

d. Adding a Teen Driver. Adding a teen driver to your policy can increase your premiums. However, you can offset some of the cost by taking advantage of discounts for good students, driver training courses, and safe driving programs.

15. Consider Pay-Per-Mile Insurance. Pay-per-mile insurance is an excellent option for drivers who don't use their cars frequently. This type of insurance charges you based on the number of miles you drive, which can be a cost-effective option for low-mileage drivers.

a. How Pay-Per-Mile Insurance Works. Pay-per-mile insurance typically includes a base rate plus a per-mile charge. If you drive less, you pay less, making it a great way to lower your car insurance costs.

b. Benefits of Pay-Per-Mile Insurance. This type of insurance is ideal for people who drive infrequently, such as retirees, remote workers, or city dwellers who primarily use public transportation. By only paying for the miles you drive, you can save a significant amount on your insurance.

c. Compare Pay-Per-Mile vs. Traditional Insurance. Before switching to pay-per-mile insurance, compare the overall cost with your current policy. In some cases, traditional insurance may still be more cost-effective, especially if you drive regularly.

16. Opt for Paperless Billing and Auto-Pay. Many insurance companies offer discounts for customers who choose paperless billing and auto-pay options. These small changes can lead to modest savings on your premiums.

a. Paperless Billing. Switching to paperless billing reduces the administrative costs for your insurer, and they may pass some of these savings onto you in the form of a discount.

b. Auto-Pay Discounts. Setting up automatic payments ensures your premiums are paid on time, which can also qualify you for a discount. Plus, it helps you avoid late fees and potential lapses in coverage.

c. Combine Paperless Billing and Auto-Pay. Combining both paperless billing and auto-pay can maximize your discounts. Check with your insurer to see if they offer these savings options.

17. Drive a Car That’s Cheaper to Insure. The car you drive has a direct impact on your insurance premiums. Some cars are cheaper to insure than others, depending on factors like safety ratings, repair costs, and the likelihood of theft.

a. Research Insurance Costs Before Buying. Before purchasing a new car, research its insurance costs. Some vehicles, such as economy cars or sedans, tend to have lower insurance premiums compared to luxury or sports cars.

b. Consider the Total Cost of Ownership. When buying a car, consider the total cost of ownership, including insurance. A car with a lower purchase price might have higher insurance costs, so factor in all expenses when making your decision.

c. Opt for a Vehicle with Lower Repair Costs. Cars with lower repair costs generally have lower insurance premiums. Vehicles with readily available and affordable parts can reduce the overall cost of insuring the car.

Final thoughts

Lowering your car insurance doesn't have to be a daunting task. By following these 17 strategies, you can find ways to reduce your premiums while still maintaining the coverage you need. From shopping around and increasing your deductible to taking advantage of discounts and choosing the right car, there are numerous ways to lower your car insurance costs. Regularly reviewing your policy and staying informed about potential savings opportunities can help you keep more money in your pocket while ensuring you're protected on the road.

Remember, the key to finding the best deal is to stay proactive. Continually assess your insurance needs, explore available discounts, and don't be afraid to switch providers if it means getting a better rate. With a little effort and attention to detail, you can successfully lower your car insurance premiums and enjoy peace of mind knowing you're covered at a price that fits your budget.


Want more videos all about auto?
Subscribe to our YouTube channel👉Cartech Home
Textual description of firstImageUrl

Spongy Brakes: Causes, Solutions, and Prevention

All About Auto Image

If you've ever pressed your brake pedal and noticed that it feels soft or spongy, you're experiencing what’s commonly known as “spongy brakes.” This issue can be unsettling and may indicate a serious problem with your braking system. Spongy brakes can reduce your vehicle's stopping power, compromising your safety on the road. In this comprehensive article, we will delve into what spongy brakes are, the common causes behind them, how to fix the problem, and preventative measures to ensure your brakes remain in top condition.

👉What Are Spongy Brakes?

Spongy brakes refer to a situation where the brake pedal feels unusually soft or mushy when you press it. Instead of the firm resistance that you would normally expect, the pedal may sink closer to the floor with less effort. This phenomenon is a clear sign that something is amiss in your vehicle's braking system, which should be addressed immediately to avoid potential safety risks.

👉The Importance of a Reliable Braking System

Before diving into the specifics of spongy brakes, it's crucial to understand the role of your vehicle's braking system. The braking system is one of the most vital components of your car, directly impacting your ability to control and stop the vehicle safely. It consists of several parts, including the brake pads, rotors, calipers, brake fluid, and the master cylinder. When you press the brake pedal, it activates the hydraulic system, which applies pressure to the brake pads, causing them to clamp down on the rotors and slow the vehicle.

If any part of this system fails or is compromised, it can lead to reduced braking efficiency, increasing the risk of accidents. Spongy brakes are one such indicator that your braking system is not functioning as it should.

👉Common Causes of Spongy Brakes

There are several reasons why your brakes may feel spongy. Understanding these causes can help you identify and address the issue promptly.

1. Air in the Brake Lines. One of the most common causes of spongy brakes is air in the brake lines. The braking system relies on hydraulic pressure to function correctly, and air in the system can significantly disrupt this process. When air gets trapped in the brake lines, it compresses when the brake pedal is pressed, resulting in a soft, spongy feeling.

How does air get into the brake lines?

• Brake Fluid Replacement: If the brake fluid is not properly bled during replacement, air can be introduced into the system.

• Leaking Brake Lines: A small leak in the brake lines can allow air to enter.

• Damaged Components: Worn or damaged components, such as the master cylinder, can also allow air to enter the brake system.

2. Low Brake Fluid. Brake fluid plays a crucial role in your vehicle's braking system. It is responsible for transferring the force from the brake pedal to the brake pads, enabling the vehicle to stop. If the brake fluid level is low, it can cause the brakes to feel spongy.

What causes low brake fluid?

• Leaks: The most common reason for low brake fluid is a leak somewhere in the braking system.

• Worn Brake Pads: As brake pads wear down, more brake fluid is required to compensate for the increased gap, which can lead to a low fluid level.

• Improper Maintenance: Failing to regularly check and top off the brake fluid can also result in low levels.

3. Worn or Damaged Brake Components. Over time, various components of the braking system can wear out or become damaged, leading to spongy brakes. Some of the most common culprits include:

Worn Brake Pads: As brake pads wear down, they become less effective at creating the necessary friction to stop the vehicle. This can result in a spongy feel when you press the brake pedal.

• Damaged Brake Rotors: Damaged or warped rotors can cause uneven braking, leading to a soft brake pedal.

• Faulty Calipers: If the brake calipers are not functioning correctly, they may not apply the necessary pressure to the brake pads, resulting in spongy brakes.

4. Contaminated Brake Fluid. Brake fluid can become contaminated over time, which can affect its ability to transfer hydraulic pressure effectively. Common contaminants include water, dirt, and debris. When brake fluid becomes contaminated, it can lead to a decrease in braking performance and a spongy brake pedal.

How does brake fluid become contaminated?

• Moisture Absorption: Brake fluid is hygroscopic, meaning it absorbs moisture from the air. Over time, this moisture can accumulate and reduce the effectiveness of the brake fluid.

• Dirty Reservoir Cap: A dirty or damaged brake fluid reservoir cap can allow dirt and debris to enter the brake fluid, leading to contamination.

• Improper Maintenance: Failing to regularly flush and replace the brake fluid can result in contamination.

5. Problems with the Master Cylinder. The master cylinder is a critical component of the braking system, responsible for generating the hydraulic pressure needed to operate the brakes. If the master cylinder is failing, it can lead to a loss of pressure, resulting in spongy brakes.

Common master cylinder issues:

• Internal Leaks: Internal leaks within the master cylinder can reduce the pressure applied to the brake system, leading to a soft pedal.

• Worn Seals: The seals inside the master cylinder can wear out over time, allowing brake fluid to bypass the piston and reduce pressure.

6. Leaking Brake Lines. Brake lines are responsible for carrying brake fluid from the master cylinder to the brake calipers. If there is a leak in one of the brake lines, it can result in a loss of hydraulic pressure, leading to spongy brakes.

How do brake lines develop leaks?

• Corrosion: Brake lines are often made of metal, which can corrode over time, especially in areas with harsh weather conditions or where road salt is used.

• Physical Damage: Brake lines can become damaged due to road debris, accidents, or improper installation.

• Aging: As brake lines age, they can become brittle and develop cracks, leading to leaks.

👉Diagnosing Spongy Brakes

If you suspect that your brakes are spongy, it's essential to diagnose the issue as soon as possible. Driving with spongy brakes can be dangerous, as it can significantly reduce your ability to stop the vehicle in an emergency.

1. Visual Inspection. Start by performing a visual inspection of the braking system. Check the brake fluid level in the reservoir, and look for any signs of leaks around the brake lines, calipers, and master cylinder. Inspect the brake pads and rotors for wear and damage.

2. Brake Pedal Test. With the engine off, press the brake pedal several times to see if it feels spongy. If the pedal feels soft or sinks to the floor, it’s a clear sign that something is wrong with the braking system.

3. Brake Fluid Quality. Check the quality of the brake fluid by looking at its color and consistency. Brake fluid should be clear or light amber. If it appears dark, cloudy, or has visible contaminants, it may need to be replaced.

4. Professional Diagnosis. If you are unable to identify the issue yourself, it's best to take your vehicle to a professional mechanic. They can perform a more thorough diagnosis using specialized tools and equipment to pinpoint the exact cause of the spongy brakes.

👉How to Fix Spongy Brakes

Once you've identified the cause of your spongy brakes, it's time to address the issue. Here are some common solutions for fixing spongy brakes:

1. Bleeding the Brake Lines. If air is trapped in the brake lines, bleeding the system can remove the air and restore proper hydraulic pressure. Bleeding the brakes involves opening the bleeder valves on the brake calipers or wheel cylinders and pumping the brake pedal to expel any trapped air.

Steps to bleed the brakes:

1. Locate the Bleeder Valves: The bleeder valves are typically located on the brake calipers or wheel cylinders.

2. Attach a Clear Hose: Attach a clear hose to the bleeder valve and place the other end in a container to catch the brake fluid.

3. Open the Bleeder Valve: Use a wrench to open the bleeder valve slightly.

4. Pump the Brake Pedal: Have an assistant pump the brake pedal several times and then hold it down.

5. Close the Valve: While the pedal is held down, close the bleeder valve to prevent air from re-entering the system.

6. Repeat: Repeat the process for each wheel until no air bubbles are visible in the brake fluid.

2. Replacing Brake Fluid. If the brake fluid is contaminated or low, replacing it can restore proper brake function. It's essential to use the correct type of brake fluid recommended by your vehicle's manufacturer.

Steps to replace brake fluid:

1. Drain the Old Fluid: Use a turkey baster or similar tool to remove the old brake fluid from the reservoir.

2. Refill with Fresh Fluid: Pour fresh brake fluid into the reservoir, making sure not to overfill it.

3. Bleed the Brakes: Bleed the brakes to remove any air that may have entered the system during the fluid replacement.

4. Check for Leaks: After replacing the brake fluid, check for any leaks in the system.

3. Repairing or Replacing Brake Components. If worn or damaged components are causing spongy brakes, repairing or replacing them can restore proper brake function. This may include:

• Replacing Worn Brake Pads: Worn brake pads should be replaced with new ones to ensure proper braking performance.

• Resurfacing or Replacing Rotors: Warped or damaged rotors can be resurfaced or replaced to provide a smooth braking surface.

• Repairing or Replacing Calipers: Faulty calipers should be repaired or replaced to ensure they apply the necessary pressure to the brake pads.

4. Repairing or Replacing the Master Cylinder. If the master cylinder is the source of the problem, it may need to be repaired or replaced. This is a more complex repair that may require the expertise of a professional mechanic.

Steps to replace the master cylinder:

1. Remove the Old Master Cylinder: Disconnect the brake lines and mounting bolts, then remove the old master cylinder.

2. Install the New Master Cylinder: Install the new master cylinder and reconnect the brake lines and mounting bolts.

3. Bleed the Brake System: After replacing the master cylinder, bleed the brake system to remove any air that may have entered during the replacement.

5. Repairing Brake Line Leaks. If a leak in the brake lines is causing spongy brakes, the damaged section of the brake line will need to be repaired or replaced.

Steps to repair a brake line leak:

1. Locate the Leak: Identify the location of the leak in the brake line.

2. Cut Out the Damaged Section: Use a pipe cutter to remove the damaged section of the brake line.

3. Install a New Section: Install a new section of brake line using a flaring tool and fittings.

4. Bleed the Brake System: After repairing the brake line, bleed the brake system to remove any air that may have entered.

👉Preventing Spongy Brakes

While spongy brakes can be a common issue, there are several preventative measures you can take to minimize the risk of experiencing this problem.

1. Regular Brake Maintenance. Regular brake maintenance is essential for keeping your braking system in top condition. This includes:

• Checking Brake Fluid Levels: Regularly check the brake fluid level and top it off if necessary.

• Inspecting Brake Components: Periodically inspect the brake pads, rotors, and calipers for wear and damage.

• Replacing Brake Fluid: Replace the brake fluid as recommended by your vehicle's manufacturer.

2. Promptly Addressing Leaks. If you notice any signs of a brake fluid leak, such as a low fluid level or fluid on the ground, address the issue promptly to prevent air from entering the brake system.

3. Avoiding Contaminants. Keep the brake fluid reservoir clean and ensure the cap is tightly sealed to prevent contaminants from entering the system.

4. Using Quality Brake Parts. When replacing brake components, use high-quality parts that meet or exceed the manufacturer's specifications to ensure reliable braking performance.

5. Driving Carefully. Avoid harsh driving habits, such as sudden stops and aggressive braking, which can cause excessive wear on the braking system and increase the risk of spongy brakes.

💬Final Thoughts

Spongy brakes are a serious issue that can compromise your vehicle's safety and should not be ignored. Understanding the common causes of spongy brakes, how to diagnose the problem, and the steps to fix it can help you maintain a safe and reliable braking system. Regular maintenance, prompt repairs, and using quality brake components are key to preventing spongy brakes and ensuring your vehicle stops safely when you need it to. If you're unsure about any aspect of your braking system, it's always best to consult a professional mechanic who can provide expert advice and service.

Textual description of firstImageUrl

How to Check Tire Pressure: A Simple Guide for Every Driver

All about auto image

Maintaining the correct tire pressure is crucial for your safety and the longevity of your vehicle. Whether you're a seasoned driver or just getting behind the wheel, understanding how to check tire pressure can save you from a variety of issues like poor fuel efficiency, uneven tire wear, and potential blowouts. This guide will walk you through the steps of checking your tire pressure and explain why it’s so important.

👉 Why Tire Pressure Matters

Before diving into how to check tire pressure, it's essential to understand why it matters. Tires are the only part of your car that touches the road, making them a critical component of your vehicle's safety and performance. The correct tire pressure ensures:

1. Safety. Under-in ed tires can overheat and increase the likelihood of a blowout, while over-inflated tires can reduce traction and cause uneven wear.

2. Fuel Efficiency. Properly inflated tires reduce rolling resistance, which means your car doesn’t have to work as hard, leading to better fuel efficiency.

3. Tire Longevity. Keeping your tires at the correct pressure prevents premature wear, saving you money on replacements.

👉What You Need to Check Tire Pressure

To begin, you’ll need a few basic tools:

Tire Pressure Gauge. You can find these at most automotive stores. Digital gauges are typically more accurate, but manual stick gauges work well too.

Owner’s Manual or Driver’s Side Door Jamb Sticker. This will tell you the recommended tire pressure for your vehicle. It’s usually expressed in PSI (pounds per square inch).

👉 Step-by-Step Guide on How to Check Tire Pressure

Here’s a simple, step-by-step guide to help you check your tire pressure:

Step 1: Find the Recommended Tire Pressure

The first step in learning how to check tire pressure is to locate the recommended tire pressure for your vehicle. This information can typically be found in your owner’s manual or on a sticker inside the driver’s side door jamb. The recommended pressure will vary depending on the vehicle and tire type but is usually between 30 and 35 PSI for most passenger cars.

Step 2: Check Tire Pressure When Tires Are Cold

For an accurate reading, check the tire pressure when your tires are cold. Tires heat up as you drive, which increases the pressure inside them. If you’ve been driving for a while, wait at least 30 minutes before checking to ensure the tires have cooled down.

Step 3: Remove the Valve Cap

Locate the valve stem on the tire, which is the small protruding tube where you’ll attach the pressure gauge. Remove the cap from the valve stem and keep it in a safe place.

Step 4: Attach the Tire Pressure Gauge

Press the tire pressure gauge firmly onto the valve stem. You’ll hear a brief hissing sound, which is normal. If you hear a prolonged hiss, it means the gauge isn’t correctly seated, and you should try again. For digital gauges, the reading will appear on the screen. For stick gauges, the measuring stick will pop out to show the PSI.

Step 5: Compare the Reading to the Recommended PSI

Once you’ve got your reading, compare it to the recommended PSI listed in your owner’s manual or door jamb. If the reading is too high, you can release some air by pressing the center pin in the valve stem with a tool (most gauges have this built-in). If the reading is too low, add air until you reach the correct pressure.

Step 6: Check All Four Tires

Repeat the process for all four tires. Don’t forget to check the spare tire, if your car has one. Spare tires are often overlooked, but they’re crucial in an emergency.

Step 7: Reattach the Valve Caps

Once you’ve finished checking the tire pressure, reattach the valve caps to protect the valve stems from dirt and moisture.

👉 Common Mistakes When Checking Tire Pressure

Even when you know how to check tire pressure, it’s easy to make mistakes. Here are some common errors and how to avoid them:

Not Using a Reliable Gauge. A faulty or inaccurate gauge can give you the wrong readings. Make sure your gauge is in good condition, and consider replacing it if it’s old or unreliable.

Ignoring Temperature Differences. Tire pressure can vary with temperature changes. Check your tire pressure more frequently during extreme weather conditions.

Forgetting the Spare Tire. Don’t neglect your spare. It should be checked and inflated to the recommended pressure just like your regular tires.

Over-inflating or Under-inflating. Always follow the manufacturer’s recommended PSI. Over-inflating can make your tires more susceptible to damage from road hazards, while under-inflating can lead to excessive wear and potential blowouts.

How Often Should You Check Tire Pressure?

Knowing how to check tire pressure is only part of the equation. You also need to know when to do it. It’s generally recommended to check your tire pressure at least once a month and before long trips. Regular checks are especially important during seasonal changes, as temperature fluctuations can significantly affect tire pressure.

👉 How to Add Air to Your Tires

If you find that your tire pressure is too low, you’ll need to add air. Most gas stations have air pumps that you can use, often for free or a small fee. Here’s how to add air to your tires:

1. Park Near the Air Pump. Position your vehicle so that the hose can reach all four tires.

2. Remove the Valve Cap. Just like when you checked the pressure, remove the valve cap from the tire.

3. Attach the Air Pump Hose. Connect the hose to the valve stem. Most air pumps have a built-in pressure gauge, so you can monitor the PSI as you add air.

4. Add Air. Start the pump and add air in short bursts, checking the pressure frequently. It’s easy to over-inflate if you’re not careful.

5. Check the Pressure Again. Once you think you’ve added enough air, use your gauge to check the pressure. Adjust as needed until you reach the recommended PSI.

6. Replace the Valve Cap. Once the tire is properly inflated, reattach the valve cap.

💬 Final Thoughts

Understanding how to check tire pressure is a simple but essential skill for every driver. Proper tire maintenance not only ensures your safety on the road but also enhances your vehicle’s performance and efficiency. By regularly checking your tire pressure and maintaining it at the recommended levels, you’ll save money on fuel, extend the life of your tires, and enjoy a smoother, safer ride.

Whether you're a new driver or a seasoned one, keeping this guide handy will help you stay on top of your tire maintenance, ensuring that you're always ready for the road ahead.


Want more videos all about auto?
Subscribe to our YouTube channel👉Cartech Home
Textual description of firstImageUrl

Dead Battery: Causes, Symptoms, Prevention, and Solutions

All about auto image

A dead battery is one of the most common and frustrating issues car owners face. It can happen at the most inconvenient times, leaving you stranded and frustrated. Whether you're in a hurry to get to work or stuck in a parking lot late at night, a dead battery can disrupt your plans and cause unnecessary stress. Understanding what a dead battery is, its causes, symptoms, and how to prevent it can save you from these unexpected moments of frustration.

👉What is a Dead Battery?

A dead battery refers to a car battery that has lost its charge and is unable to start the engine. Car batteries are designed to provide a burst of power to start the engine and to support the electrical components of your vehicle. When a battery loses its ability to hold a charge, it can no longer perform these functions effectively.

A dead battery can result from various factors, such as age, weather conditions, or leaving lights on for too long. Once a battery is dead, the vehicle won't start, and you'll need to jump-start the car, replace the battery, or in some cases, perform more extensive repairs.

👉Causes of a Dead Battery

Understanding the common causes of a dead battery can help you prevent this issue. Here are some of the most frequent reasons your car battery might go dead:

1. Age of the Battery. Car batteries typically last between three to five years. Over time, the battery's ability to hold a charge diminishes, making it more susceptible to dying. If your battery is old, it may be time for a replacement to avoid getting stranded.

2. Extreme Weather Conditions. Both extreme cold and extreme heat can negatively affect a car battery. Cold weather can slow down the chemical reactions inside the battery, making it harder for the engine to start. Hot weather, on the other hand, can cause the battery fluid to evaporate, leading to internal damage.

3. Leaving Electrical Components On. One of the most common causes of a dead battery is accidentally leaving electrical components like headlights, interior lights, or the radio on when the engine is off. These components draw power from the battery even when the car is not running, which can quickly drain the battery.

4. Short Drives. Short trips, especially in stop-and-go traffic, don't give your battery enough time to recharge. If you frequently drive short distances, your battery may not have the chance to regain the charge it lost during startup, leading to a dead battery over time.

5. Faulty Alternator. The alternator is responsible for charging the battery while the car is running. If the alternator is bad or faulty, it won't recharge the battery effectively, which can lead to a dead battery even if you haven't left any lights or electronics on.

6. Corroded or Loose Battery Connections. Corrosion on battery terminals or loose connections can prevent the battery from charging properly. Regularly inspecting and cleaning the battery terminals can help prevent this issue.

7. Parasitic Drain. A parasitic drain occurs when something continues to use power from the battery even after the engine is turned off. This could be due to a malfunctioning component, such as a stuck relay or a faulty wiring system, leading to a dead battery over time.

👉Symptoms of a Dead Battery

Knowing the symptoms of a dead battery can help you diagnose the problem before it leaves you stranded. Here are some common signs that your battery might be on its last legs:

1. Engine Cranks Slowly. If you notice that your engine cranks more slowly than usual when you turn the key, this could be a sign that your battery is low on power. A sluggish start is often a precursor to a dead battery.

2. Dim Lights. Dim or flickering headlights and interior lights can indicate that your battery is struggling to provide enough power. When the battery is near death, the lights may appear noticeably dimmer than usual.

3. Clicking Sound When Turning the Key. If you hear a clicking sound when you turn the key but the engine doesn't start, this is a classic symptom of a dead battery. The clicking noise is the starter motor trying to engage but failing due to insufficient power from the battery.

4. No Electrical Response. If you turn the key and nothing happens—no dashboard lights, no sound from the starter, and no electrical activity—this is a strong indicator that your battery is completely dead.

5. Warning Light on the Dashboard. Many vehicles have a battery warning light on the dashboard. If this light comes on while driving or when you start the car, it could be a sign that your battery is not charging properly.

6. Swollen Battery Case. A swollen or bloated battery case is a physical sign that your battery may be dead or close to it. This swelling is usually due to excessive heat or overcharging and is a serious issue that requires immediate attention.

7. Strange Odor. A dead battery or one that's failing may emit a foul, rotten egg smell. This odor is caused by sulfuric acid leaking from the battery and is a clear sign that your battery needs to be replaced.

👉How to Prevent a Dead Battery

While a dead battery can sometimes be unavoidable, there are several steps you can take to reduce the likelihood of it happening:

1. Regular Battery Maintenance. Regularly inspect your battery for signs of wear, corrosion, and loose connections. Clean the battery terminals with a mixture of baking soda and water to remove any corrosion that might prevent a good connection.

2. Test Your Battery. Many auto parts stores offer free battery testing services. Have your battery tested regularly to ensure it's holding a charge and is in good working condition.

3. Drive Your Car Regularly. If your car sits idle for long periods, the battery can lose its charge. Make sure to drive your vehicle regularly, even if it's just for a short distance, to keep the battery charged.

4. Turn Off Electrical Components. Always double-check that you've turned off all lights, the radio, and other electrical components before leaving your car. This simple step can save your battery from draining unexpectedly.

5. Protect Your Car from Extreme Temperatures. If possible, park your car in a garage or shaded area during extreme temperatures. This can help protect your battery from the harmful effects of both cold and heat.

6. Check the Alternator. Regularly have your alternator checked during routine maintenance. A faulty alternator can lead to a dead battery, so ensuring it's working correctly can prevent future issues.

7. Avoid Short Trips. Try to combine errands into one longer trip rather than making several short ones. This will give your battery more time to recharge between starts.

8. Invest in a Battery Charger. If you frequently leave your car unused for extended periods, consider investing in a battery charger or maintainer. These devices can keep your battery charged when your car is not in use.

👉What to Do If You Have a Dead Battery

If you find yourself with a dead battery, don't panic. There are several steps you can take to get back on the road:

1. Jump-Starting the Car. Jump-starting is the most common solution for a dead battery. To jump-start your car, you'll need a set of jumper cables and another vehicle with a charged battery. Here’s how to do it:

1. Park the working vehicle close to the car with the dead battery.

2. Turn off both vehicles and connect the jumper cables—red to positive terminals, black to negative terminals.

3. Start the working vehicle and let it run for a few minutes.

4. Try starting the car with the dead battery. If it starts, let it run for a while to recharge the battery.

5. Disconnect the cables in the reverse order.

f the car doesn’t start after a few attempts, you may need to replace the battery.

2. Using a Battery Charger. If you have access to a battery charger, you can use it to recharge your dead battery. Follow the charger’s instructions carefully, and make sure to connect the cables to the correct terminals.

3. Calling for Roadside Assistance. If you’re unable to jump-start the car or if you don’t have access to the necessary tools, calling for roadside assistance is a good option. Many insurance plans include this service, or you can contact a local tow company.

4. Replacing the Battery. If your battery is old or has failed completely, replacing it is the best option. Most auto parts stores offer battery replacement services and can help you choose the right battery for your vehicle.

💬Final Thoughts

A dead battery is an inconvenient and often unexpected problem, but it’s one that can be easily managed with the right knowledge and precautions. Understanding the causes and symptoms of a dead battery can help you prevent it from happening in the first place, and knowing what to do if your battery does die can save you time and frustration.

Regular maintenance, careful attention to your vehicle’s electrical components, and being prepared with the right tools and knowledge can keep your car running smoothly and help you avoid the hassle of a dead battery. Whether it’s ensuring your battery connections are clean and tight, testing your battery regularly, or simply being mindful of the weather and how it affects your car, these small steps can make a big difference in the longevity and reliability of your battery.

By staying informed and proactive, you can minimize the chances of finding yourself with a dead battery and enjoy a smoother, more reliable driving experience.


Want more videos all about auto?
Subscribe to our YouTube channel ðŸ‘‰Cartech Home
Textual description of firstImageUrl

Flat Tire Driving Risks: Consequences and Solutions

All about auto image

Flat tire driving is a scenario that most drivers dread, yet many may find themselves in at some point. Whether it's a slow puncture that gradually deflates your tire or an abrupt blowout, knowing how to handle a flat tire situation is crucial for your safety and the longevity of your vehicle. This article delves into the risks, consequences, and necessary steps to take when you're faced with flat tire driving.

👉What Is Flat Tire Driving?

Flat tire driving refers to the act of continuing to drive a vehicle even after one or more of its tires have lost air pressure. This can happen due to a variety of reasons, including punctures, valve stem failures, or tire bead leaks. Regardless of the cause, driving on a flat tire is highly dangerous and can lead to severe consequences.

Common Causes of Flat Tires

Understanding the common causes of flat tires can help you take preventative measures:

1. Punctures by Sharp Objects: Nails, glass, or other sharp objects on the road can puncture your tire, leading to a flat.

2. Underinflation: Tires that are underinflated are more susceptible to damage from potholes, curbs, or road debris.

3. Overloading: Carrying loads beyond your vehicle’s capacity can put excessive pressure on your tires, leading to a blowout.

5. Valve Stem Issues: The valve stem, which is responsible for maintaining air pressure in the tire, can become damaged or corroded, causing air to leak out slowly.

👉The Dangers of Flat Tire Driving

Driving on a flat tire is not just inconvenient; it's dangerous. The following are some of the risks associated with flat tire driving:

1. Loss of Vehicle Control. One of the most immediate dangers of flat tire driving is the loss of control over your vehicle. A flat tire significantly reduces the tire's ability to grip the road, especially during turns or sudden maneuvers. This loss of traction can lead to skidding, especially on wet or slippery surfaces, increasing the likelihood of an accident.

2. Damage to the Tire and Wheel. When you drive on a flat tire, the rubber of the tire can quickly wear down to the point where the wheel rim is in direct contact with the road. This can cause severe damage to both the tire and the wheel. In some cases, the tire may become irreparably damaged, necessitating a complete replacement.

3. Damage to the Suspension and Alignment. Flat tire driving can also cause significant damage to your vehicle's suspension and alignment. The uneven distribution of weight caused by a flat tire puts extra strain on the suspension system, leading to premature wear and potential failure. Additionally, the alignment of your vehicle can be thrown off, causing uneven tire wear and further reducing your vehicle's handling capabilities.

4. Increased Fuel Consumption. Driving on a flat tire increases the rolling resistance of the vehicle, which in turn increases fuel consumption. This means that you’ll end up using more fuel to travel the same distance, leading to higher fuel costs over time.

5. Potential for a Blowout. If you continue to drive on a flat tire, especially at high speeds, there is a significant risk of a blowout. A blowout occurs when the tire’s structural integrity is compromised to the point where it suddenly bursts. This can cause the vehicle to swerve uncontrollably, increasing the risk of a serious accident.

👉What to Do If You Experience a Flat Tire While Driving

Knowing what to do in the event of a flat tire can help you avoid the dangers associated with flat tire driving. Here are the steps you should take:

1. Stay Calm and Avoid Sudden Movements. If you realize you have a flat tire while driving, it’s important to stay calm. Avoid making any sudden movements such as slamming on the brakes or jerking the steering wheel. Instead, maintain a firm grip on the steering wheel and gently reduce your speed.

2. Pull Over to a Safe Location. Once you’ve safely reduced your speed, look for a safe place to pull over. This could be a wide shoulder, a parking lot, or any other area away from traffic. Use your turn signal to indicate your intentions to other drivers, and gradually bring your vehicle to a stop.

3. Turn on Your Hazard Lights. Once you’ve stopped, turn on your hazard lights to alert other drivers to your situation. This is especially important if you’ve had to stop on the side of the road, as it will make your vehicle more visible to passing traffic.

4. Assess the Damage. After you’ve safely pulled over and turned on your hazard lights, it’s time to assess the damage. Carefully exit your vehicle and inspect the flat tire. If the tire is only slightly deflated and the damage appears minor, you may be able to temporarily inflate it using a portable tire inflator. However, if the tire is severely damaged or completely flat, you’ll need to replace it with a spare tire.

5. Replace the Flat Tire with a Spare. If you have a spare tire and the necessary tools, you can replace the flat tire yourself (see How to Change a Flat Tire). First, ensure that your vehicle is on a flat, stable surface. Then, use the jack to lift the vehicle off the ground, and remove the lug nuts using a lug wrench. After removing the flat tire, place the spare tire onto the wheel hub, secure it with the lug nuts, and lower the vehicle back to the ground.

6. Call for Assistance if Needed. If you’re unable to change the tire yourself or if you don’t have a spare, it’s important to call for roadside assistance. Many insurance companies offer roadside assistance as part of their coverage, and there are also third-party services available that can help you get back on the road.

👉Preventative Measures to Avoid Flat Tire Driving

While it’s impossible to completely eliminate the risk of a flat tire, there are several preventative measures you can take to reduce the likelihood of flat tire driving:

1. Regularly Check Tire Pressure. One of the most effective ways to prevent flat tire driving is to regularly check your tire pressure (see How to check tire pressure). Underinflated tires are more susceptible to damage and can lead to a flat tire. Use a tire pressure gauge to check the pressure in each tire at least once a month, and inflate them to the manufacturer’s recommended levels.

2. Inspect Tires for Wear and Damage. Regularly inspecting your tires for signs of wear and damage can help you catch potential issues before they lead to a flat tire. Look for any cuts, cracks, or bulges in the tire, as well as uneven wear patterns. If you notice any of these signs, it’s important to have your tires inspected by a professional.

3. Rotate Tires Regularly. Rotating your tires regularly can help ensure even wear, which can extend the life of your tires and reduce the risk of a flat. Most manufacturers recommended tire rotation interval for tires every 5,000 to 7,500 miles, but it’s a good idea to consult your vehicle’s owner’s manual for specific recommendations.

4. Avoid Overloading Your Vehicle. Overloading your vehicle can put excessive pressure on your tires, increasing the risk of a flat. Be sure to follow the manufacturer’s recommendations for load capacity, and avoid carrying more weight than your vehicle is designed to handle.

5. Drive Carefully. Driving carefully can help you avoid hazards that could lead to a flat tire. Be on the lookout for potholes, sharp objects, and other debris on the road, and try to avoid them whenever possible. Additionally, be cautious when driving over curbs or other obstacles that could damage your tires.

👉The Importance of Having a Spare Tire

Having a spare tire in your vehicle can be a lifesaver in the event of a flat tire. However, it’s important to note that not all spare tires are created equal. There are two main types of spare tires:

1. Full-Size Spare Tires. A full-size spare tire is the same size as the other tires on your vehicle and can be used as a permanent replacement if needed. This type of spare tire is typically found in larger vehicles, such as SUVs and trucks.

2. Compact Spare Tires. Also known as "donuts," compact spare tires are smaller and lighter than full-size spare tires. They are designed for temporary use only and should be replaced with a full-size tire as soon as possible. Compact spare tires are common in smaller vehicles, such as sedans and hatchbacks.

How to Care for Your Spare Tire

Just like your regular tires, your spare tire needs to be properly maintained to ensure it’s ready for use when needed. Here are some tips for caring for your spare tire:

• Check the Pressure Regularly: Spare tires can lose air pressure over time, so it’s important to check the pressure regularly and inflate it to the manufacturer’s recommended levels.

• Inspect for Damage: Periodically inspect your spare tire for signs of damage, such as cuts, cracks, or bulges. If you notice any damage, it’s important to replace the spare tire before you need to use it.

• Know the Age of Your Spare Tire: Tires have a limited lifespan, even if they’re not used. Most manufacturers recommend replacing tires that are more than six years old, so be sure to check the age of your spare tire and replace it if necessary. (see How to Know Age of Tire)

👉When to Replace a Flat Tire

If you’ve experienced a flat tire and have replaced it with a spare, it’s important to have the flat tire inspected and potentially replaced as soon as possible. Here are some signs that it’s time to replace a flat tire:

1. Sidewall Damage. The sidewall of a tire is its weakest point, and damage to the sidewall can compromise the structural integrity of the tire. If your flat tire has sidewall damage, it’s important to replace it immediately.

2. Tread Wear. If the tread on your flat tire is worn down to the point where the tread wear indicators are visible, it’s time to replace the tire. Driving on worn-out tires increases the risk of a blowout and reduces your vehicle’s traction on the road.

3. Punctures in the Shoulder or Sidewall. Punctures in the shoulder or sidewall of a tire are difficult to repair and often require the tire to be replaced. If your flat tire has a puncture in one of these areas, it’s important to replace it with a new tire.

4. Multiple Punctures. If your flat tire has multiple punctures, especially if they are close together, it may be difficult to repair the tire effectively. In this case, it’s usually best to replace the tire to ensure your safety on the road.

The Legal and Financial Implications of Flat Tire Driving

Flat tire driving can have legal and financial consequences, especially if it leads to an accident or damages your vehicle. Here are some of the potential implications:

1. Fines and Penalties. In some jurisdictions, driving on a flat tire may be considered a violation of traffic laws, especially if it endangers other drivers. This could result in fines, penalties, or even points on your driving record.

2. Increased Insurance Premiums. If flat tire driving leads to an accident, your insurance company may increase your premiums. Additionally, if the accident is deemed to be your fault, you may be held liable for damages to other vehicles or property.

3. Cost of Repairs. Driving on a flat tire can cause significant damage to your vehicle, including damage to the wheel, suspension, and alignment. The cost of these repairs can add up quickly, especially if you need to replace the tire as well.

4. Legal Liability. If flat tire driving leads to an accident that causes injury or death, you could be held legally liable for the damages. This could result in a lawsuit, legal fees, and potentially a judgment against you.

Final Thoughts

Flat tire driving is a dangerous and potentially costly situation that every driver should strive to avoid. By understanding the risks associated with flat tire driving and taking preventative measures to reduce the likelihood of a flat, you can help ensure your safety on the road. If you do experience a flat tire, it’s important to know what steps to take to avoid further damage and get back on the road safely. Remember, the best way to avoid the dangers of flat tire driving is to stay vigilant and prepared.


Want more videos all about auto?
Subscribe to our YouTube channel ðŸ‘‰Cartech Home
Textual description of firstImageUrl

Steering Wheel Shakes When Braking

All about auto image

When you experience your steering wheel shaking while braking, it can be a nerve-wracking experience. Not only does it affect the comfort and safety of your driving, but it also indicates that something is wrong with your vehicle. If you've been searching for information on why your steering wheel shakes when braking, you're not alone. This issue is quite common, and understanding its causes, solutions, and how to prevent it is crucial for maintaining your vehicle's performance and safety.

👉 Why Does the Steering Wheel Shake When Braking?

The primary reason your steering wheel shakes when braking is due to issues within your vehicle's braking system or suspension. The shaking or vibrating sensation usually intensifies as you apply the brakes at higher speeds, but it may also be noticeable at lower speeds. Here are the most common reasons behind this problem:

1. Warped Brake Rotors. Warped brake rotors are the most common cause of a steering wheel shaking when braking. Rotors are the discs that your brake pads press against to stop your vehicle. Over time, excessive heat, hard braking, and regular wear can cause these rotors to become uneven or warped. When this happens, the brake pads can no longer make consistent contact with the rotor surface, resulting in the steering wheel vibrating or shaking when you press the brakes.

All about auto image

Solution: If you suspect warped rotors, a professional mechanic can measure the thickness and evenness of your rotors. If they are indeed warped, the rotors may need to be resurfaced or replaced entirely.

2. Worn Brake Pads. Another potential cause of your steering wheel shaking when braking is worn brake pads. As brake pads wear down, they can become uneven, which leads to inconsistent pressure on the brake rotors. This uneven pressure can cause vibrations that are felt through the steering wheel.

Solution: Worn brake pads should be replaced as soon as possible. Not only will this solve the shaking issue, but it will also improve your vehicle's braking performance and safety.

3. Brake Caliper Issues. The brake caliper's job is to squeeze the brake pads against the rotors to create the friction needed to stop the car. If the caliper is sticking or not functioning correctly, it can cause uneven pressure on the rotors, leading to the steering wheel shaking when braking.

Solution: A sticking brake caliper may need to be lubricated, adjusted, or replaced. It's important to address this issue quickly, as it can cause additional wear on your braking system and reduce overall braking effectiveness.

4. Suspension System Problems. The suspension system is designed to keep your tires in contact with the road, and any issues within this system can cause your steering wheel to shake when braking. Worn-out components like ball joints, tie rods, or control arms can lead to instability when braking, which you might feel as a shake or vibration in the steering wheel.

All about auto image
Suspension System

Solution: If the suspension system is the culprit, a thorough inspection by a mechanic is necessary. Worn-out components should be replaced to restore stability and smoothness to your vehicle's braking.

5. Wheel Alignment Issues. Improper wheel alignment can cause your steering wheel to shake when braking. When the wheels are not aligned correctly, the tires can wear unevenly, leading to vibrations when you brake. This issue is often accompanied by a vehicle pulling to one side while driving.

Solution: A professional wheel alignment can correct this issue. It's recommended to have your alignment checked regularly to prevent uneven tire wear and ensure a smooth ride.

6. Tire Problems. Tires that are out of balance, unevenly worn, or have a flat spot can cause your steering wheel to shake when braking. Even a slight imbalance in your tires can lead to noticeable vibrations at certain speeds, especially when you apply the brakes.

Solution: Balancing the tires, rotating them, or replacing worn-out tires can solve the problem. Regular tire maintenance is essential to prevent this and other related issues.

👉 How to Prevent Steering Wheel Shakes When Braking

Preventing your steering wheel from shaking when braking involves regular vehicle maintenance and being mindful of your driving habits. Here are some tips to help you avoid this common issue:

1. Regular Brake Maintenance. Ensure that your brake pads, rotors, and calipers are inspected regularly. Routine brake maintenance can catch issues before they become severe, saving you from more costly repairs down the line.

2. Avoid Hard Braking. Frequent hard braking generates excessive heat, which can warp your rotors over time. Try to anticipate stops and slow down gradually to reduce wear on your braking system.

3. Proper Tire Maintenance.Keep your tires properly inflated, balanced, and rotated. Regularly check for signs of uneven wear and replace tires as needed. Proper tire maintenance not only prevents vibrations but also extends the life of your tires.

4. Wheel Alignment Checks. Regular wheel alignment checks can prevent uneven tire wear and ensure that your vehicle drives smoothly. Misaligned wheels can lead to a host of issues, including the steering wheel shaking when braking.

5. Suspension System Inspections. Have your suspension system inspected during routine maintenance checks. Replacing worn-out components early can prevent the shaking sensation and keep your vehicle's handling crisp and responsive.

👉 When to Seek Professional Help

If you're experiencing a steering wheel shake when braking, it's important to address the issue promptly. Ignoring the problem can lead to more serious damage to your vehicle and compromise your safety on the road.

A professional mechanic will be able to diagnose the exact cause of the vibration and recommend the appropriate repairs. Whether it's resurfacing or replacing rotors, installing new brake pads, or addressing suspension issues, it's crucial to follow through with the necessary repairs to ensure your vehicle is safe to drive.

💬Final Thoughts

A steering wheel shaking when braking is not only an annoying issue but also a potential safety hazard. Understanding the common causes, such as warped brake rotors, worn brake pads, or suspension problems, can help you identify and address the issue quickly. Regular maintenance, careful driving habits, and prompt attention to any unusual vibrations can prevent this problem from occurring and ensure a smooth, safe driving experience.

If you notice that your steering wheel shakes when braking, don't hesitate to seek professional help. Taking action early can prevent further damage and keep your vehicle running smoothly for years to come.


Want more videos all about auto?
Subscribe to our YouTube channel ðŸ‘‰Cartech Home

Textual description of firstImageUrl

How to Check Oil Level: A Complete Guide

All about Auto

When it comes to maintaining your vehicle, one of the most crucial tasks is regularly checking the oil level. This simple yet vital routine can prevent engine damage, improve fuel efficiency, and extend the life of your car. In this comprehensive guide, we will walk you through everything you need to know about "how to check oil level," ensuring your engine remains in optimal condition.

👉Understanding the Importance of Checking Oil Level

Before diving into the step-by-step process of checking the oil level, it’s essential to understand why this task is so important. Engine oil plays a crucial role in your vehicle's operation. It lubricates the engine's moving parts, reduces friction, prevents overheating, and cleans contaminants. Without the proper amount of oil, your engine could suffer serious damage, leading to costly repairs.

Regularly checking the oil level ensures that your engine has enough lubrication to function correctly. If the oil level is too low, it can lead to increased friction, overheating, and ultimately, engine failure. On the other hand, overfilling the oil can cause foaming, leading to inadequate lubrication and potential engine damage.

👉How Often Should You Check the Oil Level?

A common question among vehicle owners is, "How often should I check my oil level?" The answer varies depending on your car's make, model, and driving conditions. However, as a general rule of thumb, it's recommended to check your oil level at least once a month. If you drive long distances frequently, or under severe conditions such as extreme temperatures, dusty environments, or heavy towing, you should check it more often.

It's also a good practice to check the oil level before long trips to ensure your engine is adequately protected throughout your journey.

👉Preparing to Check the Oil Level

Before you begin checking the oil level, it's important to ensure that the car is on level ground. Checking the oil level on an incline can give you inaccurate readings, either showing too much or too little oil.

Here’s what you need to do to prepare:

1. Park on Level Ground. Make sure your car is parked on a flat, level surface. This ensures an accurate reading.

2. Turn Off the Engine. The engine should be turned off and allowed to cool for at least 10-15 minutes. Checking the oil immediately after driving can give you a falsely low reading because some oil will still be circulating in the engine.

3. Gather Your Tools. While checking the oil level is a simple task, having a few basic tools on hand can make the process easier. You'll need a clean rag or paper towel and, if necessary, a flashlight to help you see in the engine bay.

👉Step-by-Step Guide: How to Check Oil Level

Now that you’re prepared, follow these steps to check the oil level accurately:

1. Locate the Dipstick. The dipstick is a long, thin metal rod that extends into the oil pan. It’s usually located near the front of the engine and has a brightly colored handle, often yellow or orange, making it easy to spot. If you’re unsure where the dipstick is located, consult your vehicle’s owner’s manual.

All about auto image

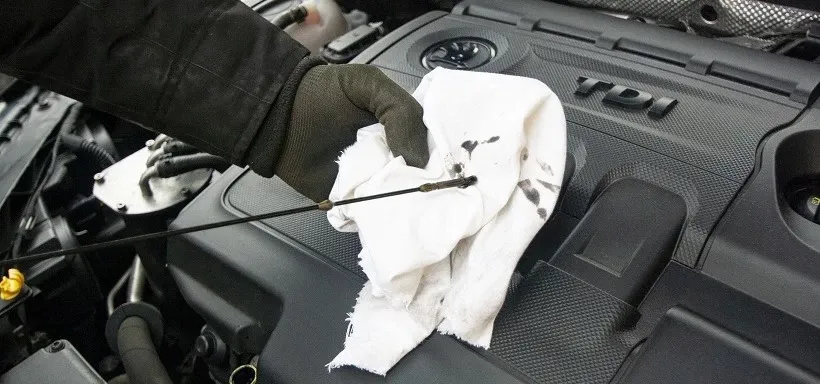
2. Remove the Dipstick and Clean It. Once you've located the dipstick, carefully pull it out from its tube. You'll notice that it's coated in oil, making it difficult to get an accurate reading right away. This is why the next step is crucial: take your clean rag or paper towel and wipe the dipstick from the top to the bottom.

All about auto image

3. Reinsert the Dipstick. After cleaning the dipstick, insert it back into the tube all the way. Make sure it's fully seated, as this ensures you get an accurate reading. Once inserted, pull the dipstick out again carefully.

4. Check the Oil Level. Now that you've pulled the dipstick out for the second time, look closely at the tip. You’ll notice markings on the dipstick, typically consisting of two lines, holes, or a crosshatch pattern. The lower mark indicates the minimum oil level, while the upper mark indicates the maximum. The oil on the dipstick should fall between these two marks.

All about auto image

If the oil level is between the marks, your oil level is good. If it’s below the lower mark, you need to add oil as soon as possible to prevent engine damage. Conversely, if the oil level is above the upper mark, you should remove some oil to avoid potential issues.

5. Inspect the Oil's Condition. While checking the oil level, it's also a good idea to assess the oil's condition. Fresh oil is typically amber or light brown. If the oil appears dark, dirty, or has a burnt smell, it may be time for an oil change. Additionally, if the oil has a milky appearance, it could indicate coolant leakage into the oil, a sign of serious engine problems that require immediate attention.

6. Reinsert the Dipstick. Once you’ve checked the oil level and condition, wipe the dipstick clean again and reinsert it into its tube, ensuring it’s securely in place. This step is often overlooked but is important for keeping the dipstick in good condition and preventing contaminants from entering the engine.

👉Adding Oil If Necessary

If your oil level is low, it’s important to add the correct type and amount of oil to your engine. Here’s how to do it:

1. Consult Your Owner’s Manual: Before adding oil, check your vehicle’s owner’s manual to determine the recommended oil type and viscosity (e.g., 5W-30). Using the wrong oil can harm your engine.

Locate the Oil Filler Cap: The oil filler cap is usually labeled with the word “Oil” or an oil can symbol. It’s typically located on the top of the engine.

Add Oil: Remove the oil filler cap and carefully pour the oil into the engine. Use a funnel to avoid spills. Start by adding a small amount, as it’s easier to add more oil than to remove excess. After adding oil, wait a few minutes to allow the oil to settle in the oil pan, then recheck the level using the dipstick.

4. Recheck the Oil Level: Follow the same steps as before to check the oil level. Ensure the oil level falls between the minimum and maximum marks on the dipstick. If necessary, add more oil until you reach the correct level.

Return the Oil Filler Cap: Once the oil level is correct, return the oil filler cap and ensure it’s securely tightened.

👉Common Mistakes to Avoid

While checking the oil level is a straightforward process, there are a few common mistakes that can lead to inaccurate readings or engine damage. Here’s what to avoid:

1. Not Allowing the Engine to Cool: Checking the oil level immediately after driving can give you a falsely low reading. Always allow the engine to cool for 10-15 minutes before checking the oil level.

2. Not Wiping the Dipstick Clean: Failing to wipe the dipstick clean before rechecking the oil level can result in inaccurate readings. Always wipe the dipstick clean before reinserting it.

3. Overfilling the Oil: Adding too much oil can cause foaming, which leads to inadequate lubrication and potential engine damage. Add oil slowly and check the level frequently to avoid overfilling.

Using the Wrong Oil: Using the incorrect type or viscosity of oil can harm your engine. Always consult your owner’s manual to ensure you’re using the right oil for your vehicle.

Ignoring Oil Condition: Checking the oil level is important, but so is inspecting the oil's condition. Dark, dirty, or milky oil can indicate that your engine needs an oil change or has other issues that need attention.

👉Troubleshooting: What to Do If the Oil Level Is Too Low

If you find that your oil level is consistently low, even after topping it off, it could indicate an underlying issue. Here are some common reasons for low oil levels and what you can do about them:

1. Oil Leaks. One of the most common reasons for low oil levels is an oil leak. Check for oil spots under your car or on the engine. Common places for leaks include the oil pan, valve cover gaskets, and oil filter. If you suspect a leak, it's best to take your vehicle to a mechanic for a thorough inspection and repair.

2. Burning Oil. If your car is burning oil, you may notice blue smoke coming from the exhaust or a decrease in oil levels without visible leaks. Burning oil can be caused by worn piston rings, valve seals, or other internal engine components. This issue requires professional diagnosis and repair.

3. Faulty Oil Filter. A clogged or damaged oil filter can restrict oil flow, leading to low oil levels. If you’ve recently changed your oil and filter, make sure the filter was installed correctly and is functioning properly.

4. High Mileage Engine. As engines age, they can consume more oil due to wear and tear. If you have a high-mileage vehicle, you may need to check the oil level more frequently and top it off as needed. Using high-mileage motor oil can help reduce oil consumption in older engines.

👉The Role of Engine Oil in Vehicle Maintenance

Understanding the role of engine oil in vehicle maintenance is crucial for every car owner. Beyond lubricating moving parts, engine oil also plays several other vital roles:

• Cooling: Engine oil helps dissipate heat from the engine components, preventing overheating and maintaining optimal operating temperatures.

• Cleaning: Oil circulates through the engine, picking up dirt, debris, and metal particles. These contaminants are then trapped in the oil filter, preventing them from causing engine wear.

• Sealing: Engine oil helps seal the gaps between the piston rings and cylinder walls, maintaining compression and preventing the engine from losing power.

• Corrosion Protection: Engine oil contains additives that protect engine components from rust and corrosion, extending the engine's life.

👉How to Prolong Engine Life Through Regular Oil Checks

Regularly checking the oil level is a simple yet effective way to prolong your engine's life. By maintaining the correct oil level and using the right type of oil, you can reduce engine wear, prevent overheating, and avoid costly repairs. Here are some additional tips to help you get the most out of your engine:

1. Follow the Manufacturer's Oil Change Schedule

Every vehicle has a recommended oil change interval, typically based on mileage or time. Following this schedule ensures that your engine always has fresh, clean oil to protect its components.

2. Use High-Quality Oil

Using high-quality motor oil can make a significant difference in your engine's performance and longevity. Look for oils that meet or exceed your vehicle manufacturer’s specifications.

3. Replace the Oil Filter Regularly

The oil filter plays a crucial role in keeping the oil clean and free of contaminants. Replacing the oil filter at every oil change is a good practice to ensure your engine receives clean oil.

4. Address Oil Leaks Promptly

If you notice an oil leak, don't ignore it. Even a small leak can lead to significant oil loss over time, potentially causing engine damage. Have leaks repaired as soon as possible to maintain the correct oil level.

5. Monitor Oil Consumption

If you find that your vehicle is consuming oil more quickly than usual, it’s important to monitor the situation closely. Frequent oil top-offs may indicate an underlying issue that needs to be addressed.

💬Final thoughts: Why Knowing How to Check Oil Level Matters

Knowing how to check the oil level is a fundamental skill that every vehicle owner should possess. It's a quick and easy task that can save you from costly repairs and keep your engine running smoothly. By following the steps outlined in this guide, you can confidently check your oil level, add oil when necessary, and ensure your engine remains in top condition.

Remember, regular maintenance is key to prolonging the life of your vehicle. By making oil checks a routine part of your car care regimen, you’ll be taking a significant step toward protecting your investment and enjoying a reliable, efficient vehicle for years to come.

• Regularly checking the oil level is essential for engine health and performance.

• Always park on level ground and allow the engine to cool before checking the oil.

• Use your vehicle’s owner’s manual to determine the correct type of oil for your engine.

• Avoid common mistakes like overfilling the oil or using the wrong oil type.

• Address any oil leaks or consumption issues promptly to prevent engine damage.

By mastering the process of checking the oil level, you can keep your engine in excellent condition and avoid the headaches of unexpected breakdowns or costly repairs. So, take a few minutes each month to check your oil level—it’s a small task that can make a big difference in your vehicle’s longevity and performance.


Want more videos all about auto?
Subscribe to our YouTube channel ðŸ‘‰Cartech Home
Textual description of firstImageUrl

How to Remove Mildew Smell from Your Car: A Complete Guide

All About Auto Image

Discover effective methods to eliminate mildew smell from your car and keep your interior smelling fresh. Mildew can develop in vehicles due to excess moisture and poor ventilation. Follow these tips to restore your car's interior.

1. Identify the Source of the Mildew. Before tackling the smell, locate the source. Common areas where mildew forms include:

• Carpet and Upholstery: Check for dampness or stains.

• Air Conditioning System: Mildew can grow in the AC ducts.

• Floor Mats and Trunk: Inspect for wet spots or mold growth.

2. Clean the Affected Areas. Thorough cleaning is essential for removing mildew. Here’s how:

• Vacuum Carpets and Upholstery: Use a vacuum with a HEPA filter to remove loose mildew spores.

• Wash Floor Mats: Remove and wash them with soapy water. Allow them to dry completely.

• Clean the Trunk: Remove items, vacuum, and wipe surfaces with a mild cleaner.

3. Use a Mold and Mildew Cleaner. Apply a mold and mildew cleaner specifically designed for automotive use. Follow the instructions on the product label for best results.

4. Address the Air Conditioning System. The AC system can trap moisture and mildew. To clean it:

• Change the Cabin Air Filter: A clogged filter can harbor mildew.

• Use an AC Cleaner: Apply an AC system cleaner to eliminate mildew and odors.

5. Dry Out the Car. Moisture is a key factor in mildew growth. Ensure your car is thoroughly dried:

• Open Windows and Doors: Allow fresh air to circulate.

• Use a Dehumidifier: Place a portable dehumidifier in the car to absorb excess moisture.

• Sunlight Exposure: Park your car in a sunny spot to help dry out damp areas.

6. Deodorize the Interior. To neutralize any lingering odors:

• Baking Soda: Sprinkle baking soda on carpets and upholstery, leave it for a few hours, then vacuum.

• Charcoal: Place activated charcoal in the car to absorb odors.

• Odor Eliminators: Use automotive odor eliminators for a fresh scent.

7. Prevent Future Mildew. Growth To avoid mildew problems in the future:

• Keep the Interior Dry: Regularly check for leaks and fix them promptly.

• Maintain Good Ventilation: Use the air conditioning system and open windows to ensure proper airflow.

• Regular Cleaning: Clean your car’s interior frequently to remove any potential mildew sources.

Conclusion. By following these steps, you can effectively remove mildew smell from your car and keep it smelling fresh. Regular maintenance and vigilance can prevent mildew from becoming a recurring issue.


Want more videos all about auto?
Subscribe to our YouTube channel👉Cartech Home