Cartech - All About Auto

Textual description of firstImageUrl

When to Replace Shocks and Struts Guide for Car Owners

All about auto

Shocks and struts are critical components of your vehicle's suspension system. They play an essential role in ensuring a smooth and comfortable ride, maintaining vehicle stability, and prolonging the life of your tires and other suspension components. However, like all parts of a vehicle, shocks and struts wear out over time and need to be replaced. Knowing when to replace shocks and struts can save you money, enhance safety, and keep your car running smoothly.

๐Ÿ‘‰Understanding the Role of Shocks and Struts

Before diving into when to replace shocks and struts, it's important to understand what they do. Shocks and struts may sound similar, but they serve different functions within the suspension system.

Shocks (Shock Absorbers). Shock absorbers are hydraulic devices designed to absorb and dampen the impact of road conditions. When your vehicle hits a bump, the springs compress, and the shock absorbers dissipate the energy generated by this compression. This prevents the car from bouncing excessively and ensures that your tires remain in contact with the road surface.

Struts. Struts, on the other hand, are structural components of the suspension system. They combine the functions of a shock absorber and a coil spring. In addition to absorbing shock, struts provide structural support to the vehicle's suspension. They help manage the weight of the vehicle, maintain proper alignment, and contribute to steering stability.

๐Ÿ‘‰Signs That Indicate When to Replace Shocks and Struts

Over time, shocks and struts wear down due to constant use, exposure to road conditions, and environmental factors. It's essential to recognize the signs of wear to determine when to replace shocks and struts. Here are some common indicators:

1. Excessive Bouncing or Swaying. One of the most noticeable signs that it's time to replace your shocks and struts is when your vehicle starts to bounce or sway excessively. If you find that your car continues to bounce after hitting a bump or dip in the road, it's a clear indication that your shock absorbers are not functioning correctly. This excessive movement can make your ride uncomfortable and can also compromise your vehicle's handling and stability.

2. Nose Diving During Braking. If you notice that the front of your vehicle dips down or "nose dives" when you apply the brakes, it's a sign that your shocks or struts may be worn out. This occurs because the worn-out shocks or struts cannot adequately support the weight transfer during braking, leading to a loss of control and increased stopping distance.

3. Uneven Tire Wear. Another sign of worn shocks and struts is uneven tire wear. When shocks and struts are in good condition, they help keep the tires firmly on the road, ensuring even tire contact. However, when these components wear out, the tires may not maintain consistent contact with the road surface, leading to uneven wear patterns. This can reduce the lifespan of your tires and affect your vehicle's handling.

4. Leaking Fluid. Shocks and struts are filled with hydraulic fluid that helps them absorb impact. If you notice oil or fluid leaking from your shocks or struts, it's a sign that they may be damaged and need replacement. Leaking fluid reduces the effectiveness of the shocks and struts, leading to poor ride quality and handling.

5. Difficulty Steering. Worn shocks and struts can also make it difficult to steer your vehicle. You may notice that the steering feels loose or that the car pulls to one side when driving. This can be particularly noticeable when driving on uneven or bumpy roads. If you're experiencing difficulty steering, it's crucial to have your shocks and struts inspected and replaced if necessary.

6. Rattling or Knocking Noises. Unusual noises, such as rattling, knocking, or clunking sounds coming from your vehicle's suspension, can also indicate that it's time to replace shocks and struts. These noises can occur when the internal components of the shocks or struts become worn or damaged, leading to metal-on-metal contact.

7. Excessive Body Roll. When taking corners or making sharp turns, you may notice excessive body roll, where the vehicle leans excessively to one side. This is a clear indication that the shocks and struts are no longer able to control the weight transfer effectively, compromising the vehicle's stability and safety.

๐Ÿ‘‰How Often Should You Replace Shocks and Struts?

Now that you know the signs that indicate when to replace shocks and struts, you might be wondering how often these components need to be replaced. The lifespan of shocks and struts can vary depending on several factors, including driving habits, road conditions, and the type of vehicle.

1. Manufacturer Recommendations. Most vehicle manufacturers recommend replacing shocks and struts every 50,000 to 100,000 miles. However, this is just a general guideline. The actual replacement interval can vary depending on how and where you drive your vehicle. For example, if you frequently drive on rough or unpaved roads, your shocks and struts may wear out more quickly.

2. Driving Conditions. Driving conditions play a significant role in determining when to replace shocks and struts. If you regularly drive on smooth highways, your shocks and struts may last longer than if you frequently drive on rough, uneven terrain. Additionally, if you often carry heavy loads or tow a trailer, the added weight can put extra stress on the suspension system, leading to faster wear and tear.

3. Driving Habits. Your driving habits can also impact the lifespan of your shocks and struts. Aggressive driving, such as hard braking, rapid acceleration, and taking corners at high speeds, can put additional strain on the suspension system and cause shocks and struts to wear out more quickly. On the other hand, gentle driving and maintaining a consistent speed can help prolong the life of these components.

4. Vehicle Type. The type of vehicle you drive can also affect how often you need to replace shocks and struts. For example, trucks and SUVs, which are designed for off-road use and heavy loads, may have more durable shocks and struts compared to smaller cars. However, the added weight and rugged use can also lead to faster wear in these vehicles.

๐Ÿ‘‰The Importance of Regular Inspections

To ensure your shocks and struts are in good condition and to determine when to replace them, it's essential to have your vehicle's suspension system regularly inspected by a qualified mechanic. Regular inspections can help identify potential issues early on and prevent more significant problems down the road.

During an inspection, a mechanic will check for signs of wear, such as leaking fluid, damaged components, and excessive movement. They may also perform a "bounce test," where they push down on the vehicle's hood or trunk to see how quickly it returns to its original position. If the vehicle continues to bounce, it may be time to replace the shocks and struts.

๐Ÿ‘‰Consequences of Not Replacing Worn Shocks and Struts

Ignoring the signs that it's time to replace shocks and struts can lead to several negative consequences, including:

1. Reduced Vehicle Control. Worn shocks and struts can significantly reduce your vehicle's control and stability, especially when driving on uneven or bumpy roads. This can make it more challenging to handle the vehicle, particularly in emergency situations, increasing the risk of accidents.

2. Longer Stopping Distances. When shocks and struts are worn out, your vehicle may require a longer distance to come to a complete stop. This is because the worn components cannot effectively manage the weight transfer during braking, leading to increased stopping distances and a higher risk of rear-end collisions.

3. Increased Tire Wear. As mentioned earlier, worn shocks and struts can lead to uneven tire wear. This not only reduces the lifespan of your tires but can also negatively impact your vehicle's handling and fuel efficiency. Replacing tires prematurely can be costly, so it's essential to address suspension issues promptly.

4. Damage to Other Suspension Components. When shocks and struts are worn, they can place additional stress on other suspension components, such as ball joints, control arms, and bushings. This can lead to premature wear and potentially costly repairs. By replacing shocks and struts when needed, you can prevent further damage to the suspension system.

5. Uncomfortable Ride. Perhaps the most noticeable consequence of worn shocks and struts is an uncomfortable ride. Without properly functioning shocks and struts, you'll feel every bump and pothole on the road, leading to a rough and jarring driving experience.

๐Ÿ‘‰The Replacement Process: What to Expect

If you've determined that it's time to replace shocks and struts, you may be wondering what the replacement process entails. Here's an overview of what to expect:

1. Choosing the Right Shocks and Struts. Before the replacement process begins, you'll need to choose the right shocks and struts for your vehicle. It's essential to select components that are compatible with your vehicle's make and model. You can consult your vehicle's owner manual or speak with a qualified mechanic to ensure you choose the correct parts.

2. Professional Installation. While some car owners may attempt to replace shocks and struts themselves, it's generally recommended to have the work done by a professional mechanic. Replacing shocks and struts requires specialized tools and expertise, and improper installation can lead to safety issues and further damage to the suspension system.

3. Alignment Check. After replacing shocks and struts, it's essential to have your vehicle's alignment checked and adjusted if necessary. Replacing these components can affect the vehicle's alignment, and driving with improper alignment can lead to uneven tire wear and handling issues.

4. Test Drive. Once the shocks and struts have been replaced and the alignment has been checked, the mechanic will typically perform a test drive to ensure everything is functioning correctly. During the test drive, the mechanic will check for any unusual noises, handling issues, or other signs that may indicate a problem.

๐Ÿ‘‰Tips for Prolonging the Life of Shocks and Struts

While shocks and struts will eventually wear out and need to be replaced, there are steps you can take to prolong their life and ensure they perform optimally:

1. Drive Carefully. Avoid aggressive driving, such as hard braking, rapid acceleration, and taking corners at high speeds. Gentle driving can reduce the strain on your shocks and struts and help them last longer.

2. Avoid Potholes and Rough Roads. Whenever possible, avoid driving on rough or uneven roads, as these can accelerate wear on your shocks and struts. If you must drive on such roads, reduce your speed to minimize the impact on the suspension system.

3. Regularly Inspect Tires. Regularly check your tires for signs of uneven wear, as this can indicate a problem with your shocks and struts. Maintaining proper tire pressure and rotating your tires can also help prolong the life of your suspension components.

4. Perform Regular Maintenance. In addition to regular inspections by a mechanic, perform routine maintenance on your vehicle's suspension system, including lubricating moving parts and checking for signs of wear or damage.

๐Ÿ‘‰When to Replace Shocks and Struts

Knowing when to replace shocks and struts is crucial for maintaining your vehicle's safety, performance, and comfort. By understanding the signs of wear and tear, following manufacturer recommendations, and taking steps to prolong the life of your suspension components, you can ensure a smooth and safe ride for years to come.

Regular inspections and timely replacement of shocks and struts not only enhance your driving experience but also prevent costly repairs and potential safety hazards. If you're experiencing any of the symptoms mentioned in this article, don't hesitate to have your vehicle's suspension system inspected by a qualified mechanic. Replacing worn shocks and struts may seem like an expense, but it's an investment in your vehicle's longevity and your safety on the road.

Want more videos all about auto?
Subscribe to our YouTube channel๐Ÿ‘‰Cartech Home

Textual description of firstImageUrl

Tread Wear Indicators: The Key to Safe Driving

All about auto image

Tire safety is one of the most critical aspects of vehicle maintenance, and the role of tread wear indicators (TWIs) in this regard cannot be overstated. While the average driver might not give much thought to the grooves on their tires, these seemingly simple patterns play a crucial role in ensuring road safety. The tread on your tires is essential for traction, handling, and overall vehicle performance, and knowing how to monitor it can make a significant difference in driving safety. This article will dive deep into the concept of tread wear indicators, explaining what they are, why they matter, and how to use them to ensure your tires are roadworthy.

๐Ÿ‘‰What is a Tread Wear Indicator?

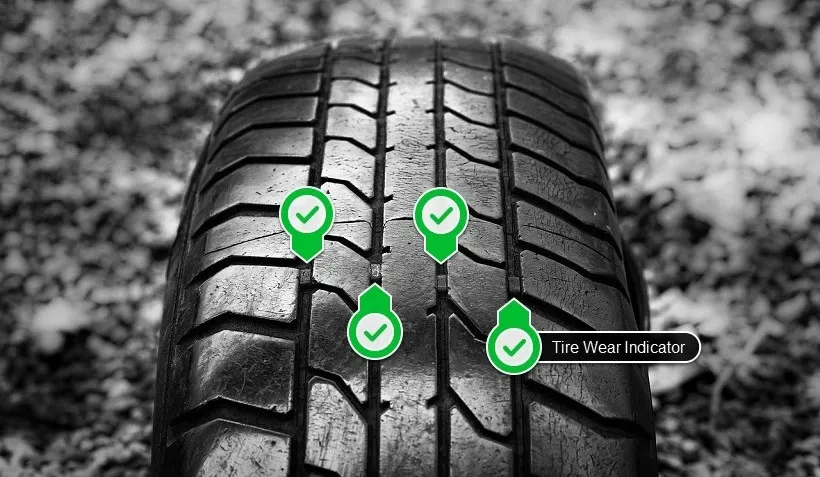
A tread wear indicator is a small raised section or bar of rubber that is embedded in the grooves of a tire’s tread pattern. These indicators are designed to provide a visual cue to drivers when their tires are nearing the end of their safe and effective life. As the tire tread wears down over time, the tread depth decreases, and the wear indicators gradually become more visible. When the tread surface is level with these indicators, it signals that the tire has worn down to a critical point and should be replaced.

The Science Behind Tread Wear Indicators

Tread wear indicators are strategically placed in various locations around the tire, often every 120 degrees around the circumference. They are usually set at a depth of 1.6 millimeters (or about 2/32 of an inch), which is the minimum legal tread depth in many countries, including the United States. This depth is considered the threshold below which a tire is no longer able to effectively grip the road, particularly in wet or slippery conditions.

Historical Context and Development

The concept of tread wear indicators was developed in the early 20th century as a response to increasing automotive safety concerns. Initially, drivers had no reliable way to gauge tire wear other than visually inspecting the tire or using rudimentary tools. As tire technology advanced, manufacturers began incorporating these indicators as a standard feature, providing a simple yet effective method for drivers to monitor tire health.

๐Ÿ‘‰Why Tread Wear Indicators Are Important

The primary purpose of tread wear indicators is to help maintain road safety by providing an easy way for drivers to determine when their tires need replacing. The tread on your tires is responsible for channeling water away from the contact patch (the area of the tire that touches the road) and providing the necessary grip to prevent hydroplaning, skidding, or losing control of the vehicle.

Safety Implications. When the tread wears down, the tire’s ability to perform these functions diminishes, leading to increased stopping distances, reduced handling, and a higher likelihood of accidents. This is particularly dangerous in adverse weather conditions such as rain, snow, or ice, where traction is already compromised. The tread wear indicators act as an early warning system, alerting drivers before their tires reach a dangerously low level of tread.

Legal Requirements. In many jurisdictions, there are legal requirements concerning tire tread depth. For example, in the United States, the Department of Transportation (DOT) mandates that tires must have a minimum tread depth of 1.6 millimeters. Driving on tires with tread below this limit can result in fines, failed vehicle inspections, and even liability in the event of an accident. Tread wear indicators help drivers stay compliant with these laws by providing a clear, visual reference.

Financial Considerations. Beyond safety and legal concerns, maintaining proper tread depth can also have financial benefits. Tires that are replaced before they become dangerously worn can extend the life of your vehicle’s suspension and braking systems, as well as improve fuel efficiency. Worn tires increase rolling resistance, which can lead to higher fuel consumption. By paying attention to tread wear indicators, drivers can replace their tires at the optimal time, potentially saving money in the long run.

๐Ÿ‘‰How to Check Tread Wear Indicators

Checking your tire tread is a simple process that can be done at home with minimal tools. Regularly inspecting your tread wear indicators is an essential part of vehicle maintenance and can help prevent unexpected tire failures.

Visual Inspection. The most straightforward method of checking tread wear indicators is a visual inspection. To do this, park your vehicle on a level surface and turn the steering wheel to one side to expose the tread. Look for the tread wear indicators, which are small bars running perpendicular to the tread grooves. If these bars are flush with the tire's tread surface, it’s time to consider replacing the tire.

All about auto image

The Penny Test. A commonly used method to measure tread depth is the penny test. Although this method doesn’t involve the tread wear indicators directly, it’s a good way to check if your tires are nearing the critical depth. Insert a penny into the tread groove with Lincoln’s head upside down and facing you. If you can see the top of Lincoln’s head, your tread is too worn, and the tire should be replaced. This test gives a rough estimate and should be used in conjunction with checking the tread wear indicators.

Using a Tread Depth Gauge. For a more accurate measurement, you can use a tread depth gauge. This tool is inexpensive and easy to use. Simply insert the probe into the tread groove and press the base of the gauge against the tire. The reading on the gauge will tell you the exact depth of the tread. Compare this measurement to the location of the tread wear indicators to determine whether your tires are still within the safe range.

When to Check Your Tires. It’s recommended to check your tires at least once a month and before long trips. Regular checks can help you catch uneven wear patterns, which might indicate issues with your vehicle’s alignment, suspension, or tire inflation.

๐Ÿ‘‰Common Myths About Tread Wear Indicators

Despite their importance, there are several misconceptions about tread wear indicators and tire maintenance in general. Dispelling these myths can help drivers make more informed decisions about their tire care.

Myth 1: All Tires Have the Same Tread Wear Indicators

Not all tires are created equal. While most passenger car tires have tread wear indicators set at 1.6 millimeters, some performance tires or tires designed for specific conditions (such as winter tires) may have different indicators. Always check the manufacturer’s specifications for your particular tire model.

Myth 2: Tread Wear Indicators Are the Only Measure of Tire Health

While tread wear indicators are an important tool, they are not the only factor to consider when evaluating tire health. Other aspects, such as sidewall damage, punctures, or aging, can also compromise a tire’s integrity. Tires older than six years, regardless of tread wear, may need replacing due to the rubber degrading over time.

Myth 3: Tread Wear Indicators Measure All Types of Wear

Tread wear indicators are designed to measure overall tread depth but may not accurately reflect uneven wear patterns. Uneven wear can occur due to improper alignment, over- or under-inflation, or other mechanical issues. Regular tire rotation and alignment checks are essential to ensure even wear and prolong tire life.

๐Ÿ‘‰The Role of Tread Wear Indicators in Tire Design

Tread wear indicators are not just an afterthought in tire design; they are an integral part of how a tire is engineered. Tire manufacturers spend considerable time and resources designing tread patterns that optimize performance while incorporating effective tread wear indicators.

Tread Design and Performance. The tread pattern on a tire is carefully designed to balance various performance characteristics, including traction, handling, noise, and wear. The placement of tread wear indicators within this pattern must be precise to ensure they are both visible and effective. For example, in a tire designed for wet conditions, the tread wear indicators must be placed in areas that are likely to experience the most wear during hydroplaning situations.

The Impact of New Technologies. Advancements in tire technology continue to improve the effectiveness of tread wear indicators. For instance, some modern tires are equipped with digital tread wear indicators that provide real-time data to the driver, either through a smartphone app or the vehicle’s onboard computer. These systems can alert drivers when their tires are approaching the end of their safe lifespan, making tire maintenance even more straightforward.

Sustainability and Tread Wear Indicators. As environmental concerns grow, tire manufacturers are increasingly focused on sustainability. Tread wear indicators play a role in this by helping drivers maximize the life of their tires, reducing the frequency of replacements, and thus minimizing waste. Some companies are also exploring the use of eco-friendly materials in tread wear indicators, further contributing to the overall sustainability of tire production.

๐Ÿ‘‰How to Extend Tire Life Beyond Tread Wear Indicators

While tread wear indicators are a valuable tool for knowing when to replace your tires, there are steps you can take to extend the life of your tires and delay the need for replacement.

Proper Tire Inflation. Maintaining the correct tire pressure is one of the most important factors in extending tire life. Under-inflated tires cause excessive heat buildup, leading to increased tread wear and a higher risk of blowouts. Over-inflated tires, on the other hand, can cause uneven wear and reduce the tire’s contact patch with the road. Regularly checking and maintaining the recommended tire pressure can significantly extend tire life.

Regular Tire Rotation. Tires wear differently depending on their position on the vehicle. Front tires, for example, often wear faster due to the additional weight of the engine and the demands of steering. Regular tire rotation helps ensure even wear across all tires, extending their overall lifespan. Most manufacturers recommend rotating your tires every 5,000 to 8,000 miles, but you should consult your vehicle’s owner manual for specific guidance.

Wheel Alignment and Balancing. Proper wheel alignment and balancing are crucial for even tire wear. Misaligned wheels can cause the tires to wear unevenly, leading to premature replacement. Signs of misalignment include the vehicle pulling to one side, uneven tread wear, and steering wheel vibration. Regular alignment checks, especially after hitting a pothole or curb, can help prevent these issues.

Avoiding Excessive Speed and Hard Braking. Driving habits also play a role in tire wear. Frequent hard braking, rapid acceleration, and high-speed driving can all accelerate tread wear. By adopting a smoother driving style, you can reduce the strain on your tires and prolong their life.

Regular Inspections. In addition to checking the tread wear indicators, regularly inspect your tires for any signs of damage, such as cuts, punctures, or bulges. Catching these issues early can prevent more serious problems and extend the life of your tires.

๐Ÿ‘‰The Future of Tread Wear Indicators

As automotive technology continues to evolve, so too do tread wear indicators. The future promises even more sophisticated systems designed to improve tire safety and longevity.

Smart Tires and Connected Vehicles. The rise of smart tires, which are equipped with sensors to monitor tire pressure, temperature, and tread depth in real-time, represents a significant advancement in tire technology. These tires can communicate with the vehicle’s onboard systems or directly with the driver through smartphone apps, providing alerts when the tread is nearing its limit or when other maintenance is needed. This level of connectivity not only enhances safety but also simplifies tire maintenance by removing much of the guesswork.

Advanced Materials and Design. Tire manufacturers are also exploring the use of advanced materials and designs that can extend tire life and improve the accuracy of tread wear indicators. For instance, some tires are being developed with self-healing properties, where minor cuts or punctures can seal themselves, reducing the need for immediate replacement. Additionally, new tread patterns are being designed to wear more evenly, making the tread wear indicators more reliable over the life of the tire.

Regulatory Changes and Standards. As governments and regulatory bodies continue to focus on vehicle safety and environmental impact, it is likely that new standards for tread wear indicators will be introduced. These could include stricter guidelines on tread depth, more widespread adoption of digital indicators, or requirements for manufacturers to include more detailed information about tire wear in vehicle manuals.

๐Ÿ‘‰The Essential Role of Tread Wear Indicators

Tread wear indicators are a vital component of tire safety, providing drivers with a simple yet effective way to monitor the condition of their tires. By understanding what these indicators are, how they work, and why they are important, drivers can make informed decisions about tire maintenance and replacement. Regularly checking tread wear indicators, along with other tire care practices such as proper inflation, rotation, and alignment, can help ensure that your tires remain safe and effective for as long as possible.

In a world where automotive technology is rapidly advancing, the humble tread wear indicator remains a cornerstone of tire safety. Whether you’re driving a high-tech electric vehicle or a classic car, these small but significant features are essential for keeping you safe on the road. As you go about your daily driving, take a moment to check your tires and pay attention to those tread wear indicators—they could make all the difference in your safety and the longevity of your tires.

By keeping these points in mind, you can extend the life of your tires, save money, and, most importantly, stay safe on the road. The tread wear indicator is more than just a feature—it’s your first line of defense in maintaining tire safety.

Want more videos all about auto?
Subscribe to our YouTube channel๐Ÿ‘‰Cartech Home

Textual description of firstImageUrl

Tire Rotation Complete Guide: Essential Tips and Benefits

All about auto image

Tire rotation is one of the simplest yet most crucial maintenance tasks for your vehicle. Despite its importance, many drivers overlook or misunderstand the need for regular tire rotation. In this comprehensive guide, we’ll delve into the ins and outs of tire rotation, why it matters, how often it should be done, and the long-term benefits of keeping your tires properly rotated. If you're a car owner looking to extend the life of your tires and improve your vehicle’s performance, understanding tire rotation is essential.

๐Ÿ‘‰What is Tire Rotation?

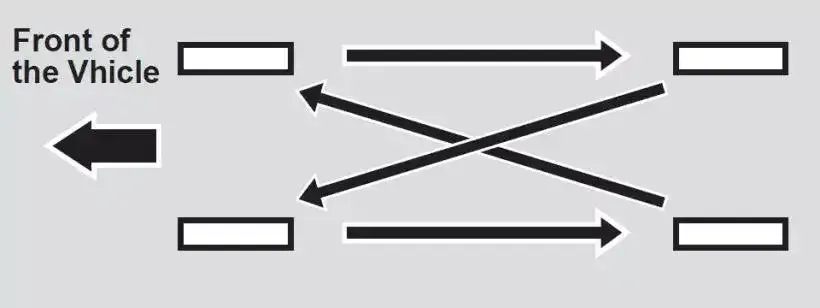
Tire rotation refers to the practice of moving your vehicle’s tires from one position to another to ensure even wear. Typically, this involves swapping the front tires with the rear tires, but it can also include moving the tires diagonally or side-to-side, depending on your vehicle and its drivetrain.

Common Tire Rotation Patterns

All about auto image

1. Front-to-Rear Rotation. This is the most basic tire rotation pattern, where the front tires are moved to the rear and vice versa. This pattern is commonly used for vehicles with the same size tires on both the front and rear.

2. Cross Rotation. In this pattern, the front tires are moved to the rear but also swapped side-to-side. For example, the front left tire might be moved to the rear right position. This pattern is often used for front-wheel-drive vehicles.

3. Rearward Cross. For rear-wheel-drive and 4WD/AWD vehicles, the rear tires are moved to the front, while the front tires are crossed (front left to rear right, and front right to rear left).

4. X-Pattern. This pattern involves crossing all tires diagonally (front left to rear right, front right to rear left) and is often recommended for front-wheel-drive vehicles with non-directional tires.

5. Side-to-Side (Lateral) Rotation. This pattern is used primarily for vehicles with directional tires. The tires are simply swapped from left to right and vice versa, without changing their position front-to-back.

Why Tire Rotation Matters

Tire rotation is essential because it helps ensure that all four tires wear evenly over time. Uneven tire wear can lead to a variety of problems, including reduced fuel efficiency, poor handling, and the need to replace tires sooner than necessary. By regularly rotating your tires, you can maximize their lifespan, save money on tire replacements, and maintain the overall safety and performance of your vehicle.

๐Ÿ‘‰The Importance of Regular Tire Rotation

Regular tire rotation is not just a recommendation; it's a necessity for maintaining the health of your tires and the safety of your vehicle. Here are some key reasons why tire rotation should be a routine part of your vehicle maintenance:

1. Even Tire Wear. One of the primary benefits of tire rotation is promoting even tire wear. Tires wear differently depending on their position on the vehicle. For example, in front-wheel-drive vehicles, the front tires bear more weight and handle the brunt of steering, acceleration, and braking. As a result, they tend to wear out faster than the rear tires. By rotating the tires regularly, you distribute the wear more evenly, extending the life of all four tires.

2. Improved Handling and Safety. Uneven tire wear can negatively impact your vehicle's handling, especially in adverse weather conditions. Worn tires may have reduced traction, which can lead to longer braking distances and a higher risk of skidding or hydroplaning on wet roads. Rotating your tires ensures that all tires maintain optimal tread depth, enhancing your vehicle's grip on the road and improving overall safety.

3. Better Fuel Efficiency. Tires that are worn unevenly or improperly inflated can increase rolling resistance, meaning your engine has to work harder to move the vehicle. This extra effort can reduce your fuel efficiency, leading to more frequent trips to the gas station. Regular tire rotation helps maintain even tread wear and proper tire inflation, both of which contribute to better fuel economy.

4. Extended Tire Lifespan. Tires are a significant investment, and replacing them can be expensive. Regular tire rotation is a cost-effective way to extend the lifespan of your tires. By ensuring even wear, you can delay the need for new tires, saving you money in the long run.

5. Warranty Compliance. Many tire manufacturers require regular rotation as a condition of their warranty. Failing to rotate your tires as recommended can void the warranty, leaving you responsible for the full cost of tire replacement. Adhering to a regular rotation schedule not only protects your tires but also ensures you remain covered under the manufacturer’s warranty.

๐Ÿ‘‰How Often Should You Rotate Your Tires?

The frequency of tire rotation depends on several factors, including your vehicle's drivetrain, driving habits, and the type of tires you have. However, a general rule of thumb is to rotate your tires every 5,000 to 7,500 miles. This interval is often aligned with oil changes, making it convenient to handle both tasks simultaneously.

Drivetrain Considerations

• Front-Wheel Drive (FWD): In FWD vehicles, the front tires experience more wear because they handle most of the braking, steering, and power transfer. It’s crucial to rotate the tires regularly to prevent the front tires from wearing out too quickly.

• Rear-Wheel Drive (RWD): In RWD vehicles, the rear tires receive more power, causing them to wear faster. Rotating the tires ensures even wear across all four tires.

• All-Wheel Drive (AWD) and Four-Wheel Drive (4WD): These vehicles often require more frequent tire rotations due to the power being distributed to all four tires. Keeping the wear even is important to maintain proper handling and performance.

Tire Type and Rotation Interval

• Standard Tires: For most vehicles with standard tires, a rotation every 5,000 to 7,500 miles is sufficient.

• High-Performance Tires: If you have high-performance tires or use your vehicle for spirited driving, you may need to rotate the tires more frequently, every 3,000 to 5,000 miles.

• Off-Road Tires: For vehicles with off-road tires, especially those used in rugged terrains, more frequent rotations are recommended due to the uneven and harsh conditions they face.

๐Ÿ‘‰Signs That Your Tires Need Rotation

While following a regular rotation schedule is ideal, certain signs indicate it might be time to rotate your tires sooner:

1. Uneven Tread Wear. If you notice that the tread on one or more tires is wearing down faster than the others, it’s time for a rotation. Use the penny test: Insert a penny into the tire tread with Lincoln’s head facing down. If you can see the top of Lincoln’s head, your tread is too low, and the tires need attention.

2. Vibrations While Driving. If you feel vibrations in the steering wheel or throughout the vehicle, it could be a sign of uneven tire wear or balance issues. A tire rotation can often resolve these vibrations.

3. Noisy Tires. Tires that are unevenly worn may produce more noise while driving, especially at higher speeds. If your tires are making unusual noises, it’s a good idea to have them checked and possibly rotated.

4. Decreased Fuel Efficiency. If you’ve noticed a drop in your vehicle’s fuel efficiency without any other explanation, uneven tire wear could be the culprit. Regular rotation can help maintain optimal fuel economy.

๐Ÿ‘‰How to Rotate Your Tires: A Step-by-Step Guide

While many drivers prefer to have a professional handle tire rotation, it’s a task that you can do at home with the right tools and a bit of knowledge. Here’s a step-by-step guide to rotating your tires:

Tools You’ll Need

• A car jack and jack stands

• A lug wrench

• A torque wrench (optional but recommended)

• A tire pressure gauge

Step 1: Prepare Your Vehicle. Before you begin, make sure your vehicle is on a flat, level surface. Engage the parking brake and loosen the lug nuts on all four wheels slightly, but do not remove them completely.

Step 2: Lift the Vehicle. Using your car jack, lift one corner of the vehicle and secure it with a jack stand. Repeat this process until all four corners of the vehicle are supported by jack stands. Ensure that the vehicle is stable and that the jack stands are positioned correctly.

Step 3: Remove the Tires. Once the vehicle is lifted and secured, remove the lug nuts and take off each tire. It’s a good idea to mark the tires with chalk or tape to remember their original position.

Step 4: Rotate the Tires. Refer to your vehicle’s manual or the rotation patterns discussed earlier to determine the correct pattern for your vehicle. Move each tire to its new position according to the pattern.

Step 5: Reinstall the Tires. Place each tire onto its new position and hand-tighten the lug nuts. Lower the vehicle back to the ground one corner at a time, then use the lug wrench or torque wrench to fully tighten the lug nuts in a star pattern. This ensures even pressure and helps prevent the wheel from becoming misaligned.

Step 6: Check Tire Pressure. After the tires are reinstalled, use a tire pressure gauge to check the air pressure in each tire. Adjust the pressure to the manufacturer’s recommended level, which can usually be found on a sticker inside the driver’s door or in the vehicle’s manual.

Step 7: Test Drive. Once everything is secured and the tire pressure is correct, take your vehicle for a short test drive. Pay attention to how the vehicle handles and listen for any unusual noises. If everything feels and sounds normal, you’ve successfully rotated your tires!

๐Ÿ‘‰The Role of Tire Rotation in Vehicle Maintenance

Tire rotation is just one aspect of comprehensive vehicle maintenance. To keep your vehicle running smoothly and safely, it’s important to integrate tire rotation into your regular maintenance routine. Here’s how tire rotation fits into the broader context of vehicle care:

1. Aligning Tire Rotation with Oil Changes

One of the easiest ways to remember to rotate your tires is to do it when you get an oil change. Since oil changes are typically recommended every 5,000 to 7,500 miles, this interval aligns well with the recommended tire rotation schedule. Combining these two services saves time and ensures that your tires receive regular attention.

2. Balancing Tires

While rotating your tires, it’s also a good time to have them balanced. Tire balancing ensures that the weight is evenly distributed around the wheel, preventing vibrations and uneven wear. Most tire shops will offer balancing as part of the rotation service.

3. Wheel Alignment

If you notice uneven tire wear despite regular rotations, your vehicle may need a wheel alignment. Alignment issues can cause the tires to wear unevenly, reduce fuel efficiency, and affect handling. It’s a good idea to have your alignment checked if you experience these issues.

๐Ÿ’ฌFinal Thoughts

Tire rotation is a vital yet simple maintenance task that can have a significant impact on your vehicle’s performance, safety, and longevity. By regularly rotating your tires, you can ensure even wear, improve handling, extend the lifespan of your tires, and save money in the long run. Whether you choose to rotate your tires at home or have a professional do it, the benefits of this routine maintenance are undeniable.

Incorporate tire rotation into your regular vehicle care routine, and you’ll enjoy a smoother, safer ride and get the most out of your investment in your tires. Don’t wait until your tires show signs of uneven wear—schedule your next tire rotation today and keep your vehicle running at its best.

Want more videos all about auto?
Subscribe to our YouTube channel๐Ÿ‘‰Cartech Home

Textual description of firstImageUrl

Car Pulls to the Right After Alignment: Causes and Solutions

All about auto image

Having your car pull to the right after an alignment can be frustrating and concerning. You've just invested time and money into getting your wheels aligned, expecting your vehicle to drive straight and true, only to find that it's still veering off course. In this article, we'll explore the reasons behind why a car might pull to the right even after an alignment, the potential solutions to this issue, and tips for preventing it from happening in the future.

๐Ÿ‘‰Understanding Wheel Alignment

Before diving into the reasons why a car pulls to the right after alignment, it’s essential to understand what alignment is and why it’s crucial for your vehicle. Wheel alignment refers to adjusting the angles of the wheels so that they are set to the manufacturer's specifications. Proper alignment ensures that your tires meet the road at the correct angle, that your wheels are pointing straight, and that your tires are centered in the wheel wells.

The Importance of Proper Alignment

Proper wheel alignment affects several aspects of your vehicle's performance, including:

• Tire Wear: Misalignment can cause uneven tire wear, reducing the lifespan of your tires.

• Fuel Efficiency: Misaligned wheels create more rolling resistance, which can decrease your fuel efficiency.

• Handling and Safety: Misalignment can affect your vehicle's handling, making it more difficult to steer and increasing the risk of accidents.

• Comfort: Proper alignment ensures a smoother, more comfortable ride.

Now that we understand the importance of proper alignment, let’s explore why a car might pull to the right even after the alignment has been performed.

๐Ÿ‘‰Common Causes of a Car Pulling to the Right After Alignment

Several factors can cause your car to pull to the right after an alignment. These issues can range from minor problems that are easily fixed to more serious concerns that may require professional attention. Below are some of the most common reasons for this issue:

1. Tire Pressure Imbalance. One of the most common and easily overlooked causes of a car pulling to the right after an alignment is an imbalance in tire pressure. If the tire pressure on the right side of your vehicle is lower than on the left, it can cause the car to pull to the right. This is because the lower-pressure tire has a larger contact patch with the road, creating more rolling resistance and causing the car to veer in that direction.

Solution: Check your tire pressure using a tire gauge and ensure that all four tires are inflated to the manufacturer's recommended pressure. This information can usually be found on a sticker inside the driver's door or in the owner's manual. It's also a good practice to check your tire pressure regularly to avoid similar issues in the future.

2. Uneven Tire Wear. Even if your alignment is perfect, uneven tire wear can still cause your car to pull to the right. Tires that are worn unevenly can affect the balance and handling of your vehicle, leading to a pull in one direction.

Solution: Inspect your tires for signs of uneven wear. If you notice that one tire is more worn than the others, it may need to be replaced. Additionally, rotating your tires regularly can help ensure even wear and prolong the life of your tires.

3. Mismatched Tires. Having mismatched tires on your vehicle can also lead to pulling. Tires that are different in size, brand, or tread pattern can create an imbalance in your vehicle's handling, causing it to pull to one side.

Solution: Ensure that all four tires on your vehicle are the same size, brand, and tread pattern. If you have mismatched tires, consider replacing them with a matching set to eliminate the pull.

4. Brake Issues. Brake issues, particularly problems with the calipers or brake pads, can cause your car to pull to the right. If a brake caliper is sticking or if the brake pads on one side are more worn than the other, it can create uneven braking force, causing the car to pull to the right when you apply the brakes.

Solution: Have your brakes inspected by a professional mechanic. If a sticking caliper or uneven brake pad wear is identified, the faulty components should be repaired or replaced.

5. Suspension Problems. Your vehicle's suspension system plays a crucial role in its alignment and handling. Worn or damaged suspension components, such as control arms, ball joints, or bushings, can affect the alignment and cause the car to pull to the right.

Solution: If you suspect that suspension issues are causing your car to pull to the right, have the suspension system inspected by a qualified mechanic. Replacing worn or damaged components can restore proper alignment and eliminate the pull.

6. Incorrect Alignment Settings. Although you’ve just had an alignment done, there’s still a chance that the alignment settings were not adjusted correctly. The alignment process involves setting the camber, caster, and toe angles to the manufacturer's specifications. If any of these angles are off, it can cause the car to pull to one side.

Solution: If you suspect that the alignment was not done correctly, take your vehicle back to the shop that performed the alignment and ask them to recheck the settings. Ensure that they use a computerized alignment machine that provides accurate and precise measurements.

7. Torque Steer. Torque steer is a phenomenon that occurs in front-wheel-drive vehicles where the car pulls to one side under acceleration. This is often due to differences in the length of the drive shafts or unequal weight distribution between the front wheels. If your car only pulls to the right when accelerating, torque steer could be the culprit.

Solution: Unfortunately, torque steer is a characteristic of some front-wheel-drive vehicles and may not be completely eliminated. However, ensuring that your tires are properly inflated, your alignment is correct, and your suspension components are in good condition can help minimize the effects of torque steer.

8. Road Crown. Many roads are built with a slight slope, known as the crown, to help water drain off the surface. This slope can cause your car to pull slightly to the right, especially if you’re driving on the right side of the road. While this is a natural effect of the road design, it can be more noticeable if your alignment is not perfect.

Solution: If your car only pulls to the right on certain roads, the road crown may be the cause. In this case, there’s not much you can do to eliminate the pull, but you can try driving in the center lane of a multi-lane road to see if the pull is less noticeable.

9. Steering System Issues. Problems with your vehicle's steering system can also cause pulling. A misaligned or worn steering component, such as a tie rod or steering rack, can lead to uneven handling and cause the car to pull to one side.

Solution: Have your steering system inspected by a professional mechanic. If any components are worn or misaligned, they should be repaired or replaced to restore proper steering and eliminate the pull.

10. Alignment Drift. Alignment drift occurs when a vehicle gradually pulls to one side over time, even if the alignment was initially correct. This can happen due to normal wear and tear on suspension and steering components or from driving over potholes, curbs, or rough roads.

Solution: Regularly scheduled maintenance, including alignment checks, can help catch alignment drift early and prevent it from becoming a more significant issue. If you notice your car pulling to one side, have the alignment checked and corrected as needed.

๐Ÿ‘‰How to Diagnose the Cause of Pulling

Diagnosing the cause of your car pulling to the right after alignment can be challenging, but it’s essential to identify the root cause to avoid further damage to your vehicle. Here are some steps you can take to diagnose the issue:

1. Check Tire Pressure: Start by checking the tire pressure on all four tires. Ensure that they are inflated to the recommended pressure levels.

2. Inspect Tires for Uneven Wear: Look for signs of uneven tire wear, such as bald spots or uneven tread depth.

3. Test the Brakes: Pay attention to whether the car pulls to the right only when you apply the brakes. If so, brake issues may be the cause.

4. Drive on Different Roads: Test your vehicle on different types of roads to see if the pull is consistent or varies depending on the road surface.

5. Observe When the Pull Occurs: Notice if the car pulls to the right only when accelerating, braking, or driving at a steady speed. This can help pinpoint whether the issue is related to torque steer, brake problems, or alignment.

Have a Professional Inspection: If you’re unable to identify the cause of the pulling on your own, it’s best to have a professional mechanic inspect your vehicle. They can perform a thorough diagnostic check to determine the exact cause of the issue.

Preventing Your Car from Pulling to the Right

While it’s frustrating to deal with a car that pulls to the right after an alignment, there are steps you can take to prevent this issue from occurring in the first place:

1. Regular Maintenance. Regular vehicle maintenance, including tire rotations, alignment checks, and suspension inspections, can help prevent issues that cause your car to pull to the right. Stay on top of your vehicle's maintenance schedule and address any issues promptly.

2. Avoid Potholes and Rough Roads. Potholes, curbs, and rough roads can damage your vehicle's alignment and suspension components, leading to pulling issues. Whenever possible, avoid driving over these hazards, and if you do hit a pothole or curb, have your alignment checked to ensure it hasn’t been affected.

3. Use Quality Tires. Investing in high-quality, matching tires can help prevent pulling issues. Cheap or mismatched tires can lead to uneven wear and imbalances that cause your car to pull to the right. Additionally, ensure that your tires are properly inflated and rotated regularly.

4. Monitor Your Alignment. If you notice any signs of misalignment, such as uneven tire wear or your car pulling to one side, have your alignment checked immediately. Catching alignment issues early can prevent more severe problems down the road.

5. Pay Attention to Your Brakes. Since brake issues can cause your car to pull to the right, it’s essential to pay attention to any changes in braking performance. If you notice that your brakes are making noise, feel spongy, or cause your car to pull to one side, have them inspected by a professional.

6. Be Mindful of Road Crowns. If you frequently drive on roads with a pronounced crown, be aware that this can cause your car to pull slightly to the right. While this is normal and not necessarily a cause for concern, it’s still a good idea to have your alignment checked regularly to ensure it’s within the proper specifications.

๐Ÿ‘‰When to Seek Professional Help

If you’ve tried the above solutions and your car still pulls to the right after alignment, it’s time to seek professional help. A qualified mechanic can perform a detailed inspection of your vehicle’s alignment, suspension, brakes, and steering system to identify the root cause of the issue. They can also make the necessary repairs to ensure that your vehicle drives straight and true.

What to Expect from a Professional Inspection

During a professional inspection, the mechanic will likely perform the following checks:

• Alignment Check: They’ll recheck the alignment settings to ensure that the camber, caster, and toe angles are within the manufacturer’s specifications.

• Tire Inspection: The mechanic will inspect the tires for signs of uneven wear, proper inflation, and matching sizes and tread patterns.

• Brake Inspection: They’ll check the brake system for any issues, such as sticking calipers or uneven brake pad wear.

• Suspension Inspection: The suspension components will be inspected for wear or damage that could be causing the pulling issue.

• Steering System Check: The mechanic will examine the steering system for any misaligned or worn components.

Once the inspection is complete, the mechanic will recommend the necessary repairs or adjustments to correct the pulling issue. In some cases, the solution may be as simple as rebalancing the tires or adjusting the alignment settings. In other cases, more extensive repairs, such as replacing worn suspension components or repairing the brake system, may be required.

๐Ÿ’ฌFinal Thoughts

Experiencing a car that pulls to the right after an alignment can be frustrating, but it’s a common issue that can usually be resolved with proper diagnosis and maintenance. By understanding the potential causes of this problem and taking steps to prevent it, you can ensure that your vehicle drives straight and true, providing a safer and more comfortable driving experience.

Remember to perform regular maintenance on your vehicle, including tire rotations, alignment checks, and brake inspections, to prevent pulling issues from arising. And if you ever encounter a persistent pull to the right, don’t hesitate to seek professional help to identify and resolve the issue. By staying proactive and addressing problems early, you can keep your car running smoothly and enjoy a more enjoyable driving experience.

By following this comprehensive guide, you'll have a better understanding of why your car might pull to the right after alignment and what you can do to fix and prevent it. Whether it's a simple issue like tire pressure or a more complex problem like suspension damage, addressing the root cause will ensure your car stays on the straight and narrow.


Want more videos all about auto?
Subscribe to our YouTube channel ๐Ÿ‘‰Cartech Home

Textual description of firstImageUrl

Car Pulls to the Left When Braking: Causes and Solutions

All about auto image

When you experience a situation where your car pulls to the left when braking, it can be both alarming and frustrating. This issue not only impacts your driving comfort but also poses a significant safety risk. The key to resolving this problem lies in understanding its causes, diagnosing it accurately, and applying the appropriate solutions.

In this comprehensive guide, we will explore the various reasons why your car might pull to the left when braking, how to diagnose the problem, and what steps you can take to fix it. By the end of this article, you'll have a clear understanding of how to handle this common but concerning issue.

๐Ÿ‘‰ Understanding the Basics: What Does It Mean When a Car Pulls to the Left When Braking?

When you apply the brakes, your vehicle should ideally slow down in a straight line. However, if your car veers to one side—specifically to the left—it indicates an imbalance in the braking system or related components. This imbalance can arise from various factors, each contributing to the uneven braking force applied to the wheels.

๐Ÿ‘‰ Common Causes of a Car Pulling to the Left When Braking

There are several potential reasons why a car pulls to the left when braking. Here are some of the most common causes:

1. Uneven Brake Pad Wear. Brake pads are designed to wear down over time, but they should do so evenly on both sides of the vehicle. If one set of brake pads wears out faster than the other, it can cause the car to pull to one side when braking. This uneven wear can be due to various factors, including caliper issues or driving habits.

How it happens:

• When the brake pads on the left side wear out more quickly than those on the right, the braking force on the left will be stronger. This discrepancy causes the car to pull to the left when you apply the brakes.

Diagnosis:

• Inspect the brake pads on both sides. If one side is noticeably more worn than the other, it's likely the cause of the pulling issue.

Solution:

• Replace the brake pads on both sides to ensure even wear and balanced braking.

2. Sticking Brake Caliper. A sticking brake caliper can also cause your car to pull to the left when braking. The caliper is responsible for pressing the brake pads against the rotor to create the friction needed to stop the vehicle. If a caliper becomes stuck or does not release properly, it can cause continuous or uneven braking pressure.

How it happens:

• A stuck caliper on the left side means the brake pads on that side are constantly in contact with the rotor, even when you're not braking. This leads to the car pulling to the left when you do apply the brakes.

Diagnosis:

• You may notice the car pulling to the left not only during braking but also while driving. The wheel on the affected side might feel hotter than the others after driving.

Solution:

• A stuck caliper usually requires professional repair or replacement. It's important to address this issue promptly to avoid further damage to the braking system.

3. Uneven Tire Pressure. Tire pressure plays a crucial role in maintaining vehicle stability and control. If the tire pressure on the left side is significantly lower than on the right, it can cause the car to pull to the left when braking.

How it happens:

• Lower tire pressure on the left side reduces the tire's ability to grip the road, leading to a pull in that direction during braking.

Diagnosis:

• Check the tire pressure on all four tires. If there's a noticeable difference, especially between the left and right tires, this could be the culprit.

Solution:

• Inflate all tires to the recommended pressure levels as specified in your vehicle's manual. Regularly check tire pressure to prevent this issue from recurring.

4. Misaligned Wheels. Wheel alignment is crucial for ensuring that your vehicle handles properly. If the wheels are out of alignment, it can cause the car to pull to one side when braking or even during normal driving.

How it happens:

• Misaligned wheels cause uneven tire wear and can affect the direction in which your car moves. When you brake, the car might pull towards the side where the wheels are misaligned.

Diagnosis:

• Uneven tire wear is a common sign of misalignment. You might also notice the steering wheel is off-center when driving straight.

Solution:

• wheel alignment service at a professional shop will correct this issue. It's advisable to have your alignment checked regularly, especially after hitting potholes or curbs.

5. Faulty Suspension Components. Your car’s suspension system is designed to keep all four tires in firm contact with the road. If any component of the suspension system, such as the control arms, bushings, or struts, is worn or damaged, it can cause the vehicle to pull to one side.

How it happens:

• A damaged suspension component on the left side might cause the wheel to tilt or change its angle, leading to a pull when you brake.

Diagnosis:

• A visual inspection of the suspension components can reveal wear or damage. However, a professional mechanic may be needed to diagnose the issue accurately.

Solution:

• Replace any faulty suspension components to restore proper handling and braking performance.

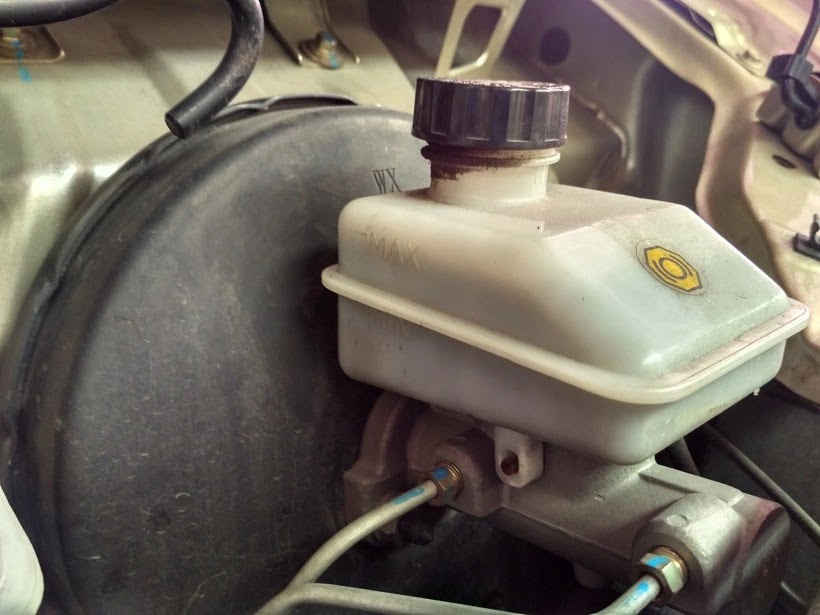
6. Brake Fluid Contamination. Brake fluid is essential for the proper operation of the braking system. If the brake fluid becomes contaminated with moisture, dirt, or debris, it can lead to uneven braking pressure, causing the car to pull to the left when braking.

How it happens:

• Contaminated brake fluid can cause the braking system to function inconsistently, leading to uneven pressure on the brake pads.

Diagnosis:

• Check the color and clarity of the brake fluid. If it's dark or cloudy, it may be contaminated.

Solution:

• A brake fluid flush and replacement will resolve this issue. Ensure that the fluid is changed regularly according to the manufacturer’s recommendations.

7. Worn or Damaged Rotors. Brake rotors are the surfaces that the brake pads clamp onto to stop the vehicle. If a rotor is warped or unevenly worn, it can cause the car to pull to one side when braking.

How it happens:

• A warped rotor on the left side creates uneven braking pressure, leading to a pull in that direction.

Diagnosis:

• A mechanic can measure the rotor’s thickness and check for warping. You might also feel a pulsation in the brake pedal when braking.

Solution:

• Resurfacing or replacing the rotors can resolve this issue. Both rotors should be addressed to ensure even braking.

8. Issues with the Brake Hoses. Brake hoses are responsible for transferring brake fluid from the master cylinder to the brake calipers. If a brake hose becomes damaged or kinked, it can restrict the flow of brake fluid, causing uneven braking.

How it happens:

• A restricted brake hose on the left side can reduce the braking force on that side, causing the car to pull to the left.

Diagnosis:

• Inspect the brake hoses for any visible damage, kinks, or leaks.

Solution:

• Damaged brake hoses should be replaced immediately to restore proper braking function.

๐Ÿ‘‰ Diagnosing the Issue: Steps to Take When Your Car Pulls to the Left When Braking

If your car pulls to the left when braking, it’s important to diagnose the problem correctly before attempting any repairs. Here are some steps you can take:

1. Visual Inspection. Start with a visual inspection of the braking system, tires, and suspension components. Look for any obvious signs of wear, damage, or unevenness. This can help you identify potential issues such as uneven brake pad wear, low tire pressure, or visible damage to the brake hoses or suspension parts.

2. Check Tire Pressure. Use a tire pressure gauge to check the pressure in all four tires. Ensure that the pressure is consistent with the manufacturer's recommendations. Uneven tire pressure is one of the simplest issues to diagnose and fix.

3. Test Drive. Take your car for a test drive on a straight, flat road. Pay attention to how the car behaves when you apply the brakes. Note whether the pull to the left is consistent or if it varies with different levels of braking force.

4. Brake Pad and Rotor Inspection. If you suspect uneven brake pad wear or rotor issues, remove the wheels and inspect the pads and rotors. Look for signs of excessive wear, scoring, or warping. If you're unsure, have a professional mechanic perform the inspection.

5. Check for Sticking Calipers. A sticking caliper can be harder to diagnose without professional tools. However, you can check for signs such as uneven brake pad wear, excessive heat on one wheel, or a burning smell after driving.

6. Seek Professional Help. If you're unable to identify the problem through these steps, it’s best to seek the help of a professional mechanic. They can perform a more thorough inspection and use specialized equipment to diagnose the issue accurately.

๐Ÿ‘‰Solutions and Repairs:

Fixing a Car That Pulls to the Left When Braking:
Once you've identified the cause of the pulling issue, the next step is to apply the appropriate fix. Here’s how to address the various problems that could cause your car to pull to the left when braking:

1. Brake Pad Replacement. If uneven brake pad wear is the issue, replacing the brake pads on both sides of the vehicle should resolve the problem. This ensures that both sides apply equal braking force.

2. Caliper Repair or Replacement. A sticking caliper may require professional repair or replacement. This is not a DIY job for most car owners, as it involves working with the braking system, which is crucial for safety.

3. Tire Pressure Adjustment. If uneven tire pressure is the culprit, inflating the tires to the correct pressure should solve the issue. Regularly check tire pressure to prevent this from happening again.

4. Wheel Alignment. If your wheels are misaligned, a professional alignment service will correct the issue. This not only stops the pulling during braking but also improves overall vehicle handling.

5. Suspension Repair. Worn or damaged suspension components should be replaced by a professional mechanic. This will restore proper vehicle control and prevent the car from pulling to one side.

6. Brake Fluid Flush. Contaminated brake fluid should be flushed out and replaced with fresh fluid. This is usually done as part of regular brake maintenance but can also be done if you suspect fluid contamination.

7. Rotor Resurfacing or Replacement. If the rotors are warped or unevenly worn, they will need to be resurfaced or replaced. This ensures even braking and eliminates the pull to the left.

8. Brake Hose Replacement. If a brake hose is damaged or kinked, it should be replaced immediately. This is a relatively simple and inexpensive fix that can make a big difference in braking performance.

๐Ÿ‘‰ Preventative Maintenance: Keeping Your Braking System in Top Shape

To avoid issues like your car pulling to the left when braking, regular maintenance is key. Here are some tips to keep your braking system and related components in top condition:

1. Regular Brake Inspections. Have your brakes inspected regularly, especially if you notice any changes in braking performance. This can help catch issues like uneven pad wear or rotor damage early.

2. Tire Maintenance. Regularly check and maintain tire pressure, and rotate your tires according to the manufacturer's recommendations. This helps ensure even wear and prevents pulling issues.

3. Wheel Alignments. Get your wheels aligned regularly, particularly if you hit a large pothole or curb. Proper alignment is crucial for vehicle stability and handling.

4. Brake Fluid Checks. Check your brake fluid regularly and have it replaced according to the manufacturer’s schedule. Clean brake fluid is essential for consistent braking performance.

5. Suspension System Inspections. Have your suspension system checked during routine maintenance visits. This can help identify worn or damaged components before they lead to more serious issues.

๐Ÿ’ฌ Final Thoughts

A car that pulls to the left when braking is more than just a minor inconvenience—it’s a potential safety hazard. Understanding the causes, diagnosing the issue, and applying the right solutions are crucial steps in ensuring your vehicle’s safety and reliability.

By following the guidelines in this article, you can address the problem effectively and keep your car performing at its best. Regular maintenance and prompt attention to any issues will help you avoid the discomfort and dangers associated with a car that pulls to the left when braking.

Remember, if you’re ever in doubt about the cause or the best course of action, it’s always best to consult with a professional mechanic. Your safety on the road is paramount, and proper care of your vehicle’s braking system is essential for peace of mind and secure driving.

This comprehensive approach not only ensures your safety but also optimizes your vehicle’s performance, making your driving experience smoother and more enjoyable. By understanding and addressing the issue of your car pulling to the left when braking, you can keep your car in top condition and avoid more serious problems down the road.


Want more videos all about auto?
Subscribe to our YouTube channel ๐Ÿ‘‰Cartech Home

Textual description of firstImageUrl

How to Change a Flat Tire on a Car: A Step-by-Step Guide

All About Auto Image

Getting a flat tire is one of those unfortunate yet inevitable situations that every driver is likely to encounter at some point. Whether you're commuting to work, taking a road trip, or simply running errands around town, a flat tire can happen anytime, anywhere. Knowing how to change a flat tire is an essential skill that can save you time, money, and a lot of frustration. This article will walk you through the steps of changing a flat tire, ensuring you can handle the situation with confidence and ease.

๐Ÿ‘‰ Preparation: What You’ll Need

Before you even start, it’s important to ensure that your vehicle is equipped with the necessary tools. Here’s what you’ll need:

1. Spare Tire. A properly inflated spare tire, also known as a "donut" or full-sized spare, should always be in your trunk.

2. Jack. This is used to lift your car off the ground.

3. Lug Wrench. Also known as a tire iron, this tool is used to remove the lug nuts holding the wheel in place.

4. Wheel Wedges. These are placed in front of or behind the tires to prevent the car from rolling while you’re working.

5. Owner’s Manual. This will provide specific information about your vehicle, including the correct jack points.

๐Ÿ‘‰ How to Change a Flat Tire on a Car

Step 1. Find a Safe Location. The first step in changing a flat tire is to find a safe and level place to pull over. If you're on a busy road, try to find a wide shoulder or a nearby parking lot. Avoid stopping on a curve or in areas with poor visibility. Turn on your hazard lights to alert other drivers, and set the parking brake to prevent the car from moving.

Step 2. Apply the Wheel Wedges. Once you’ve found a safe spot, place the wheel wedges in front of or behind the tires to keep the car from rolling. If the flat tire is at the front, place the wedges behind the rear tires. If the flat is at the back, place them in front of the front tires.

Step 3. Remove the Hubcap or Wheel Cover. If your car has a hubcap or wheel cover, you'll need to remove it before you can access the lug nuts. Use the flat end of your lug wrench to pry off the hubcap. Some cars have special lug nut covers that need to be unscrewed before the hubcap can be removed.

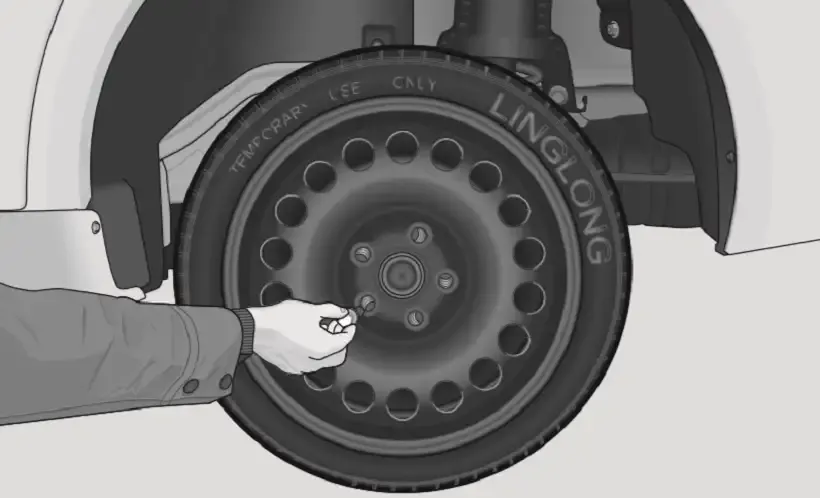
Step 4. Loosen the Lug Nuts. Before lifting the car with the jack, you'll need to loosen the lug nuts. Use the lug wrench to turn the nuts counterclockwise. Don’t remove them completely just yet—just break the initial resistance so they’re easier to remove once the car is off the ground. If the lug nuts are tight, you may need to use your foot or body weight to apply more force.

All about auto image

Step 5. Position the Jack. Refer to your owner’s manual to locate the correct jack points on your vehicle. These are usually reinforced areas of the frame designed to support the weight of the car. Place the jack under the correct point near the flat tire and begin lifting the car. Make sure the jack is on solid, level ground to prevent it from tipping over. Raise the car until the flat tire is about six inches off the ground.

All about auto image

Step 6. Remove the Lug Nuts and the Flat Tire. Once the car is lifted, you can finish removing the lug nuts. Keep them in a safe place, as you’ll need them to secure the spare tire. With the lug nuts removed, carefully pull the flat tire straight off the wheel hub. Place the flat tire under the car as a safety precaution. If the jack fails, the car will land on the tire rather than the ground, which could prevent injury or damage.

Step 7. Mount the Spare Tire. Take your spare tire and align it with the lug bolts. Push the tire onto the wheel hub until it’s snug against the hub. Start threading the lug nuts by hand, tightening them as much as you can. This helps ensure that the tire is properly centered and mounted on the hub.

All about auto image

Step 8. Tighten the Lug Nuts. With the spare tire in place, use the lug wrench to begin tightening the lug nuts. It’s crucial to tighten the nuts in a star or crisscross pattern rather than going around the wheel in a circle. This ensures even pressure on the wheel and prevents it from wobbling. Tighten the lug nuts as much as possible while the car is still lifted.

All about auto image

Step 9. Lower the Car. Once the lug nuts are secure, carefully lower the car back to the ground by slowly turning the jack in the opposite direction. Once the car is fully grounded, remove the jack and give the lug nuts another good tightening to ensure they’re secure.

Step 10. Replace the Hubcap or Wheel Cover. If you removed a hubcap or wheel cover earlier, put it back on the spare tire. If the spare tire is a “donut” type, which is smaller than a regular tire, the hubcap may not fit. In this case, store the hubcap in your trunk until you have the flat tire repaired and reinstalled.

Step 11. Check the Tire Pressure. Before driving off, check the pressure of the spare tire using a tire pressure gauge. Most spare tires require a higher pressure than regular tires—usually around 60 psi. If the tire pressure is too low, drive carefully to the nearest gas station and inflate the tire to the recommended pressure.

Step 12. Stow the Equipment and Flat Tire. After everything is secured, pack away your tools, jack, and wheel wedges. Place the flat tire in your trunk. Don’t forget to take it to a mechanic or tire shop as soon as possible to get it repaired or replaced.

Step 13. Drive Carefully. Spare tires, especially “donuts,” are not designed for long distances or high speeds. They are temporary solutions meant to get you to a tire repair shop. Avoid driving over 50 mph, and try not to exceed 50-70 miles on the spare tire. If your spare is a full-sized tire, you can drive normally, but it’s still a good idea to get your original tire repaired or replaced soon.

๐Ÿ’ฌ Final Thoughts

Changing a flat tire is a skill every driver should have. While it may seem daunting at first, with the right tools and knowledge, you can confidently change a tire and get back on the road in no time. Remember to always stay safe, work carefully, and if you ever feel uncomfortable or unsure, don’t hesitate to call for roadside assistance.

Want more videos all about auto?
Subscribe to our YouTube channel๐Ÿ‘‰Cartech Home

Textual description of firstImageUrl

Ticking Noise From Engine While Driving

All about auto image

A ticking noise from your engine while driving can be concerning for any vehicle owner. This noise can range from a faint tick to a loud, persistent sound, often leading to anxiety about the potential cost of repairs. This article will dive deep into the causes of ticking noise from the engine while driving, guide you on how to diagnose the issue, and provide possible solutions to get your vehicle running smoothly again.

๐Ÿ‘‰ Common Causes of Ticking Noise from Engine While Driving

Understanding the root cause of the ticking noise from the engine while driving is crucial to addressing the issue. Several factors can contribute to this problem, ranging from minor issues that can be easily fixed to more serious mechanical problems requiring professional intervention.

1. Low Engine Oil Levels. One of the most common causes of a ticking noise from the engine while driving is low engine oil levels. Engine oil lubricates the various moving parts within your engine, reducing friction and wear. When oil levels are low, these parts may not receive adequate lubrication, leading to increased friction and, subsequently, a ticking noise.

Solution: Regularly check your engine oil level and top it up as needed. If you notice that your oil levels are consistently low, you might have a leak or your engine might be burning oil, which requires further investigation.

2. Faulty Hydraulic Lifters. Hydraulic lifters, also known as tappets, play a crucial role in ensuring smooth engine operation. They maintain zero clearance between the valve stem and the rocker arm. If the lifters are faulty or worn out, they can cause a ticking noise from the engine while driving, especially during acceleration.

Solution: Replacing faulty hydraulic lifters is usually the best course of action. This job is best left to a professional mechanic, as it requires precise knowledge of engine components.

3. Worn Out Timing Chain or Belt. The timing chain or belt synchronizes the rotation of the crankshaft and camshaft, ensuring that the engine’s valves open and close at the right time. A worn-out or loose timing chain can cause a ticking noise from the engine while driving. This issue is particularly concerning as a broken timing chain can lead to significant engine damage.

Solution: If you suspect your timing chain or belt is the issue, have it inspected by a mechanic immediately. Replacing a worn timing chain or belt is essential to prevent catastrophic engine failure.

4. Exhaust Leaks. An exhaust leak can also be a culprit behind the ticking noise from the engine while driving. When there’s a leak in the exhaust manifold or exhaust pipe, the escaping gases can create a ticking sound that varies with engine speed.

Solution: Inspect the exhaust system for leaks and have any damaged components replaced. Addressing exhaust leaks promptly can prevent further engine damage and improve your vehicle’s performance.

5. Spark Plug Issues. Loose or damaged spark plugs can create a ticking noise from the engine while driving. This noise occurs because the spark plugs are not seated properly, leading to an incomplete combustion process and resulting in a ticking sound.

Solution: Check the spark plugs for signs of wear and ensure they are properly tightened. Replacing old or damaged spark plugs can eliminate the ticking noise and improve engine performance.

6. Fuel Injector Noise. Fuel injectors are responsible for delivering fuel into the engine’s combustion chambers. In some cases, fuel injectors can make a ticking noise from the engine while driving, especially if they are dirty or malfunctioning.

Solution: Using a fuel injector cleaner can help remove deposits and reduce noise. If the issue persists, consider having a professional inspect the fuel injectors for any underlying problems.

7. Worn Engine Bearings. Engine bearings support the movement of the engine's crankshaft and other components. When these bearings wear out, they can produce a ticking or knocking noise from the engine while driving. This is a serious issue that requires immediate attention to prevent engine damage.

Solution: Replacing worn engine bearings is a complex and labor-intensive task that should be performed by a qualified mechanic. Delaying this repair can lead to more severe engine problems and higher repair costs.

๐Ÿ‘‰ Diagnosing the Ticking Noise From Engine While Driving

Diagnosing the cause of the ticking noise from your engine while driving is the first step toward resolving the issue. Here’s a step-by-step guide to help you identify the source of the noise:

1. Check Engine Oil Level. Start by checking the engine oil level. Low oil levels are a common cause of ticking noises. Ensure that your vehicle is on a level surface, and use the dipstick to check the oil level. If it’s low, add the recommended oil type for your vehicle.

2. Listen to the Engine at Idle. Start the engine and listen for the ticking noise while the vehicle is idling. If the noise is present, it could indicate an issue with the hydraulic lifters, timing chain, or a loose component.

3. Rev the Engine. Gradually increase the engine speed and listen for any changes in the ticking noise. A noise that becomes more pronounced with increased engine speed could point to issues with the timing chain or fuel injectors.

4. Inspect the Exhaust System. Examine the exhaust manifold and pipes for any signs of leaks. A small hole or crack can produce a ticking noise, especially under acceleration.

5. Check the Spark Plugs. Inspect the spark plugs for signs of wear or damage. Ensure that they are properly seated and tightened. A loose spark plug can cause a ticking noise that varies with engine speed.

6. Consult a Mechanic. If you’re unable to pinpoint the source of the ticking noise, it’s best to consult a professional mechanic. They have the tools and expertise to accurately diagnose and repair the issue, preventing further damage to your vehicle.

๐Ÿ‘‰ Preventing Ticking Noise From Engine While Driving

Preventive maintenance is key to avoiding ticking noise from the engine while driving. Here are some tips to keep your engine running smoothly:

1. Regular Oil Changes. Ensure that you change your engine oil at the intervals recommended by the manufacturer. Fresh oil helps lubricate engine components and prevents wear and tear that can lead to ticking noises.

2. Timely Spark Plug Replacement. Replace spark plugs according to the manufacturer’s recommendations. Worn or damaged spark plugs can lead to incomplete combustion and ticking noises.

3. Inspect Timing Chain/Belt. Have your timing chain or belt inspected at regular intervals. Replace it as per the manufacturer’s guidelines to prevent noise and potential engine damage.

4. Maintain the Exhaust System. Regularly inspect the exhaust system for leaks or damage. Addressing exhaust issues promptly can prevent ticking noises and improve overall vehicle performance.

5. Use Quality Fuel and Oil. Using high-quality fuel and oil can reduce the likelihood of engine issues. Quality fuel can help keep the fuel injectors clean, while quality oil ensures proper lubrication of engine components.

๐Ÿ’ฌ Final Thoughts

A ticking noise from the engine while driving can be unsettling, but with the right knowledge, it’s possible to diagnose and address the issue effectively. By understanding the common causes, following a systematic diagnostic approach, and adhering to regular maintenance practices, you can keep your engine in optimal condition and enjoy a smooth, noise-free driving experience. If you’re ever in doubt, don’t hesitate to seek the help of a professional mechanic to ensure your vehicle remains in top shape.

Want more videos all about auto?
Subscribe to our YouTube channel๐Ÿ‘‰Cartech Home

Textual description of firstImageUrl

Symptoms of Low Brake Fluid Every Car Owner Needs to Know

All About Auto Image

Brakes are one of the most crucial components of your vehicle. They ensure your safety by allowing you to stop or slow down your car when necessary. However, the effectiveness of your braking system heavily relies on brake fluid. Understanding the symptoms of low brake fluid can help you prevent accidents and costly repairs. This article will focus on the keyword "low brake fluid symptoms" and explain everything an ordinary car owner needs to know.

๐Ÿ‘‰ What is Brake Fluid and Why is it Important?

Brake fluid is a hydraulic fluid that transfers the force from your foot on the brake pedal to the brakes themselves. It plays a critical role in the functioning of your vehicle’s braking system. Without adequate brake fluid, your brakes won’t function correctly, putting you and others on the road at risk.


All About Auto Image

๐Ÿ‘‰ Common Low Brake Fluid Symptoms

Understanding the symptoms of low brake fluid can help you identify problems early and take action before your braking system fails. Here are the most common low brake fluid symptoms you should watch out for:

1. Spongy or Soft Brake Pedal. One of the first low brake fluid symptoms you may notice is a spongy or soft brake pedal. When you press the brake pedal, it should feel firm and responsive. If it feels soft or spongy, it could indicate that there’s not enough brake fluid in the system. This symptom occurs because air gets into the brake lines when fluid levels are low, leading to a decrease in hydraulic pressure.

2. Increased Stopping Distance. If you find that your car is taking longer to stop than usual, it could be a sign of low brake fluid. Brake fluid is essential for generating the necessary pressure to stop your vehicle. When the fluid level is low, the braking system may struggle to generate the required pressure, leading to a longer stopping distance. This is one of the most dangerous low brake fluid symptoms and should be addressed immediately.

3. Brake Warning Light. Modern vehicles are equipped with a brake warning light on the dashboard. This light is designed to alert you to potential issues with your braking system, including low brake fluid levels. If the brake warning light comes on, it’s essential to check the brake fluid level as soon as possible. Ignoring this warning can lead to severe brake failure.

All About Auto Image

4. Noisy Brakes. Another common symptom of low brake fluid is noisy brakes. If you hear a squealing, grinding, or scraping noise when you apply the brakes, it could indicate that the brake pads are not getting enough hydraulic pressure due to low fluid levels. This lack of pressure can cause the brake pads to wear unevenly, leading to noise and potentially more severe damage if left unchecked.

5. ABS Malfunction. The Anti-lock Braking System (ABS) relies on brake fluid to function correctly. If the brake fluid level is low, the ABS may not work as intended, leading to an ABS warning light on your dashboard. An ABS malfunction can be a serious safety issue, especially in emergency braking situations where the ABS is crucial for maintaining control of the vehicle.

๐Ÿ‘‰ Causes of Low Brake Fluid

Understanding the causes of low brake fluid can help you prevent this issue from occurring. Here are some common reasons why your brake fluid might be low:

1. Leaks in the Brake System. Leaks are the most common cause of low brake fluid. Over time, the brake lines, calipers, or master cylinder can develop leaks, leading to a gradual loss of brake fluid. It’s essential to inspect your brake system regularly and address any leaks immediately to prevent a drop in brake fluid levels.

2. Worn Brake Pads. As brake pads wear down, the brake calipers need to extend further to make contact with the rotors. This increased movement can cause the brake fluid level to drop slightly. While this is normal to some extent, severely worn brake pads can lead to a more significant drop in brake fluid levels.

3. Evaporation. Brake fluid can evaporate over time, especially if the brake fluid reservoir cap is not sealed correctly. Although this is less common, it can still lead to low brake fluid levels if not addressed.


๐Ÿ‘‰ How to Check and Maintain Brake Fluid Levels

Regularly checking and maintaining your brake fluid levels is crucial for the proper functioning of your vehicle’s braking system. Here’s how you can do it:

1. Locate the Brake Fluid Reservoir. The brake fluid reservoir is typically located near the back of the engine bay, close to the firewall. It’s usually a small, translucent plastic container with a cap labeled “Brake Fluid.” If you’re unsure where to find it, consult your vehicle’s owner’s manual.


All About Auto Image

2. Check the Fluid Level. Once you’ve located the reservoir, check the fluid level against the “MIN” and “MAX” markings on the side of the container. The brake fluid should be between these two marks. If it’s below the “MIN” mark, you’ll need to add more brake fluid.


All About Auto Image

3. Top Off with the Correct Brake Fluid. If your brake fluid level is low, you’ll need to top it off with the correct type of brake fluid. Most vehicles use DOT 3 or DOT 4 brake fluid, but it’s essential to check your owner’s manual to ensure you’re using the right type. Open the cap carefully, as brake fluid can be corrosive, and pour the fluid into the reservoir until it reaches the “MAX” mark.

4. Inspect for Leaks. After topping off the brake fluid, inspect the brake lines, calipers, and master cylinder for any signs of leaks. If you notice any wet spots or drips, it’s crucial to have your brake system inspected by a professional mechanic.

๐Ÿ’ฌ Final Thoughts

Low brake fluid symptoms are not something to take lightly. A spongy brake pedal, increased stopping distance, brake warning light, noisy brakes, and ABS malfunctions are all signs that your brake fluid level may be low. Understanding these symptoms can help you catch problems early and ensure your vehicle’s braking system remains in top condition.

Regularly checking and maintaining your brake fluid levels is a simple yet effective way to prevent brake failure and keep your vehicle safe on the road. If you’re ever in doubt about your brake fluid levels or notice any of the symptoms mentioned above, don’t hesitate to consult a professional mechanic. Your safety and the safety of others on the road depend on it.


Want more videos all about auto?
Subscribe to our YouTube channel๐Ÿ‘‰Cartech Home