Cartech - All About Auto

Textual description of firstImageUrl

Battery Light Flickers While Driving: Causes and Solutions

All about auto image

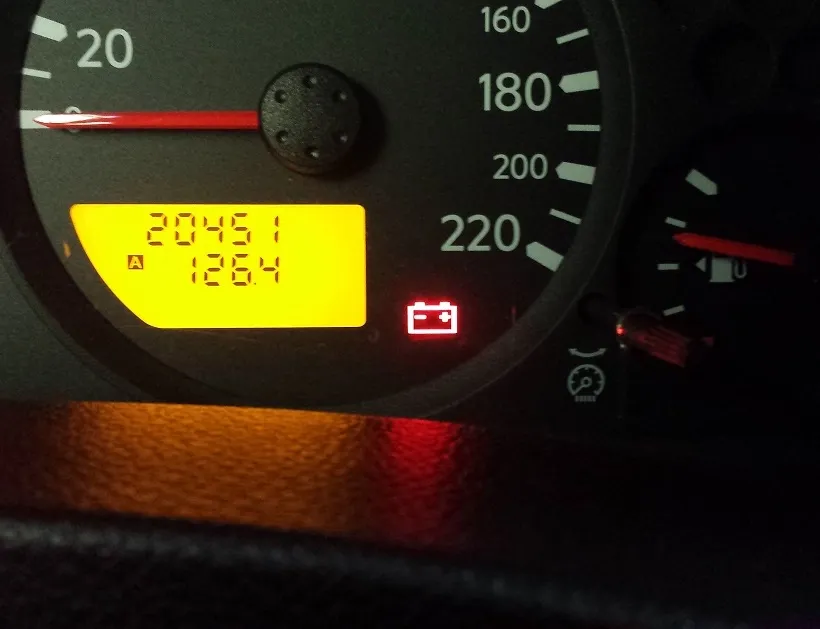
When you're cruising down the road and suddenly notice that the battery light flickers while driving, it's natural to feel a sense of alarm. This warning light is an important indicator that something might be wrong with your vehicle's charging system. In this article, we’ll explore the common reasons why the battery light flickers while driving, the potential consequences of ignoring this issue, and practical steps to address it.

👉 What Does the Battery Light Mean?

The battery light on your dashboard is part of your vehicle’s onboard diagnostics system. When it illuminates or flickers, it's signaling that there's an issue with the electrical system. Typically, this involves the battery or the alternator. If the battery light flickers while driving, it usually indicates that your car's battery isn't being charged properly, which could lead to a breakdown if left unchecked.

👉 Common Reasons Why the Battery Light Flickers While Driving

There are several reasons why the battery light might flicker while you're driving. Understanding these causes can help you diagnose the problem more effectively.

1. Faulty Alternator. The alternator is a crucial component of your vehicle's electrical system. It charges the battery and powers the electrical systems while the engine is running. If the alternator is failing, it may not provide a consistent charge, causing the battery light to flicker while driving. A failing alternator can lead to a completely drained battery, leaving you stranded.

All about auto image
Symptoms of a Faulty Alternator:

• Dim or flickering headlights

• Electrical accessories like the radio or power windows work intermittently

• Strange noises, such as whining or grinding, coming from the engine bay

• The smell of burning rubber or hot wires

2. Worn or Loose Alternator Belt. The alternator belt, sometimes referred to as the serpentine belt, drives the alternator from the engine's crankshaft. If this belt is worn, loose, or slipping, the alternator may not spin fast enough to generate the required power. This can cause the battery light to flicker while driving.

All about auto image
Symptoms of a Worn or Loose Alternator Belt:

• Squealing noise from the engine, especially during acceleration

• Visible wear, cracks, or glazing on the belt

• Intermittent loss of power to electrical systems

3. Poor Battery Connections. Corroded or loose battery terminals can cause an inconsistent electrical connection. This poor connection might result in the battery not receiving a proper charge, which can cause the battery light to flicker while driving.

Symptoms of Poor Battery Connections:

• Difficulty starting the vehicle

• Visible corrosion on the battery terminals

• Intermittent power loss to electrical components

4. Failing Battery

While the alternator is responsible for charging the battery, the battery itself could be the culprit if it’s nearing the end of its life. A failing battery might struggle to hold a charge, causing the battery light to flicker while driving.

Symptoms of a Failing Battery:

• Slow engine crank when starting the car

• Battery age over three to five years

• Swollen or misshapen battery case

• The battery requires frequent jump-starts

5. Electrical System Issues

Sometimes, the issue might not be with the alternator or the battery, but rather with the electrical system as a whole. Faulty wiring, blown fuses, or malfunctioning sensors can all lead to the battery light flickering while driving.

Symptoms of Electrical System Issues:

• Intermittent electrical failures

• Burning smell from wiring

• Unusual behavior of electrical components (e.g., lights, gauges)

👉 Consequences of Ignoring a Flickering Battery Light

Ignoring a battery light that flickers while driving can have serious consequences. Here’s what might happen if the underlying issue isn’t addressed:

1. Complete Battery Drain. If the alternator isn't charging the battery properly, the battery will eventually drain completely. This will leave you stranded, as the engine will no longer start without a functioning battery.

2. Electrical System Failure. A flickering battery light is often a sign that your vehicle's electrical system is under stress. Continued driving without addressing the problem can lead to a complete electrical system failure, affecting everything from your headlights to your power steering.

3. Costly Repairs. What starts as a small issue, like a loose alternator belt, can quickly escalate into a more expensive repair if ignored. For example, a failing alternator can damage the battery and other electrical components, leading to higher repair costs.

👉 How to Fix a Flickering Battery Light

If you notice the battery light flickers while driving, it’s important to take immediate action to prevent a breakdown or further damage to your vehicle. Here’s what you should do:

1. Pull Over Safely. If the battery light is flickering, find a safe place to pull over and turn off the engine. Continuing to drive could lead to the battery dying completely, which would leave you stranded.

2. Check the Battery Connections. Open the hood and inspect the battery terminals for any signs of corrosion or loose connections. Clean any corrosion with a battery terminal cleaner or a mixture of baking soda and water. Tighten any loose connections with a wrench.

3. Inspect the Alternator Belt. Visually inspect the alternator belt for signs of wear, cracks, or looseness. If you notice any issues, it may be time to replace the belt. This is a relatively inexpensive and straightforward repair that can prevent further damage.

4. Test the Battery and Alternator. If you're comfortable doing so, you can use a multimeter to test the voltage of the alternator and battery. With the engine off, a healthy battery should read around 12.6 volts. With the engine running, the alternator should produce between 13.7 and 14.7 volts. If the readings are outside these ranges, you may need to replace the battery or alternator.

5. Seek Professional Help. If you're unable to diagnose or fix the problem yourself, it’s best to take your vehicle to a professional mechanic. They can perform a comprehensive diagnostic test to pinpoint the exact cause of the flickering battery light and recommend the appropriate repairs.

👉 Preventing Future Issues

To prevent the battery light from flickering while driving in the future, regular maintenance is key. Here are some tips:

Regularly Inspect the Battery and Alternator. Check for signs of wear or damage and replace components as needed.

Keep Battery Terminals Clean. Regularly clean the battery terminals to prevent corrosion and ensure a good connection.

Replace Worn Belts. If you notice any signs of wear on the alternator belt, replace it promptly to avoid charging issues.

Monitor Electrical Components. Keep an eye on the performance of your vehicle's electrical components and address any issues immediately.

💬 Final Thoughts

When the battery light flickers while driving, it’s a clear sign that something is amiss with your vehicle’s electrical system. By understanding the potential causes and taking prompt action, you can prevent more serious issues down the road. Whether it’s a simple fix like tightening a loose connection or a more complex repair like replacing the alternator, addressing the problem early can save you time, money, and frustration. If you're unsure about the cause, don’t hesitate to seek professional assistance to keep your car running smoothly.


Want more videos all about auto?
Subscribe to our YouTube channel ðŸ‘‰Cartech Home
Textual description of firstImageUrl

Steering Wheel Vibration at High Speeds Causes and Solutions

All about auto image

If you’ve ever noticed your steering wheel vibrating at high speeds, you’re not alone. This common issue can be both annoying and concerning. A vibrating steering wheel isn't just uncomfortable; it could be a sign of underlying problems that, if left unchecked, may lead to more serious and costly repairs. This article will explore the potential causes, the consequences of ignoring the problem, and practical solutions to help you resolve the issue of steering wheel vibration at high speeds.

👉 Understanding Steering Wheel Vibration at High Speeds

Steering wheel vibration at high speeds can occur due to various factors. These vibrations can start as a slight annoyance and may become more pronounced as the speed increases. Typically, the vibration is felt through the steering wheel and sometimes through the entire vehicle. The causes can range from simple issues like wheel balancing to more complex problems like suspension or drivetrain components.

👉 Common Causes of Steering Wheel Vibration at High Speeds

Wheel Balancing Issues. One of the most common causes of steering wheel vibration at high speeds is unbalanced wheels. When wheels are not balanced properly, the uneven distribution of weight causes the wheels to spin unevenly, leading to vibrations. This issue is more noticeable at higher speeds because the rotational force amplifies any imbalance.

Tire Problems. Tires are another frequent culprit behind steering wheel vibrations. Worn-out or damaged tires, uneven tire wear, or tires with flat spots can all contribute to vibrations. Additionally, if the tires are not inflated to the recommended pressure, it can lead to uneven contact with the road surface, resulting in vibrations.

Wheel Alignment. Poor wheel alignment is another common cause of steering wheel vibration at high speeds. When the wheels are not aligned correctly, they don’t point in the same direction, causing uneven tire wear and vibrations. Misalignment often occurs after hitting a pothole, curb, or due to general wear and tear.

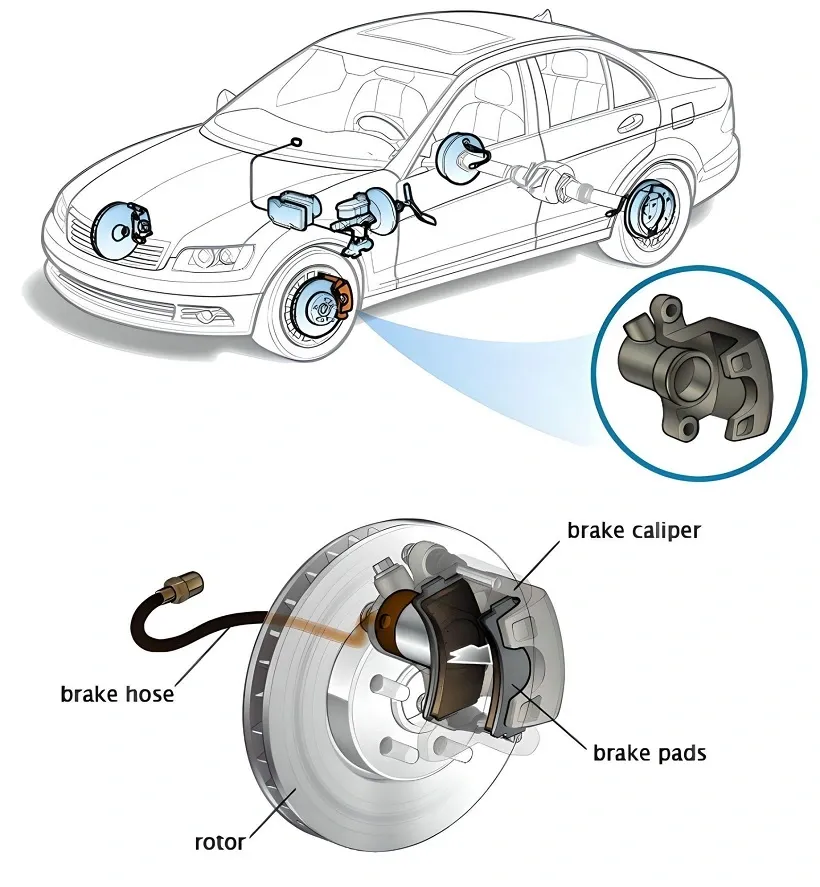
Brake Issues. While more commonly noticed during braking, certain brake issues can cause steering wheel vibrations at high speeds. Warped brake rotors, for example, can create vibrations as the rotor surfaces unevenly contact the brake pads. This is more noticeable when brakes are applied but can also cause issues at high speeds even when the brakes are not engaged.

Suspension System Problems. The suspension system plays a critical role in maintaining a smooth and stable ride. Worn or damaged suspension components like shocks, struts, and bushings can lead to steering wheel vibrations, especially at higher speeds. The suspension system is designed to absorb bumps and irregularities in the road, but if any component is compromised, it can result in a less stable ride and noticeable vibrations.

Drive Shaft and Axle Issues. For vehicles with rear-wheel or all-wheel drive, problems with the drive shaft or axles can lead to steering wheel vibrations at high speeds. If the drive shaft is bent or imbalanced, or if the CV (constant velocity) joints are worn, the rotational movement can cause vibrations that are transferred to the steering wheel.

Wheel Bearings. Worn or damaged wheel bearings can also cause steering wheel vibrations at high speeds. The wheel bearings allow the wheels to spin freely with minimal friction, but if they become worn or damaged, it can result in a rough ride and vibrations.

Consequences of Ignoring Steering Wheel Vibration at High Speeds

Ignoring steering wheel vibration at high speeds can lead to several negative consequences. What might start as a minor issue can quickly escalate into something more severe.

Increased Wear and Tear. Vibrations can cause excessive wear and tear on various vehicle components, including tires, suspension, and steering systems. This can lead to costly repairs if the issue is not addressed promptly.

Reduced Handling and Stability. A vibrating steering wheel can reduce your ability to handle the vehicle effectively, especially at high speeds. This can compromise your safety, as you may have less control over the vehicle during emergency maneuvers.

Fuel Efficiency. If the wheels or tires are not functioning correctly, it can lead to decreased fuel efficiency. Uneven tire wear, poor alignment, and other related issues can cause the engine to work harder, consuming more fuel.

Potential for Accidents. In severe cases, steering wheel vibrations at high speeds can contribute to accidents. For example, if a suspension component fails or a tire blows out, it can cause the driver to lose control of the vehicle, leading to a potential crash.

👉 How to Fix Steering Wheel Vibration at High Speeds

If you’re experiencing steering wheel vibration at high speeds, it’s important to address the issue as soon as possible. Here are some steps you can take to fix the problem:

Get Your Wheels Balanced. The first step is to have your wheels balanced. This simple procedure involves adding small weights to the wheel to ensure that it spins evenly. Most auto repair shops offer wheel balancing services, and it’s a relatively inexpensive fix.

Check and Rotate Your Tires. Inspect your tires for any signs of wear or damage. If the tires are worn unevenly, you may need to rotate them or replace them entirely. Also, make sure that the tires are inflated to the recommended pressure.

Get a Wheel Alignment. If your wheels are not aligned correctly, you’ll need to get a wheel alignment. This procedure involves adjusting the angles of the wheels so that they are set to the manufacturer’s specifications. A proper wheel alignment can prevent uneven tire wear and eliminate vibrations.

Inspect the Brakes. Have a mechanic inspect your brake system, especially if you notice vibrations when braking as well as at high speeds. If the brake rotors are warped, they may need to be resurfaced or replaced.

Check the Suspension System. If you suspect that the suspension system is the cause of the vibration, have a professional mechanic inspect it. They can identify any worn or damaged components and replace them as needed.

Inspect the Drive Shaft and Axles. For vehicles with rear-wheel or all-wheel drive, a mechanic should inspect the drive shaft and axles for any signs of damage or wear. Replacing or repairing these components can eliminate vibrations.

Check the Wheel Bearings. If the wheel bearings are worn or damaged, they will need to be replaced. This can be done by a professional mechanic to ensure that the wheels spin freely without causing vibrations.

👉 Preventing Steering Wheel Vibration at High Speeds

To prevent steering wheel vibration at high speeds, regular vehicle maintenance is key. Here are some tips:

Regular Tire Maintenance. Regularly check your tire pressure, rotate your tires, and have them balanced. Replace tires when they are worn out to ensure a smooth and safe ride.

Wheel Alignment. Have your wheel alignment checked periodically, especially after hitting a pothole or curb. This will prevent uneven tire wear and reduce the risk of vibrations.

Brake System Maintenance. Regularly inspect your brake system and replace components as needed. Warped rotors can cause vibrations, so make sure they are in good condition.

Suspension and Steering System Checks. Periodically have your suspension and steering systems inspected by a professional mechanic. Addressing any issues early can prevent more serious problems down the road.

💬 Final Thoughts

Steering wheel vibration at high speeds is not an issue to be ignored. While it may start as a minor annoyance, it can quickly escalate into a more serious problem that affects your vehicle’s safety and performance. By understanding the potential causes, taking steps to fix the issue, and performing regular maintenance, you can ensure a smooth and safe driving experience. If you notice your steering wheel vibrating at high speeds, don’t delay – take action to address the problem and enjoy a more comfortable ride.


Want more videos all about auto?
Subscribe to our YouTube channel ðŸ‘‰Cartech Home
Textual description of firstImageUrl

Car Overheating when Accelerating

All about auto image

Car overheating when accelerating is a common problem that can lead to serious damage if not addressed promptly. The issue of "car overheating when accelerating" is something that many drivers may experience, but not everyone understands why it happens or how to prevent it. This article will dive into the causes of this problem, offer some preventative measures, and suggest solutions that will help keep your vehicle running smoothly.

👉 Understanding the Basics of Car Overheating

Before we delve into why your car might be overheating when you accelerate, it's important to understand what happens during overheating. Overheating occurs when the engine temperature exceeds the normal operating range. The engine's cooling system is designed to dissipate heat, but when it fails, the temperature rises, potentially causing severe damage to the engine and other components.

👉 Why Does a Car Overheat When Accelerating?

Several factors can cause a car to overheat when accelerating. Understanding these causes can help you identify the problem early and take the necessary steps to prevent further damage.

1. Insufficient Coolant Levels. Coolant is essential for regulating the engine's temperature. If the coolant level is low, there won't be enough fluid to absorb the engine's heat, leading to overheating. This problem can become more pronounced when accelerating, as the engine works harder and generates more heat. Always check your coolant levels regularly and top up if necessary to avoid this issue.

2. Faulty Thermostat. The thermostat controls the flow of coolant through the engine. If it's stuck in the closed position, the coolant won't circulate properly, causing the engine to overheat. During acceleration, the demand on the engine increases, and if the thermostat isn't functioning correctly, the temperature can rise quickly.

3. Clogged Radiator. The radiator plays a crucial role in cooling the engine. Over time, debris and dirt can accumulate, clogging the radiator and reducing its efficiency. A clogged radiator can't dissipate heat effectively, which can lead to overheating, especially when you're accelerating. Regular radiator maintenance is essential to prevent this issue.

4. Water Pump Failure. The water pump is responsible for circulating coolant throughout the engine. If the water pump is failing, the coolant won't move efficiently, leading to overheating. Acceleration puts extra strain on the engine, making the problem more noticeable. A faulty water pump should be replaced immediately to prevent severe engine damage.

5. Leaking Coolant System. Leaks in the cooling system can lead to a loss of coolant, which in turn causes overheating. Common leak points include the radiator, hoses, and water pump. If you notice a drop in coolant levels or see coolant under your car, it's crucial to address the leak immediately to avoid overheating, especially when accelerating.

6. Blocked or Broken Cooling Fans. Cooling fans help maintain the engine's temperature by drawing air through the radiator. If the fans are broken or blocked, the engine may overheat, particularly when accelerating. The extra heat generated during acceleration requires effective cooling, and without functioning fans, the temperature can rise rapidly.

7. Head Gasket Failure. The head gasket seals the engine's combustion chambers and prevents coolant from mixing with engine oil. If the head gasket fails, it can lead to overheating, especially under the strain of acceleration. This is a serious issue that requires immediate attention, as a blown head gasket can cause extensive engine damage.

👉 Preventing Car Overheating When Accelerating

Prevention is always better than cure. Regular maintenance and careful driving can help you avoid the problem of a car overheating when accelerating.

1. Regular Coolant Checks. Ensure that your coolant levels are always adequate. Check the coolant reservoir regularly and top it up as needed. Also, consider flushing the coolant system periodically to remove any contaminants that might impede its efficiency.

2. Thermostat Maintenance. Replace the thermostat according to the manufacturer's recommendations or if you notice any signs of it malfunctioning. A faulty thermostat can lead to serious overheating issues, so don't ignore any warning signs.

3. Radiator Care. Keep your radiator clean and free of debris. Consider having it professionally flushed and cleaned periodically. If you notice any signs of clogging, such as the engine running hotter than usual, address it immediately.

4. Water Pump Inspection. Regularly inspect the water pump for signs of wear or failure. If your car is overheating when accelerating and you've ruled out other issues, the water pump might be the culprit. Replace it if necessary.

5. Check for Leaks. Inspect the cooling system for leaks regularly. Look for signs of coolant under your car or on engine components. If you find a leak, have it repaired as soon as possible to prevent overheating.

6. Cooling Fan Functionality. Ensure that the cooling fans are functioning correctly. Listen for the fan when the engine is running hot, and check for any obstructions that might be preventing it from operating effectively.

7. Head Gasket Health. Be mindful of the symptoms of a failing head gasket, such as white smoke from the exhaust, coolant loss, or milky oil. If you suspect a head gasket issue, seek professional assistance immediately to avoid costly engine repairs.

👉 What to Do if Your Car Overheats When Accelerating

If you find yourself in a situation where your car is overheating when accelerating, it's crucial to act quickly to prevent further damage.

1. Pull Over Safely. If you notice the temperature gauge rising rapidly or steam coming from under the hood, pull over to a safe location as soon as possible. Continuing to drive could cause severe engine damage.

2. Turn Off the Engine. Turn off the engine to prevent it from overheating further. Open the hood carefully to allow the heat to dissipate, but be cautious of hot steam or fluids.

3. Check Coolant Levels. If the engine has cooled down, check the coolant levels. If they're low, add coolant if you have it on hand. Be sure to wait until the engine has cooled sufficiently before removing the radiator cap to avoid burns.

4. Call for Assistance. If you're unable to resolve the issue on your own, or if the car continues to overheat, it's best to call for professional assistance. Driving with an overheating engine can lead to catastrophic failure, so it's better to be safe than sorry.

💬 Final Thoughts

"Car overheating when accelerating" is a problem that no driver wants to face, but understanding the causes and solutions can help you prevent it from happening. By keeping up with regular maintenance, checking your coolant levels, and being aware of the signs of trouble, you can keep your car running smoothly and avoid the stress and expense of dealing with an overheated engine. Remember, the key to preventing overheating is vigilance and timely action.


Want more videos all about auto?
Subscribe to our YouTube channel ðŸ‘‰Cartech Home
Textual description of firstImageUrl

How to Get Rid of Blue Smoke from Exhaust

All About Auto Image

If you've noticed blue smoke billowing from your car's exhaust, you're right to be concerned. This issue isn't just an eyesore; it signals underlying problems that could lead to expensive repairs if left unchecked. But before you panic, understanding what causes blue smoke and how to get rid of it can save you both time and money. This article will walk you through the common causes and provide actionable steps to eliminate blue smoke from your exhaust.

What Does Blue Smoke from Exhaust Mean?

Blue smoke from the exhaust typically indicates that your engine is burning oil. Unlike other exhaust smoke colors—white or black—blue smoke suggests that oil is seeping into the combustion chamber, where it burns along with the fuel. This could be due to various reasons, which we'll explore in detail below.

Common Causes of Blue Smoke from Exhaust
1. Worn Valve Seals
Valve seals prevent oil from leaking into the engine’s cylinders. Over time, these seals can wear out, allowing oil to seep into the combustion chamber. This oil then burns, producing blue smoke.

2. Damaged Piston Rings
Piston rings are designed to seal the combustion chamber, controlling oil consumption and maintaining compression. If these rings are damaged or worn, they can allow oil to enter the combustion chamber, leading to blue smoke.

3. Blown Head Gasket
A blown head gasket can cause a variety of problems, one of which is oil leaking into the combustion chamber. This is a more severe issue that often requires professional repair.

4. PCV Valve Malfunction
The Positive Crankcase Ventilation (PCV) valve helps regulate pressure in the engine. If it’s clogged or malfunctioning, it can lead to oil being pushed into the combustion chamber, resulting in blue smoke.

5. Turbocharger Issues
If your car has a turbocharger, it can also be a culprit. A failing turbocharger can leak oil into the engine, causing blue smoke from the exhaust.

How to Get Rid of Blue Smoke from Exhaust
Now that we've identified the common causes, let's dive into how to get rid of blue smoke from your exhaust. Depending on the cause, the solutions can range from simple fixes to more complex repairs.

1. Check and Replace Valve Seals
Valve seals are one of the most common culprits behind blue smoke. If you suspect that worn valve seals are the issue, you may need to have them replaced. This is a job best left to professionals, as it requires disassembling parts of the engine.

• DIY Tip. If you're handy with car repairs, you can try using an oil stop leak additive, which can sometimes help restore the seals. However, this is a temporary fix and not a substitute for replacing the seals.

2. Inspect and Replace Piston Rings
Damaged piston rings are another common cause of blue smoke. Unfortunately, replacing piston rings is a complex job that usually requires engine removal.

• Professional Help. Given the complexity, this repair is best handled by a mechanic. They will remove the engine, inspect the piston rings, and replace them if necessary.

3. Repair or Replace the Head Gasket
A blown head gasket is a serious issue that can cause significant engine damage if not addressed promptly. The head gasket seals the engine block and cylinder head, preventing oil and coolant from mixing with the fuel.

• Warning Signs. In addition to blue smoke, you may notice a milky substance on the oil cap, loss of coolant, or overheating.

• Solution. This repair involves removing the cylinder head and replacing the gasket. It's a labor-intensive process that requires expertise.

4. Clean or Replace the PCV Valve
A malfunctioning PCV valve is one of the simpler fixes for blue smoke. The PCV valve regulates pressure and prevents oil from being forced into the combustion chamber.

• DIY Fix. You can locate the PCV valve and clean it with carburetor cleaner or replace it entirely. This is a relatively inexpensive and straightforward fix that can often be done at home.

5. Turbocharger Maintenance
If your vehicle is turbocharged, a worn turbo seal could be the cause of blue smoke. The turbocharger pressurizes air entering the engine, and if its seals fail, oil can leak into the combustion chamber.

• Inspection. Check for oil in the intake pipe or around the turbo. If you find oil, the turbocharger may need to be rebuilt or replaced.

6. Regular Maintenance and Oil Changes
One of the best ways to prevent blue smoke from the exhaust is through regular vehicle maintenance. Consistent oil changes, using the correct oil grade, and regular engine check-ups can help prevent the issues that lead to blue smoke.

• Oil Quality. Always use the oil recommended by your vehicle's manufacturer. Using the wrong oil can cause it to burn more easily, leading to blue smoke.

• Monitoring. Keep an eye on your oil levels. If you notice you're frequently topping up the oil, it could indicate a leak or that your engine is burning oil.

When to Seek Professional Help
While some of these fixes can be done at home, others require professional expertise. If you're not comfortable working on your car's engine, or if the problem persists after trying the simpler fixes, it's best to consult a mechanic. Ignoring blue smoke can lead to more severe engine damage, which can be costly to repair.

💬 Final Thoughts
Blue smoke from your exhaust is a clear sign that something is amiss with your vehicle's engine. Whether it's worn valve seals, damaged piston rings, or a malfunctioning PCV valve, addressing the issue promptly can prevent further damage and keep your car running smoothly. By understanding the causes and following the steps outlined above, you can learn how to get rid of blue smoke from your exhaust and ensure your vehicle remains in good condition.

Regular maintenance, timely repairs, and a little bit of automotive knowledge go a long way in keeping your car's engine healthy. So, the next time you see that telltale blue smoke, you’ll know exactly what to do.

Want more videos all about auto?
Subscribe to our YouTube channel ðŸ‘‰Cartech Home
Textual description of firstImageUrl

Steering Wheel Shakes When I Brake

All About Auto Image

Experiencing a shaking or vibrating steering wheel while braking is a common issue that many drivers encounter. This unsettling phenomenon, often described as a "steering wheel shakes when I brake," can be alarming and potentially dangerous if left unaddressed. In this article, we'll explore the various causes of this issue, potential solutions, and preventive measures to ensure a smooth and safe driving experience.

Why Does My Steering Wheel Shake When I Brake?

When your steering wheel shakes during braking, it is typically a sign that something is wrong with your vehicle's braking system or related components. The shaking is often felt through the steering wheel because it is directly connected to the wheels and the suspension system. There are several common causes for this issue:

1. Warped Brake Rotors

Cause. One of the most frequent reasons your steering wheel shakes when you brake is warped brake rotors. Brake rotors are large, flat metal discs that your brake pads clamp onto to stop your vehicle. Over time, due to excessive heat and wear, these rotors can become uneven or warped.

Symptoms. When the rotors are warped, they cause an uneven braking surface, leading to the steering wheel shaking or vibrating when you apply the brakes.

Solution. The most effective solution is to have the rotors machined (resurfaced) if the warping is minimal. However, if the warping is severe, replacing the rotors is recommended. Regular maintenance and avoiding aggressive braking can help prevent this issue.

2. Worn Brake Pads

Cause. Brake pads press against the brake rotors to slow down your vehicle. Over time, these pads wear down, and if they become too thin, they can cause the steering wheel to shake when braking.

Symptoms. In addition to the shaking, you might hear a squealing noise when braking, which is another sign that the brake pads are worn out.

Solution. Replacing the brake pads is the best course of action. It's important to address this issue promptly to avoid further damage to the rotors and ensure safe braking.

3. Out-of-Balance Tires

Cause. Tire balance plays a crucial role in the smooth operation of your vehicle. If your tires are out of balance, they can cause vibrations that may be felt through the steering wheel, especially when braking.

Symptoms. Besides steering wheel shakes when you brake, you might also notice vibrations at higher speeds.

Solution. Have your tires balanced at a professional tire shop. Regular tire rotations and balancing can prevent this issue from occurring.

4. Loose or Worn Suspension Components

Cause. The suspension system, including components like tie rods, ball joints, and control arms, connects your wheels to the rest of your vehicle. If any of these components are loose or worn out, they can cause the steering wheel to shake when braking.

Symptoms. In addition to the shaking, you might experience uneven tire wear or a loose feeling in the steering.

Solution. A thorough inspection of the suspension system is necessary. Replacing worn or damaged components will resolve the issue.

5. mproperly Installed or Worn Wheel Bearings

Cause. Wheel bearings allow your wheels to spin freely while reducing friction. If they are worn out or improperly installed, they can cause the steering wheel to shake during braking.

Symptoms. A growling or humming noise while driving, in addition to the shaking, might indicate a problem with the wheel bearings.

Solution. Replacing the worn-out bearings or reinstalling them correctly will eliminate the vibrations.

6. Brake Caliper Issues

Cause. The brake caliper is responsible for pressing the brake pads against the rotors. If the caliper is sticking or malfunctioning, it can cause uneven braking and result in a shaking steering wheel.

Symptoms. A burning smell after driving, uneven braking, or pulling to one side when braking could indicate a caliper issue.

Solution. The caliper may need to be cleaned, lubricated, or replaced to fix the problem.

Preventive Measures: Keeping Your Braking System in Top Shape

Preventing your steering wheel from shaking when you brake involves regular maintenance and awareness of your vehicle's condition. Here are some tips to keep your braking system and related components in good shape:

1. Regular Brake Inspections. Have your brakes inspected by a professional mechanic at least once a year, or more often if you drive in hilly areas or under heavy loads. Early detection of worn brake pads, rotors, or calipers can prevent more severe issues.

2. Avoid Aggressive Braking. Hard braking generates excessive heat, which can warp rotors and wear out brake pads faster. Try to anticipate stops and brake gradually when possible.

3. Tire Maintenance. Keep your tires properly inflated and balanced. Regular tire rotations, alignments, and balancing will help ensure even wear and reduce the chances of vibrations.

4. Suspension System Care. Regularly inspect and maintain your suspension components. Worn-out parts not only cause steering wheel shakes but also affect overall vehicle handling and safety.

5. Use Quality Parts. When replacing brake pads, rotors, or any other related components, invest in high-quality parts. Cheap or substandard parts may wear out faster and cause more problems in the long run.

6. Mind the Wheel Bearings. Ensure that wheel bearings are installed correctly and in good condition. Replace them at the first sign of wear or noise to avoid more significant issues.

When to Seek Professional Help

While some car enthusiasts may feel comfortable addressing minor vehicle issues themselves, when it comes to a problem as critical as a shaking steering wheel during braking, it’s often best to consult a professional mechanic. If you experience persistent shaking, or if the problem seems to be getting worse, don't hesitate to have your vehicle inspected. A professional mechanic can accurately diagnose the issue and perform the necessary repairs to ensure your vehicle is safe to drive.

💭 Final Thoughts

A shaking steering wheel when braking is a problem that should never be ignored. Whether it's due to warped rotors, worn brake pads, or other underlying issues, addressing the problem promptly is essential for your safety and the longevity of your vehicle. By understanding the common causes and taking preventive measures, you can avoid the unsettling experience of a vibrating steering wheel and ensure a smoother, safer drive. If you ever find yourself thinking, "Why does my steering wheel shake when I brake?" remember that regular maintenance and timely repairs are key to keeping your vehicle in top condition.


Want more videos all about auto?
Subscribe to our YouTube channel ðŸ‘‰Cartech Home
Textual description of firstImageUrl

Car Shakes When Braking Causes, Solutions, and Prevention

All About Auto Image

If you've ever felt your car shake when braking, you know how unsettling it can be. This issue isn't just uncomfortable; it can also signal deeper problems that could affect your vehicle's safety and performance. Understanding why your car shakes when braking is crucial for both your peace of mind and your car’s longevity. In this article, we will dive into the various reasons why this happens, how to fix it, and how to prevent it in the future.

👉Common Causes of a Car Shaking When Braking

Several factors could cause your car to shake when braking. Below are some of the most common reasons:

1. Warped Brake Rotors. One of the most common causes of a car shaking when braking is warped brake rotors. The brake rotors are metal discs that your brake pads clamp down on to stop your vehicle. Over time, the intense heat generated from braking can cause these rotors to warp. When the rotors are uneven, the brake pads can’t grip the surface evenly, causing vibrations that you can feel through the steering wheel or brake pedal.

All About Auto
Signs of Warped Rotors:

• Pulsating sensation when applying brakes.

• Uneven or excessive wear on brake pads.

• Squeaking or squealing noises.

2. Out-of-Balance Tires. Tires that are out of balance can cause your car to shake when braking. If the weight distribution of your tires is uneven, it can lead to vibrations, especially noticeable when slowing down.

Signs of Out-of-Balance Tires:

• Vibration felt in the steering wheel.

• Uneven tire wear.

• Vehicle pulls to one side.

3. Worn Suspension Components. Worn or damaged suspension components like bushings, ball joints, or control arms can also cause shaking when braking. The suspension system helps maintain tire contact with the road, and if it’s compromised, it can affect the way your car responds when you hit the brakes.

Signs of Worn Suspension Components:

• Clunking or knocking noises.

• Uneven tire wear.

• Difficulty in steering.

4. Sticking Brake Calipers. Brake calipers that stick can create uneven pressure on the brake pads, leading to shaking or vibrations when you brake. This issue can also cause excessive heat, which can further damage the rotors and pads.

All About Auto Image
Signs of Sticking Brake Calipers:

• Vehicle pulls to one side when braking.

• Burning smell near the wheels.

• Increased fuel consumption.

5. Tire Issues. Sometimes, the problem is as simple as a tire issue. A tire with a flat spot, for instance, can cause shaking when braking. Similarly, tires that are over or under-inflated can contribute to the problem.

Signs of Tire Issues:

• Visible flat spots on tires.

• Uneven tire wear.

• Low tire pressure warning.

6. ABS Issues. The Anti-lock Braking System (ABS) is designed to prevent your wheels from locking up during braking. However, a malfunctioning ABS system can cause vibrations or shaking when you brake.

All About Auto Image
Signs of ABS Issues:

• ABS warning light on the dashboard.

• Pulsating brake pedal.

• Grinding noise when braking.

7. Worn Brake Pads. Worn brake pads can also cause your car to shake when braking. If the pads are too thin, they won’t apply consistent pressure to the rotors, leading to vibrations.

All About Auto Image
Signs of Worn Brake Pads:

• Squealing or grinding noises.

• Longer stopping distances.

• Visible wear on the brake pads.

👉 How to Fix a Car That Shakes When Braking

Once you've identified the cause of the shaking, the next step is to address the issue. Below are some common fixes for a car that shakes when braking.

1. Resurface or Replace Rotors. If the problem is due to warped rotors, you may need to have them resurfaced or replaced. Resurfacing involves shaving off a small amount of the rotor surface to make it even again. However, replacement is the only option if the rotors are too thin.

2. Balance the Tires. Having your tires balanced can solve the issue if they are out of balance. Tire balancing involves adding small weights to the rims to ensure even weight distribution.

3. Replace Suspension Components. Worn suspension components should be replaced as soon as possible. This not only eliminates the shaking but also improves the overall handling and safety of your vehicle.

4. Repair or Replace Brake Calipers. If your brake calipers are sticking, they may need to be cleaned, lubricated, or replaced. This will ensure even pressure on the brake pads and prevent further damage to the rotors.

5. Address Tire Issues. If a flat spot or improper inflation is the issue, replacing the tire or adjusting the tire pressure can solve the problem. Regular tire rotations can also help prevent flat spots from forming.

6. Check the ABS System. If the ABS system is malfunctioning, it may need to be repaired or recalibrated. In some cases, simply replacing a faulty ABS sensor can resolve the issue.

7. Replace Worn Brake Pads. If worn brake pads are causing the shaking, replacing them is the only solution. It's advisable to replace both sets of front or rear pads at the same time to ensure even braking.

👉 How to Prevent a Car From Shaking When Braking

Preventing your car from shaking when braking is mostly about regular maintenance. Here are some tips:

1. Regularly Inspect Your Brake System. Regular brake inspections can help catch issues before they become serious. Make it a habit to check your brake pads, rotors, and calipers for signs of wear.

2. Balance and Rotate Your Tires. Having your tires balanced and rotated regularly can prevent uneven wear and reduce the chances of your car shaking when braking.

3. Maintain Proper Tire Pressure. Always ensure that your tires are inflated to the manufacturer's recommended pressure. Over or under-inflated tires can cause a variety of issues, including shaking when braking.

4. Replace Worn Suspension Components. Don’t ignore signs of a worn suspension system. Replacing bushings, ball joints, and other components when they start to wear out can prevent more severe problems down the road.

5. Check the ABS System. Keep an eye on your ABS system and have it checked during regular vehicle maintenance. Address any warning lights or issues immediately.

6. Avoid Hard Braking. Constant hard braking can cause excessive heat buildup, leading to warped rotors and worn brake pads. Try to brake smoothly and gradually whenever possible.

💬 Final thoughts

A car that shakes when braking is not just an annoyance; it’s a sign that something in your vehicle needs attention. Whether it’s warped rotors, unbalanced tires, or worn suspension components, addressing the issue promptly can prevent further damage and keep you safe on the road. Regular maintenance and prompt repairs are key to preventing these issues from recurring. By understanding the common causes and taking proactive steps, you can ensure a smoother, safer driving experience.


Want more videos all about auto?
Subscribe to our YouTube channel ðŸ‘‰Cartech Home
Textual description of firstImageUrl

What Does an Insurance Claims Adjuster Do?

All About Auto Image

If you've ever been involved in an accident or suffered damage to your property, you've likely had to deal with an insurance claim. In such situations, you may have heard the term "insurance claims adjuster." But what does an insurance claims adjuster do? This article will delve into the role, responsibilities, and importance of an insurance claims adjuster, offering a clear and accessible explanation.

Understanding the Role of an Insurance Claims Adjuster

An insurance claims adjuster plays a crucial role in the insurance industry. Their primary responsibility is to investigate insurance claims and determine the extent of the insurance company's liability. The adjuster evaluates the claim, examines the evidence, and decides how much compensation, if any, the policyholder should receive.

Key Responsibilities of an Insurance Claims Adjuster:

1. Investigating Claims. When a policyholder files a claim, the adjuster is assigned to investigate the circumstances surrounding the incident. This can involve anything from a car accident, a house fire, or even a slip and fall. The adjuster gathers information by interviewing witnesses, reviewing police reports, and inspecting the damage.

2. Assessing Damage. The adjuster must evaluate the extent of the damage or loss. This could involve visiting the site, taking photographs, and obtaining estimates for repairs. In cases of bodily injury, the adjuster may review medical records and consult with medical professionals.

3. Determining Liability. One of the key questions an adjuster must answer is who is at fault. This can be straightforward or complex, depending on the circumstances. For example, in a car accident, the adjuster would look at the accident report, speak with witnesses, and possibly consult accident reconstruction experts to determine who caused the collision.

4. Calculating Compensation. After assessing the damage and determining liability, the adjuster calculates the amount of compensation the insurance company should pay. This involves analyzing policy coverage, deductibles, and the extent of the damage. The adjuster must balance the policyholder's claim with the company's interest in minimizing payouts.

5. Negotiating Settlements. Once the adjuster has calculated the compensation, they may need to negotiate with the policyholder or their attorney to reach a settlement. This is often a delicate process, as both parties may have differing views on what constitutes fair compensation.

6. Writing Reports. After completing their investigation, the adjuster writes a detailed report summarizing their findings. This report includes an assessment of the damage, the adjuster's liability determination, and the recommended settlement amount. This document is crucial for the insurance company, as it helps them make an informed decision on the claim.

Processing Claims. Finally, the adjuster processes the claim by submitting the necessary paperwork to the insurance company. This ensures that the claim is paid out in a timely manner if approved

Types of Insurance Claims Adjusters

Insurance claims adjusters can be categorized into several types, depending on their employment status and the nature of the claims they handle. Understanding these distinctions can give you a better idea of what does an insurance claims adjuster do.

1. Staff Adjusters. These are full-time employees of an insurance company. They handle claims filed by the company’s policyholders and work directly for the insurance provider. Their loyalty lies with the insurance company, and they are primarily focused on minimizing the company's liability.

2. Independent Adjusters. Independent adjusters are not directly employed by insurance companies. Instead, they work as contractors for multiple insurance providers or adjuster firms. They perform similar tasks to staff adjusters but have the flexibility to represent various companies.

3. Public Adjusters. Public adjusters work on behalf of the policyholder rather than the insurance company. They are hired by individuals or businesses to handle their claims and ensure they receive a fair settlement. Public adjusters are particularly useful when the policyholder feels that the insurance company's offer is insufficient.

4. Catastrophe Adjusters. Catastrophe adjusters, or "cat adjusters," specialize in handling claims resulting from natural disasters such as hurricanes, earthquakes, or floods. They are often called upon during large-scale events where the volume of claims is overwhelming. Their work is fast-paced, and they often travel to affected areas to assess the damage.

Skills and Qualifications of an Insurance Claims Adjuster

To perform their duties effectively, insurance claims adjusters must possess a unique set of skills and qualifications. These include:

1. Attention to Detail. Adjusters must carefully review all aspects of a claim, from the initial report to the final settlement. Overlooking small details can result in inaccurate assessments and costly mistakes.

2. Analytical Thinking. The ability to analyze complex information and make informed decisions is crucial. Adjusters must assess damage, interpret policy language, and calculate compensation accurately.

3. Communication Skills. Adjusters interact with various parties, including policyholders, witnesses, contractors, and attorneys. Strong communication skills are essential for conducting interviews, negotiating settlements, and writing reports.

4. Empathy and Interpersonal Skills. Dealing with people who have experienced loss or injury requires empathy. Adjusters must handle sensitive situations with care and professionalism, maintaining a balance between empathy and objectivity.

5. Technical Knowledge. Adjusters often need to understand the technical aspects of the damage they are assessing. For example, an adjuster handling a property damage claim may need to understand construction methods and costs.

6. Negotiation Skills. Adjusters often find themselves in the middle of negotiations between the insurance company and the policyholder. They must be skilled negotiators, able to reach fair settlements that satisfy both parties.

7. Ethical Standards. Adjusters must adhere to high ethical standards. They are responsible for making impartial decisions based on facts and must avoid conflicts of interest.

The Claims Adjustment Process: Step by Step

Understanding the step-by-step process of how an insurance claims adjuster handles a claim can provide further insight into what does an insurance claims adjuster do.

1. Claim Initiation. The process begins when a policyholder files a claim. The insurance company assigns an adjuster to the case, who then contacts the policyholder to gather initial information.

2. Investigation. The adjuster conducts a thorough investigation, which includes interviewing witnesses, reviewing reports, and inspecting the damage. This step is critical for gathering evidence and establishing the facts of the case.

3. Assessment. After collecting all necessary information, the adjuster assesses the damage or loss. This includes calculating repair or replacement costs and evaluating the policyholder's coverage.

4. Determination of Liability. The adjuster determines who is responsible for the damage or loss. This can involve reviewing contracts, policies, and laws, as well as consulting with experts if necessary.

5. Settlement Negotiation. Once liability is established, the adjuster calculates the settlement amount and negotiates with the policyholder. If both parties agree, the claim is settled, and the payment is processed.

6. Finalization. After reaching an agreement, the adjuster finalizes the claim by completing the necessary paperwork and ensuring that the settlement is paid. The adjuster also writes a report documenting the entire process for the insurance company.

💭 Final Thoughts

So, what does an insurance claims adjuster do? They play a vital role in the insurance industry by investigating claims, assessing damage, determining liability, and negotiating settlements. Their work ensures that policyholders receive fair compensation for their losses while protecting the interests of the insurance company. Whether you're dealing with a minor car accident or a major property loss, understanding the role of an insurance claims adjuster can help you navigate the claims process with confidence.

For more related articles see: Car Insurances Information


Want more videos all about auto?
Subscribe to our YouTube channel ðŸ‘‰Cartech Home
Textual description of firstImageUrl

Worn Piston Rings Symptoms Identifying Engine Issues

All About Auto Image

The health of an engine is crucial to the performance and longevity of a vehicle. One of the key components that ensure an engine runs smoothly is the piston rings. These small, circular metal bands might seem insignificant, but they play a critical role in maintaining the engine's efficiency and power. Over time, these piston rings can wear out, leading to a variety of issues. Recognizing the worn piston rings symptoms early can prevent further damage to the engine and save you from costly repairs.

What Are Piston Rings and Why Are They Important?

Before delving into the worn piston rings symptoms, it’s essential to understand what piston rings are and why they matter. Piston rings are located around the circumference of the engine's pistons. They serve three primary functions:

1. Sealing the Combustion Chamber. Piston rings seal the gap between the piston and the cylinder wall, ensuring that the combustion gases do not escape during the power stroke of the engine.

2. Regulating Oil Consumption. They help control the amount of engine oil that lubricates the cylinder walls, preventing excessive oil from entering the combustion chamber.

3. Heat Transfer. Piston rings assist in transferring heat from the piston to the cylinder wall, helping to cool the piston and maintain optimal engine temperature.

When these rings wear out, they can no longer perform these functions effectively, leading to several symptoms that indicate potential engine trouble.

Worn Piston Rings Symptoms

Identifying worn piston rings symptoms early is crucial to maintaining the health of your engine. Below are some common signs that your piston rings may be worn and in need of replacement.

1. Excessive Oil Consumption

One of the most noticeable worn piston rings symptoms is excessive oil consumption. As piston rings wear out, they lose their ability to seal the combustion chamber properly. This allows oil to seep into the chamber and burn along with the fuel. If you find yourself frequently topping up your engine oil, it could be a sign that the piston rings are worn.

2. Blue Smoke from the Exhaust

Another clear indication of worn piston rings is blue smoke coming from the exhaust. This blue smoke is a result of oil burning in the combustion chamber, which happens when the piston rings fail to keep the oil out. The more worn the rings, the more oil will burn, leading to thicker and more noticeable blue smoke. If you observe this symptom, it's essential to address it promptly to avoid further engine damage.

3. Loss of Engine Power

Worn piston rings can also lead to a noticeable loss of engine power. The primary reason for this is that worn rings cannot maintain the necessary compression within the combustion chamber. This loss of compression means the engine cannot generate the same level of power, resulting in sluggish acceleration and reduced overall performance. If your vehicle feels underpowered, it may be due to worn piston rings.

4. Poor Fuel Economy

Another worn piston rings symptom is a drop in fuel efficiency. When the piston rings are worn, the engine has to work harder to achieve the same level of performance, leading to increased fuel consumption. If you notice that your fuel economy has worsened despite no changes in your driving habits, worn piston rings could be the culprit.

5. Misfiring Engine

A misfiring engine is another symptom that can be attributed to worn piston rings. When the rings fail to seal the combustion chamber correctly, the engine may misfire, particularly during acceleration or under load. This misfiring is often accompanied by rough idling and difficulty starting the engine, which can be frustrating and may indicate significant engine wear.

6. Low Compression

Low compression in one or more cylinders is a direct result of worn piston rings. Compression is essential for the engine to run efficiently, and when it's low, the engine may struggle to start, run roughly, or stall frequently. You can test for low compression using a compression tester, which can help confirm whether the piston rings are worn.

7. Excessive Blow-by

Blow-by occurs when combustion gases escape past the piston rings and enter the crankcase. This is a common worn piston rings symptom and can be identified by excessive pressure in the crankcase, leading to oil leaks, increased oil consumption, and in severe cases, engine damage. Blow-by can also cause a buildup of sludge in the engine, further reducing its efficiency and longevity.

Diagnosing Worn Piston Rings

If you notice any of the worn piston rings symptoms mentioned above, it’s essential to diagnose the issue accurately. Here are some steps to diagnose worn piston rings:

1. Compression Test. Performing an engine compression test on each cylinder can help determine if the piston rings are worn. Low compression readings indicate that the rings are not sealing the combustion chamber effectively.

2. Leak-Down Test. A leak-down test can help pinpoint the source of compression loss. This test measures the amount of air leaking out of the cylinder and can help identify whether the issue is with the piston rings, valves, or head gasket.

3. Visual Inspection. In some cases, a visual inspection of the piston rings may be necessary. This requires removing the cylinder head and examining the rings for wear, cracks, or damage. However, this is a more invasive procedure and should be performed by a professional mechanic.

Preventing Piston Ring Wear

While piston rings will naturally wear out over time, there are steps you can take to extend their lifespan and prevent premature wear:

1. Regular Oil Changes. Changing your engine oil regularly ensures that the engine is adequately lubricated, reducing friction and wear on the piston rings.

2. Using High-Quality Oil. Using high-quality engine oil can help protect the piston rings and other engine components from wear and tear.

3. Avoiding Overheating. Overheating can cause the piston rings to warp or wear out faster. Ensure that your engine's cooling system is functioning correctly to prevent overheating.

Proper Engine Maintenance. Regular engine maintenance, including checking and replacing air filters, spark plugs, and other components, can help keep the engine running smoothly and reduce the strain on the piston rings.

💭 Final Thoughts

Worn piston rings symptoms can manifest in various ways, from excessive oil consumption and blue smoke to loss of engine power and poor fuel economy. Recognizing these symptoms early and taking the necessary steps to diagnose and repair the issue can prevent further damage to your engine and save you from costly repairs. Regular maintenance and using high-quality engine oil can help extend the life of your piston rings, ensuring your engine remains in top condition for years to come.

If you suspect that your piston rings are worn, it’s essential to consult with a professional mechanic who can accurately diagnose the issue and recommend the best course of action. By staying vigilant and addressing worn piston rings symptoms promptly, you can keep your vehicle running smoothly and efficiently.


Want more videos all about auto?
Subscribe to our YouTube channel ðŸ‘‰Cartech Home