Cartech - All About Auto

Textual description of firstImageUrl

Nissan CVT Transmission Problems: A Comprehensive Guide

All about auto image

The Continuously Variable Transmission (CVT) in Nissan vehicles has been a popular choice for its smooth and fuel-efficient performance. However, as with any automotive technology, CVT transmissions can experience problems that affect their performance and reliability. In this guide, we will delve into Nissan CVT transmission problems, focusing on specific models like the Nissan Murano, Altima, Rogue, and X-Trail. Whether you’re a Nissan owner or considering a purchase, understanding these issues can help you make informed decisions and maintain your vehicle effectively.

What is a CVT Transmission?

A CVT transmission is designed to provide a seamless driving experience by continuously varying the transmission ratio without the distinct shift points found in traditional automatic transmissions. This allows for smoother acceleration and improved fuel efficiency. Nissan's Xtronic CVT is a well-known example, used in various models including the Altima, Murano, Rogue, and X-Trail.

Common Nissan CVT Transmission Problems

Despite the advantages, CVT transmissions in Nissan vehicles have been known to face several issues. Here are some common problems:

1. Slipping or Hesitation. One of the most reported issues is gears slipping or hesitation during acceleration. Drivers may experience a noticeable lag or the sensation that the vehicle is not responding promptly when pressing the gas pedal. This problem can be particularly frustrating as it affects the vehicle’s overall drivability.

2. Overheating. CVTs are sensitive to temperature fluctuations. Overheating can cause a range of issues, including reduced performance and potential damage to the transmission. Symptoms of overheating may include the transmission fluid temperature warning light coming on or noticeable changes in the vehicle’s performance.

3. Shuddering or Jerking. Some Nissan owners report a shuddering or jerking sensation when driving at certain speeds. This can be due to issues with the transmission belt or pulley system, which may cause the vehicle to shake or vibrate unpleasantly.

4. Unusual Noises. A well-functioning CVT should operate quietly. If you hear whining, grinding, or other unusual noises coming from the transmission, it may indicate internal damage or worn components that need attention.

5. Transmission Fluid Leaks. Leaks in the CVT transmission fluid can lead to significant issues if not addressed promptly. Transmission fluid is crucial for lubrication and cooling, and a leak can cause severe damage to the transmission over time.

Nissan Murano CVT Transmission Problems

The Nissan Murano, a midsize SUV known for its comfort and performance, has also faced CVT-related issues. Here’s a closer look:

1. Frequent Complaints of Slipping. Murano owners often report slipping sensations, especially during acceleration. This issue can be attributed to worn-out CVT belts or faulty sensors that affect the transmission's ability to maintain the correct gear ratio.

2. CVT Overheating. Due to the Murano’s size and weight, the CVT can experience overheating under heavy load or in hot weather conditions. Regular maintenance, including checking and changing the transmission fluid, can help mitigate this problem.

3. Software Issues. Some Murano models have experienced software-related problems that affect the CVT's performance. These issues can sometimes be resolved through software updates provided by Nissan dealerships.

Nissan Altima CVT Transmission Problems

The Nissan Altima, a popular midsize sedan, has had its share of CVT transmission problems. Key issues include:

1. Shuddering During Acceleration. Altima owners frequently report shuddering or jerking when accelerating, especially from a stop. This can be caused by problems with the CVT’s pulley system or the need for a transmission fluid change.

2. Transmission Fluid Overheating. The Altima’s CVT can overheat if the transmission fluid is old or if the cooling system is not functioning properly. Overheating can lead to severe transmission damage if not addressed.

3. Premature Wear and Tear. Some Altima models have been known to suffer from premature CVT wear and tear, often requiring costly repairs or replacements. Regular maintenance and timely fluid changes are crucial to extending the life of the CVT.

Nissan Rogue CVT Transmission Problems

The Nissan Rogue, a compact SUV, has also faced CVT-related issues. Here’s what you should know:

1. Slipping and Hesitation. Rogue drivers often experience slipping or hesitation during acceleration. This can be particularly noticeable when merging onto highways or climbing steep grades. Regularly checking and replacing the transmission fluid can help alleviate this problem.

2. CVT Overheating. Like other models, the Rogue’s CVT can overheat, especially during heavy use or in hot climates. Ensuring proper fluid levels and cooling system maintenance can help prevent overheating.

3. Erratic Shifting. Some Rogue owners report erratic shifting or inconsistent performance, which can be due to issues with the CVT’s internal components or software.

Nissan X-Trail CVT Transmission Problems

The Nissan X-Trail, known as the Rogue in some markets, shares similar CVT problems. Here’s an overview:

1. Unusual Noises. X-Trail drivers have reported unusual noises, such as whining or grinding, which may indicate internal damage or worn components in the CVT.

2. Transmission Fluid Leaks. Leaks in the CVT transmission fluid can be a common issue, leading to decreased performance and potential damage. Promptly addressing leaks is essential for maintaining the health of the transmission.

3. Transmission Failure. In some cases, the X-Trail’s CVT can experience complete failure, often due to a combination of factors such as overheating, lack of maintenance, or internal damage.

How to Maintain Your Nissan CVT Transmission

Maintaining your Nissan CVT transmission is crucial for preventing problems and extending its lifespan. Here are some tips:

1. Regular Fluid Checks and Changes. Regularly check the CVT fluid level and condition. Nissan recommends changing the CVT fluid at specific intervals to ensure optimal performance and prevent overheating.

2. Follow Manufacturer’s Maintenance Schedule. Adhere to the maintenance schedule provided in your vehicle’s owner’s manual. This includes regular inspections and servicing by a qualified technician.

3. Address Issues Promptly. If you notice any signs of CVT problems, such as slipping, overheating, or unusual noises, address them promptly to prevent further damage.

4. Avoid Overloading. Avoid overloading your vehicle or towing excessively, as this can put additional strain on the CVT and lead to overheating and premature wear.

Final Thoughts

Nissan CVT transmissions offer smooth and efficient performance, but they are not without their issues. By understanding common problems associated with models like the Murano, Altima, Rogue, and X-Trail, you can take proactive steps to maintain your vehicle and address any issues that arise. Regular maintenance and timely repairs are key to ensuring your Nissan’s CVT transmission remains reliable and performs optimally for years to come.

Whether you’re dealing with slipping, overheating, or other CVT-related issues, staying informed and taking action can help you enjoy a trouble-free driving experience.


Want more videos all about auto?
Subscribe to our YouTube channel👉Cartech Home
Textual description of firstImageUrl

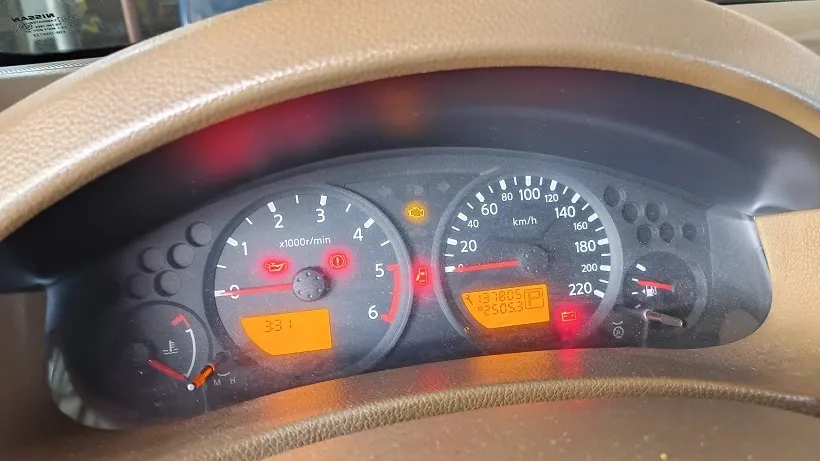
The "Service Engine Soon" Light on Nissan Vehicles

All about auto image

The "Service Engine Soon" light on your Nissan vehicle is an important indicator that something may need attention under the hood. While it’s easy to dismiss a small light on the dashboard, ignoring it can lead to more significant issues down the road. Whether you drive a Nissan Altima, Sentra, or Frontier, understanding what this light means and how to address it can save you time, money, and hassle. In this comprehensive guide, we’ll break down everything you need to know about the "Service Engine Soon" light on Nissan vehicles, with a focus on the Nissan Altima, Sentra, and Frontier.

What Does the "Service Engine Soon" Light Mean?

The "Service Engine Soon" light on a Nissan is a general indicator that something is not functioning as it should. Unlike the "Check Engine" light, which typically signifies more severe issues, the "Service Engine Soon" light often points to minor problems that need attention. These could range from routine maintenance reminders to alerts about parts that are beginning to fail.

In some cases, the light may indicate a problem with the emission system, but it can also signal issues with other components such as the fuel system, ignition system, or even something as simple as a loose gas cap.

Service Engine Soon Light Nissan Altima

For Nissan Altima owners, the "Service Engine Soon" light can be triggered by several factors, from minor maintenance needs to more serious concerns. Common causes include issues with the oxygen sensor, mass airflow sensor, or catalytic converter. In some cases, it may even be related to the spark plugs or ignition coils. If the light comes on in your Nissan Altima, it’s important to diagnose the problem as soon as possible to avoid further damage.

Service Engine Soon Light Nissan Sentra

The Nissan Sentra, like the Altima, can experience a variety of issues that trigger the "Service Engine Soon" light. For Sentra owners, this light might come on due to problems with the fuel system, such as a faulty fuel injector or fuel pump. Other common causes include issues with the exhaust system, such as a malfunctioning catalytic converter or oxygen sensor. As with any vehicle, addressing these issues promptly can prevent more costly repairs down the line.

Service Engine Soon Light on Nissan Frontier

The Nissan Frontier, known for its rugged reliability, isn’t immune to the occasional "Service Engine Soon" light. For Frontier owners, this light could be triggered by issues with the engine’s air intake system, including the air filter or mass airflow sensor. Problems with the exhaust system, such as a failing catalytic converter, are also common culprits. In addition, the light may come on if there’s an issue with the vehicle’s transmission or drivetrain. Given the Frontier’s heavy-duty use, it’s crucial to address these warnings to maintain optimal performance.

Common Reasons for the "Service Engine Soon" Light to Appear

While the specific causes for the "Service Engine Soon" light can vary between Nissan models, there are several common reasons why this light might appear:

1. Loose or Faulty Gas Cap: This is one of the most common and easily fixable reasons for the light to come on. If your gas cap is loose or not sealing properly, it can trigger the light because the fuel system detects a potential leak.

2. Oxygen Sensor Failure: The oxygen sensor monitors the level of oxygen in the exhaust gases and helps the engine control the air-fuel mixture. A failing oxygen sensor can cause the light to come on and may lead to poor fuel economy and higher emissions.

3. Mass Airflow Sensor Issues: The mass airflow (MAF) sensor measures the amount of air entering the engine, which is crucial for proper fuel injection and ignition. If the MAF sensor is faulty, it can lead to performance issues and trigger the "Service Engine Soon" light.

4. Catalytic Converter Problems: The catalytic converter reduces harmful emissions by converting exhaust gases into less harmful substances. A failing catalytic converter can cause the light to come on and may result in poor engine performance and increased emissions.

5. Spark Plug or Ignition Coil Issues: Faulty spark plugs or ignition coils can lead to engine misfires, which may trigger the "Service Engine Soon" light. Replacing these components can often resolve the issue.

6. Exhaust Gas Recirculation (EGR) Valve Problems: The EGR valve helps reduce emissions by recirculating a portion of the exhaust gases back into the engine’s cylinders. If the EGR valve is clogged or malfunctioning, it can cause the light to come on.

7. Fuel System Issues: Problems with the fuel injectors, fuel pump, or fuel pressure regulator can lead to engine performance issues and trigger the light. In some cases, these issues can also cause the engine to run too rich or too lean, leading to poor fuel economy and increased emissions.

What to Do When the "Service Engine Soon" Light Comes On

If the "Service Engine Soon" light comes on in your Nissan Altima, Sentra, or Frontier, here are the steps you should take:

1. Check the Gas Cap: Start by ensuring that your gas cap is tightly secured. If the cap is loose, tighten it and see if the light goes off after driving for a few miles. If the light remains on, it’s time to investigate further.

2. Consult the Owner’s Manual: Your Nissan’s owner’s manual can provide specific guidance on what the "Service Engine Soon" light means for your vehicle. It may also suggest potential causes and solutions.

3. Use an OBD-II Scanner: An OBD-II (On-Board Diagnostics) scanner can read the trouble codes stored in your vehicle’s computer. These codes can provide insight into what’s causing the light to come on. Many auto parts stores offer free code reading services, or you can purchase a scanner for home use.

4. Address the Issue Promptly: Once you know what’s causing the light to come on, it’s important to address the issue as soon as possible. Delaying repairs can lead to more significant problems and higher repair costs.

5. Reset the Light: In some cases, the "Service Engine Soon" light may remain on even after the issue has been resolved. You can reset the light by disconnecting the battery for a few minutes or using an OBD-II scanner to clear the codes.

Preventing the "Service Engine Soon" Light from Coming On

While it’s not always possible to prevent the "Service Engine Soon" light from coming on, regular maintenance can significantly reduce the likelihood of seeing this warning. Here are some tips to keep your Nissan Altima, Sentra, or Frontier running smoothly:

1. Regular Oil Changes: Changing your engine oil and filter regularly is one of the most important things you can do to keep your engine running smoothly. Follow the manufacturer’s recommendations for oil change intervals.

2. Replace Air and Fuel Filters: Keeping your air and fuel filters clean can prevent debris from entering the engine and causing problems. Replace these filters as recommended by Nissan.

3. Monitor Fluid Levels: Regularly check and top off your engine’s fluids, including coolant, transmission fluid, and brake fluid. Low fluid levels can lead to performance issues and trigger the "Service Engine Soon" light.

4. Inspect the Exhaust System: Regularly inspect your exhaust system for leaks or damage. A healthy exhaust system is crucial for maintaining proper engine performance and emissions levels.

5. Check the Battery: A weak or dying battery can cause a variety of electrical issues, including triggering the "Service Engine Soon" light. Test your battery regularly and replace it as needed.

6. Replace Spark Plugs and Ignition Components: Over time, spark plugs and ignition coils can wear out and cause engine misfires. Replacing these components as part of your vehicle’s regular maintenance can prevent issues from arising.

7. Pay Attention to Warning Signs: If you notice any unusual sounds, smells, or changes in your vehicle’s performance, don’t ignore them. Addressing minor issues early can prevent more significant problems down the road.

Diagnosing Specific Issues on Nissan Models

Nissan Altima

The Nissan Altima is a popular midsize sedan known for its comfortable ride and fuel efficiency. However, like any vehicle, it’s not immune to the occasional issue that can trigger the "Service Engine Soon" light.

• Oxygen Sensor Failure: A common issue in the Altima is oxygen sensor failure, which can lead to poor fuel economy and increased emissions. Replacing the oxygen sensor can often resolve the issue and turn off the light.

• Mass Airflow Sensor Problems: The Altima’s mass airflow sensor can become dirty or fail over time, causing the engine to run lean or rich. Cleaning or replacing the sensor can often fix the problem.

• Catalytic Converter Issues: If your Altima’s catalytic converter is failing, you may notice a decrease in engine performance and an increase in emissions. Replacing the catalytic converter is often necessary to resolve the issue.

Nissan Sentra

The Nissan Sentra is a compact sedan that offers a balance of performance and efficiency. However, like the Altima, it can experience issues that trigger the "Service Engine Soon" light.

• Fuel System Problems: Sentra owners may encounter issues with the fuel system, such as a failing fuel pump or clogged fuel injectors. These problems can lead to poor engine performance and trigger the light.

• Exhaust System Issues: A malfunctioning catalytic converter or oxygen sensor can cause the light to come on in a Sentra. Replacing these components can often resolve the issue.

• EGR Valve Malfunction: The EGR valve in the Sentra can become clogged or fail, leading to increased emissions and triggering the "Service Engine Soon" light. Cleaning or replacing the valve is usually necessary.

Nissan Frontier

The Nissan Frontier is a rugged and reliable pickup truck, but it’s not without its potential issues that can trigger the "Service Engine Soon" light.

• Air Intake System Problems: Frontier owners may experience issues with the air intake system, such as a dirty air filter or faulty mass airflow sensor. Addressing these issues can often resolve the light.

• Transmission or Drivetrain Issues: The Frontier’s transmission and drivetrain components are subject to wear and tear, especially with heavy use. Problems in these areas can trigger the light and require attention.

• Catalytic Converter Failure: Like the Altima and Sentra, the Frontier’s catalytic converter can fail over time, leading to increased emissions and decreased engine performance. Replacing the converter is often necessary.

Final Thoughts

The "Service Engine Soon" light on your Nissan vehicle is an important indicator that something needs attention. Whether you drive a Nissan Altima, Sentra, or Frontier, understanding what this light means and how to address it can help you maintain your vehicle’s performance and longevity. By following the tips and guidelines outlined in this article, you can ensure that your Nissan remains in top condition and avoid more costly repairs down the road. Remember, regular maintenance is key to preventing issues that could trigger the "Service Engine Soon" light, so stay on top of your vehicle’s needs and address any issues promptly.


Want more videos all about auto?
Subscribe to our YouTube channel👉Cartech Home
Textual description of firstImageUrl

Battery Warning Light in Your Car Comes On

All about auto image

Have you ever been driving and noticed a strange warning light on your dashboard? One of the most important and potentially alarming indicators is the battery warning light in your car. This article will explain what the battery warning light means, why it might come on, and what steps you should take if it does.

👉What Is the Battery Warning Light?

The battery warning light is an indicator on your car’s dashboard that looks like a small battery symbol. This light is crucial for alerting you to issues related to your vehicle’s charging system. If this light turns on, it means there is a problem with the battery or the charging system.

👉Why Is the Battery Warning Light Important?

The battery warning light is not just a minor inconvenience—it’s a signal that something could be wrong with your car's electrical system. This could potentially leave you stranded if not addressed promptly. Understanding the causes of this warning light can help you take timely action to avoid more significant problems.

👉Common Causes of the Battery Warning Light

There are several reasons why the battery warning light in your car might come on. Here are some common causes:

1. Faulty Alternator. The alternator is responsible for charging your car’s battery while the engine is running. If the alternator fails, the battery may not get the charge it needs, causing the battery warning light to illuminate. Symptoms of a failing alternator include dimming headlights, unusual noises from the engine, and electrical problems.

2. Battery Issues. A weak or dying battery can also trigger the battery warning light. Batteries typically last between 3 to 5 years, and factors like extreme temperatures or lack of maintenance can shorten their lifespan. If your battery is old or has a dead cell, it might not hold a charge properly.

3. Corroded Battery Terminals. Corrosion on the battery terminals can interrupt the flow of electricity between the battery and the car’s electrical system. This can lead to a battery warning light. Regularly checking and cleaning the battery terminals can help prevent this issue.

4. Loose or Broken Battery Cables. The battery cables connect the battery to the rest of the car’s electrical system. If these cables become loose or damaged, they can cause a poor connection, triggering the battery warning light. Ensure that the cables are secure and in good condition.

5. Faulty Voltage Regulator. The voltage regulator controls the amount of voltage supplied to the car’s electrical system. If it fails, it can cause the battery to overcharge or undercharge, resulting in the battery warning light. Replacing a faulty voltage regulator usually requires professional assistance.

👉What to Do When the Battery Warning Light Comes On

If you see the battery warning light on your dashboard, it’s essential to take action immediately. Here are the steps you should follow:

1. Check Your Battery and Alternator. Start by inspecting your battery and alternator. Look for any visible signs of damage or corrosion. If you’re comfortable doing so, you can use a multimeter to check the battery’s voltage and ensure it’s within the recommended range.

2. Check for Loose or Corroded Connections. Examine the battery terminals and cables. If you notice any corrosion or loose connections, clean the terminals with a mixture of baking soda and water and tighten any loose cables. Ensure that the connections are secure before starting the engine again.

3. Turn Off Non-Essential Electrical Components. To reduce the load on your battery and alternator, turn off any non-essential electrical components such as the radio, air conditioning, and heated seats. This can help prevent further strain on the charging system.

4. Seek Professional Help. If the battery warning light remains on after you’ve checked the battery and connections, or if you notice other symptoms like unusual noises or dimming lights, it’s best to seek professional assistance. A qualified mechanic can perform a thorough diagnosis and determine the exact cause of the problem.

👉How to Prevent Battery Warning Light Issues

Preventing issues with the battery and charging system can help you avoid seeing the battery warning light on your dashboard. Here are some preventive measures you can take:

1. Regular Battery Maintenance. Regularly inspect your battery for signs of wear and tear. Keep the terminals clean and ensure that the battery is securely mounted. If your battery is more than three years old, consider having it tested or replaced.

2. Check the Alternator. Have your alternator checked periodically, especially if you experience symptoms like dimming headlights or unusual noises. Replacing a worn-out alternator before it fails can prevent more significant issues.

3. Inspect Battery Cables. Regularly inspect your battery cables for signs of wear, damage, or corrosion. Replacing damaged cables promptly can help prevent charging system issues.

4. Drive Regularly. If you don’t drive your car often, the battery may not get enough charge to stay healthy. Try to drive your vehicle regularly to keep the battery charged and in good condition.

5. Avoid Short Trips. Frequent short trips can prevent the battery from charging fully. Whenever possible, combine errands into longer trips to give the battery sufficient time to recharge.

💬Final Thoughts

The battery warning light in your car is an important indicator of potential issues with your vehicle’s charging system. Understanding the common causes of this warning light and knowing what steps to take when it appears can help you address problems before they become severe. Regular maintenance and prompt attention to warning signs can keep your car running smoothly and prevent inconvenient breakdowns.

By following the tips outlined in this article, you can reduce the likelihood of encountering battery-related issues and ensure that your vehicle remains reliable. If you ever feel unsure about diagnosing or fixing battery problems, don’t hesitate to seek help from a professional mechanic.

Remember, your car’s battery and charging system are crucial for keeping your vehicle on the road. Pay attention to the battery warning light and take proactive measures to maintain your car’s health. Safe driving!


Want more videos all about auto?
Subscribe to our YouTube channel ðŸ‘‰Cartech Home
Textual description of firstImageUrl

All about Tires and Wheels You Need to Know

Wheels and Tires

On this page of all about auto you will learn a car troubleshooting, repair, and diagnosis related to wheels and tire problem. The troubleshooting guide indicated on this page is just the basic guide from mechanic previous experiences. Scroll down below to look at different troubleshooting information about tires and wheels.

Importance of Tire Load and Speed Ratings: A Complete Guide

Learn why tire load and speed ratings matter for safety, performance, and efficiency. Discover how to choose the right ratings for your vehicle. Learn more » Importance of Tire Load and Speed Ratings: A Complete Guide

How Often Should I Replace My Tires?

Wondering how often you should replace your tires? Learn key factors, signs, and tips to keep your tires safe and lasting longer. Learn more » How Often Should I Replace My Tires?

What is Wheel Balancing? Cost, How Often to Balance?

Learn what wheel balancing is, how often it should be done, and the cost involved to ensure smooth driving and longer tire life. Learn more » What is Wheel Balancing? Cost, How Often to Balance?

Tire Pressure Sensor Light Flashing : Causes and Solutions

Learn why your tire pressure sensor light is flashing, common causes, how to fix it, and tips to prevent future TPMS issues for safer driving. Learn more » Tire Pressure Sensor Light Flashing : Causes and Solutions

How to Choose the Right Tires for Your Car

Learn how to choose the right tires for your car by understanding tire types, sizes, driving conditions, and wear indicators for optimal safety. Learn more » How to Choose the Right Tires for Your Car

How to Check Tire Pressure: A Simple Guide for Every Driver

Learn how to check tire pressure with this simple guide. Ensure safety, fuel efficiency, and tire longevity with easy-to-follow steps. Learn more » How to Check Tire Pressure: A Simple Guide for Every Driver

Flat Tire Driving: Risks, Consequences, and What You Should Do

Learn about the risks of flat tire driving, how to handle a flat safely, preventative tips, and the legal and financial implications involved. Learn more » Flat Tire Driving: Risks, Consequences, and What You Should Do

Wheel Alignment: How Long Does It Take?

Discover how long a wheel alignment takes, factors affecting the duration, and why it's essential for vehicle safety and performance. Learn more » Wheel Alignment: How Long Does It Take?

Understanding Tread Wear Indicators: The Key to Safe Driving

Learn about tread wear indicators, their importance in tire safety, how to check them, and tips for extending tire life. Stay safe on the road! Learn more » Understanding Tread Wear Indicators: The Key to Safe Driving

Tire Rotation Complete Guide: Essential Tips and Benefits

A flat tire can happen anytime, anywhere. Knowing how to change a flat tire is an essential skill that can save you time, money. Learn more » Tire Rotation Complete Guide: Essential Tips and Benefits

How to Change a Flat Tire on a Car: A Step-by-Step Guide

A flat tire can happen anytime, anywhere. Knowing how to change a flat tire is an essential skill that can save you time and money. Learn more » How to Change a Flat Tire on a Car

Out of Balance Wheel or Out of Round Tire

When vibration occurs in your car, the first thing to check is the tire imbalance depending on where the vibration is felt, body or steering vibration. Tire imbalance is when the tire is not evenly rotating when the car is driven, this will make the car vibrates. Learn more » Out of Balance Wheel or Out of Round Tire

How to Tell the Age of a Tire

Do you know how old is your tire? How long do car tires last? Is there any way to determine the expiration of the tire? how to tell the age of tire? Tire manufacturing date plays an important factor in knowing the tire expiration, whether the tire is still safe to use or not. Learn more » How to Tell the Age of a Tire

Tires Making Screeching Noise

What causes screeching tires during regular driving, especially when cornering or when turning on a curve? screeching tires during cornering are caused by two reasons, first is an alignment problem and the second is improper tire pressure. Learn more » Tires Making Screeching Noise

How Often to Rotate Tires

Defective tires are very dangerous! If tires are damaged, excessively worn, or have improper pressure, do NOT continue the driving. While driving, pay close attention to the state of tires and regularly check for deformations (bulging) in the treads and tire sides. Learn more » How Often to Rotate Tires

Choosing the Best Tire for My Car

Do you know what tires fit your car? Here are some of the basic guides when choosing the best tire for my car. Know the Number of tires required. Ideally, to avoid handling problems that may arise, all four of your vehicle tires must be identical, failure to do so will result in possible problems of making your vehicle difficult to control due to unmatched tires. Learn more » Choosing the Best Tire for My Car

Understanding What Causes Tires to Wear in the Middle

Discover what causes tires to wear in the middle and learn how to prevent it. Get tips on maintenance, alignment, and driving habits. Learn more » Understanding What Causes Tires to Wear in the Middle

What Causes Tires To Wear On Inside Edge?

The inside edge of the tire has abnormal or unusual tire wear on the inside edge. The idea of "wheel alignment" essentially has to do with how straight the wheels are relative to the vehicle's frame. Mechanics use the term "camber" when they are talking about the tilt of a wheel. Learn more » What Causes Tires To Wear On Inside Edge?

Tire Wear Patterns and What they Mean

Before explaining this, we really need to first take a look at the notion of "wheel balance/imbalance". A wheel consists of a rim and tire. When rims and tires are manufactured, they're almost always somewhat flawed. For example, in the case of a tire, one portion of a tire's tread may be slightly thicker than a similar-sized portion of tread elsewhere on the tire. Learn more » Tire Wear Patterns and What they Mean

Tires Squealing When Turning

If the car tires are squealing when turning, this particular problem most often indicates that something is wrong with the wheel alignment. However, it can also be caused by one or more improperly inflated cars. Learn more » Tires Squealing When Turning


Want more videos Cartech?
Subscribe to our YouTube channel👉All About Auto
Textual description of firstImageUrl

Guide to Changing Brake Fluid: Everything You Need to Know

All about auto page

Maintaining your vehicle's braking system is crucial for safety and optimal performance. One of the key components in this system is the brake fluid. Often overlooked, brake fluid plays a critical role in ensuring that your brakes function properly. In this guide, we'll explore everything you need to know about brake fluid, including when and how to change it, the costs involved, and why flushing the brake fluid might be necessary.

👉Understanding Brake Fluid

Brake fluid is a type of hydraulic fluid that is used in your vehicle's brake system. When you press down on the brake pedal, the brake fluid transmits the force from your foot to the brakes, enabling the car to slow down or stop. Without adequate brake fluid, or with degraded brake fluid, the braking system may not function correctly, leading to reduced stopping power or even brake failure.

All about auto image

Types of Brake Fluid

Before diving into how to change brake fluid, it's essential to understand the different types of brake fluid available. There are primarily two categories:

1. DOT 3 and DOT 4: These are glycol-based fluids and are the most common types used in vehicles. DOT 3 is the standard for most vehicles, while DOT 4 is used in high-performance or heavy-duty applications. The main difference between them is their boiling points, with DOT 4 having a higher boiling point, making it more resistant to heat.

2. DOT 5: This is a silicone-based fluid and is not compatible with DOT 3 or DOT 4 systems. It is primarily used in classic cars or vehicles that are not driven frequently, as it does not absorb moisture as glycol-based fluids do.

👉Why Is Changing Brake Fluid Important?

Over time, brake fluid can become contaminated with moisture, dirt, and debris, which can lead to a decrease in braking efficiency. Moisture is particularly problematic because it can lower the boiling point of the fluid. When the brake fluid boils, it can create air bubbles in the system, leading to a spongy brake pedal or even complete brake failure.

Regularly changing your brake fluid ensures that your braking system remains responsive and safe. It also helps prevent corrosion and wear on the brake system components.

👉When to Change Brake Fluid

Knowing when to change brake fluid is just as important as knowing how to do it. The recommended interval for changing brake fluid varies depending on the vehicle and the type of brake fluid used. However, a general rule of thumb is to change the brake fluid every two years or every 30,000 miles, whichever comes first.

Signs That It's Time to Change Brake Fluid

Even if you are not tracking the mileage or time, certain signs can indicate that it's time to change the brake fluid:

1. Spongy Brake Pedal: If the brake pedal feels soft or spongy when you press it, this could indicate that the brake fluid is contaminated or has absorbed moisture.

2. Reduced Braking Power: If you notice that your vehicle takes longer to stop or that the brakes are less effective, it might be due to old or degraded brake fluid.

3. Brake Fluid Color: Brake fluid should be clear or slightly yellow. If it appears dark or murky, it's time for a change.

4. Brake Warning Light: Some vehicles are equipped with sensors that detect low brake fluid levels or other issues. If the brake warning light on your dashboard comes on, it's essential to check the brake fluid.

👉How Often to Flush Brake Fluid?

A brake fluid flush involves completely replacing the old fluid with fresh fluid, ensuring that the entire braking system is clean. While changing the brake fluid should be done every two years, a brake fluid flush is typically recommended every 3 to 5 years, depending on driving conditions and vehicle usage.

Regularly flushing the brake fluid is crucial for maintaining the overall health of the braking system. It helps remove any contaminants that might have accumulated and ensures that the brake fluid remains effective.

👉How to Change Brake Fluid

Changing brake fluid might sound like a daunting task, but with the right tools and a bit of patience, it can be done at home. Here's a step-by-step guide on how to change brake fluid:

Tools and Materials Needed

• Brake fluid (check your vehicle's manual for the correct type)

• A turkey baster or brake fluid siphon

• A wrench (for the bleeder screws)

• A clear plastic tube

• A container for old brake fluid

• A jack and jack stands (if needed)

• A lug wrench (if you need to remove the wheels)

👉Step-by-Step Guide

1. Park the Vehicle: Ensure your vehicle is parked on a flat surface and the engine is off. Engage the parking brake.

2. Locate the Master Cylinder: The master cylinder is usually found near the firewall on the driver's side of the engine bay. Remove the cap from the master cylinder reservoir.

3. Siphon Out Old Fluid: Use a turkey baster or a brake fluid siphon to remove as much old brake fluid as possible from the reservoir. Be careful not to spill any fluid, as brake fluid is corrosive.

4. Refill with Fresh Fluid: Pour fresh brake fluid into the reservoir until it reaches the "full" line. Do not overfill.

5. Bleed the Brakes: Bleeding the brakes is essential to remove any air bubbles from the system. Start with the brake furthest from the master cylinder (usually the rear passenger side) and work your way to the closest.

• Locate the bleeder screw on the brake caliper or drum brake.

• Attach a clear plastic tube to the bleeder screw, with the other end submerged in a container of brake fluid.

• Have an assistant press the brake pedal several times and hold it down.

• Loosen the bleeder screw with a wrench. You should see old fluid and possibly air bubbles come out.

• Tighten the bleeder screw and have your assistant release the brake pedal.

• Repeat this process until fresh fluid comes out and there are no air bubbles.

• Move on to the next brake and repeat.

6. Check the Fluid Level: After bleeding all the brakes, check the master cylinder reservoir and top it off with fresh fluid if needed.

7. Test the Brakes: Before driving, pump the brake pedal a few times to ensure it feels firm. If it still feels spongy, there may be air in the system, and you may need to bleed the brakes again.

8. Dispose of Old Brake Fluid Properly: Brake fluid is hazardous and should be disposed of at a designated recycling center.

Professional Brake Fluid Change vs. DIY

While changing brake fluid at home can save you money, there are advantages to having it done professionally. A professional mechanic will have the necessary equipment to perform a brake fluid flush, which ensures that all old fluid is completely removed from the system. Additionally, they can inspect the braking system for any other issues that may need attention.

👉Change Brake Fluid Price: What to Expect

The cost of changing brake fluid can vary depending on whether you do it yourself or have it done at a shop. Here's a breakdown of what you might expect to pay:

DIY Brake Fluid Change

If you decide to change the brake fluid yourself, the cost will primarily be for the brake fluid itself. A bottle of brake fluid typically costs between $5 and $20, depending on the type and brand. You may also need to purchase tools like a brake fluid siphon or bleeder kit, which can cost anywhere from $10 to $30.

Professional Brake Fluid Change

If you choose to have a professional change your brake fluid, the price can range from $70 to $150. This cost includes labor and the brake fluid itself. While this is more expensive than doing it yourself, the peace of mind that comes with knowing the job was done correctly might be worth the cost.

Brake Fluid Flush Price

A brake fluid flush is more comprehensive than a simple brake fluid change, and as such, it tends to be more expensive. On average, a brake fluid flush can cost between $100 and $200. This service ensures that all old fluid is removed from the system, which can help prolong the life of your brakes and prevent future issues.

👉Is a Brake Fluid Flush Necessary?

One common question among vehicle owners is whether a brake fluid flush is necessary. The answer depends on the condition of your brake fluid and the overall health of your braking system.

Why You Might Need a Brake Fluid Flush

• Contaminated Fluid: Over time, brake fluid can become contaminated with moisture, dirt, and debris. If your brake fluid appears dark or murky, a flush might be necessary to remove these contaminants.

• Air in the System: If air has entered the brake lines, it can cause a spongy brake pedal and reduce braking efficiency. A brake fluid flush can help remove this air.

• Manufacturer Recommendation: Some vehicle manufacturers recommend a brake fluid flush at certain intervals as part of regular maintenance.

How Often Should You Flush Brake Fluid?

As mentioned earlier, a brake fluid flush is generally recommended every 3 to 5 years. However, if you notice any of the signs mentioned above, it might be necessary to perform a flush sooner.

💬Final Thoughts: The Importance of Regular Brake Fluid Maintenance

Changing and flushing brake fluid is an essential part of vehicle maintenance that should not be overlooked. Whether you choose to do it yourself or have it done by a professional, keeping your brake fluid fresh ensures that your braking system remains in optimal condition.

By understanding the importance of brake fluid, knowing when and how to change it, and being aware of the costs involved, you can take proactive steps to maintain your vehicle's safety and performance. Regular brake fluid changes and flushes are small investments that can have a significant impact on your vehicle's longevity and your peace of mind.

So, the next time you're performing routine maintenance on your car, don't forget to check the brake fluid. A little attention now can prevent bigger problems down the road, keeping you and your passengers safe on every journey.


Want more videos all about auto?
Subscribe to our YouTube channel ðŸ‘‰Cartech Home
Textual description of firstImageUrl

How Often to Change Brake Fluid: A Comprehensive Guide

All about auto image

Maintaining your vehicle's braking system is crucial for your safety on the road. One of the key aspects of brake maintenance is knowing how often to change brake fluid. Brake fluid plays a vital role in the performance of your braking system, but it’s often overlooked. In this comprehensive guide, we’ll answer several important questions: how often should you change brake fluid, how much brake fluid change costs, and more. By the end of this article, you’ll have a clear understanding of why brake fluid changes are necessary, how often they should be performed, and what to expect when you take your car in for this essential service.

What is Brake Fluid and Why is it Important?

Before diving into how often you should change brake fluid, it's important to understand what brake fluid is and why it is so crucial. Brake fluid is a hydraulic fluid that transfers the force from your foot pressing the brake pedal to the brake pads, which then press against the brake rotors to slow down or stop your vehicle. Without brake fluid, your car's braking system wouldn't function properly.

Brake fluid is designed to withstand high temperatures and pressure. However, over time, brake fluid can absorb moisture from the air, leading to a decrease in its boiling point. This can result in reduced braking performance, increased stopping distances, and even complete brake failure in extreme cases. Therefore, knowing how often to change brake fluid is critical for ensuring your vehicle remains safe to drive.

👉How Often Should You Change Brake Fluid?

Manufacturer Recommendations

Most vehicle manufacturers recommend changing the brake fluid every 2 to 3 years or every 30,000 to 45,000 miles, whichever comes first. However, this can vary depending on the make and model of your vehicle. It's essential to consult your owner's manual for the specific recommendations for your car.

Driving Conditions Matter

While the manufacturer's guidelines provide a good starting point, your driving conditions can also impact how often you should change brake fluid. If you frequently drive in harsh conditions, such as mountainous terrain, heavy traffic, or areas with high humidity, you may need to change your brake fluid more frequently. These conditions can cause the brake fluid to absorb moisture more quickly, reducing its effectiveness.

Signs That Your Brake Fluid Needs to be Changed

Even if you're not close to the recommended interval for changing your brake fluid, there are some warning signs that indicate it might be time for a change. These include:

Spongy Brake Pedal: If your brake pedal feels soft or spongy when you press it, this could be a sign that your brake fluid has absorbed too much moisture and is no longer providing adequate pressure to the braking system.

Warning Light: Some vehicles are equipped with a brake fluid warning light on the dashboard. If this light comes on, it’s a clear indication that you need to check your brake fluid.

Unusual Noises: If you hear grinding or squealing noises when you apply the brakes, it could be a sign that your brake fluid is contaminated or that there is an issue with the brake pads or rotors.

Discolored Brake Fluid: Brake fluid should be a clear, amber color. If you notice that it has turned dark brown or black, it’s a sign that it’s time to change it.

👉How Often Does Brake Fluid Need to Be Changed in Older Vehicles?

If you own an older vehicle, you might need to change your brake fluid more frequently. Older cars tend to have more wear and tear on their braking systems, which can lead to more contamination in the brake fluid. In some cases, you might need to change the brake fluid every 1 to 2 years.

👉How Much Brake Fluid Change Costs

Factors Affecting the Cost

When considering how much brake fluid change will cost, several factors come into play:

1. Vehicle Make and Model: The cost of changing brake fluid can vary depending on the make and model of your vehicle. Luxury or high-performance vehicles might require more expensive brake fluid, which can increase the cost.

2. Location: Labor costs can vary significantly depending on where you live. In urban areas, the cost of labor is typically higher than in rural areas.

3. Service Provider: The cost can also vary depending on where you get the service done. Dealerships generally charge more than independent mechanics or chain auto service centers.

Average Cost of Brake Fluid Change

On average, how much does it cost to change brake fluid? You can expect to pay between $70 and $150 for a brake fluid change. This cost typically includes the brake fluid itself, labor, and any necessary disposal fees. However, if your vehicle requires a specific type of brake fluid or if additional work is needed, the cost could be higher.

Is it Worth Doing It Yourself?

Some car owners might consider changing the brake fluid themselves to save money. While this is possible, it's important to note that changing brake fluid is a more complex task than some other DIY car maintenance jobs. It requires specific tools and knowledge to ensure that the job is done correctly. If done incorrectly, you could compromise your vehicle's braking system, leading to unsafe driving conditions.

If you have experience working on cars and feel confident in your ability to perform the job, you could save money by doing it yourself. However, for most people, it's best to leave this task to a professional to ensure it’s done correctly.

👉The Process of Changing Brake Fluid

Step-by-Step Guide

To give you a better understanding of what happens when you change brake fluid, here’s a step-by-step overview of the process:

1. Prepare the Vehicle: The car is raised using a jack, and the wheels are removed to access the brake calipers.

2. Drain the Old Fluid: The mechanic will locate the brake fluid reservoir and remove the old brake fluid using a suction device. The brake lines are then bled to remove any remaining old fluid from the system.

3. Inspect the Braking System: While the brake fluid is being changed, the mechanic will inspect the entire braking system, including the brake pads, rotors, and calipers, to ensure everything is in good working order.

4. Add New Brake Fluid: The mechanic will then add new brake fluid to the reservoir and bleed the brake lines to remove any air bubbles. This step ensures that the brake fluid is evenly distributed throughout the system and that the brakes are functioning correctly.

5. Test the Brakes: After the new brake fluid has been added, the mechanic will test the brakes to ensure they are working properly.

How Long Does the Process Take?

The entire process of changing brake fluid typically takes about 30 minutes to an hour, depending on the condition of your vehicle and whether any additional repairs are needed.

👉Why Regular Brake Fluid Changes Are Essential

Safety First

Your vehicle’s braking system is arguably its most important safety feature. Neglecting to change your brake fluid at the recommended intervals can lead to decreased braking performance, which could put you and others at risk on the road. By keeping your brake fluid in good condition, you ensure that your brakes will function properly when you need them most.

Prevent Costly Repairs

Regular brake fluid changes can also help you avoid more expensive repairs down the road. Contaminated or degraded brake fluid can cause corrosion in the braking system, leading to damage to the brake lines, calipers, and other components. By changing the brake fluid regularly, you can prevent these issues and extend the life of your braking system.

Improved Braking Performance

Fresh brake fluid helps maintain the optimal performance of your braking system. When you press the brake pedal, you want a quick and responsive reaction from your brakes. Old or contaminated brake fluid can cause a delay in this response, leading to longer stopping distances and reduced control over your vehicle. By changing your brake fluid regularly, you ensure that your brakes are always at their best.

👉Common Myths About Brake Fluid Changes

Myth 1: You Only Need to Change Brake Fluid If There’s a Problem

One of the most common myths is that you only need to change your brake fluid if there’s a noticeable problem with your brakes. However, this isn’t true. Brake fluid degrades over time, even if your braking system appears to be working fine. Waiting until there’s a problem can put you at risk for brake failure.

Myth 2: Brake Fluid Never Needs to Be Changed

Another myth is that brake fluid never needs to be changed. Some people believe that as long as their brakes are working, the brake fluid is fine. However, as mentioned earlier, brake fluid can absorb moisture over time, reducing its effectiveness. Regular changes are necessary to maintain the integrity of your braking system.

Myth 3: Any Brake Fluid Will Do

Not all brake fluids are created equal. Different vehicles require different types of brake fluid, and using the wrong type can cause damage to your braking system. Always use the brake fluid recommended by your vehicle’s manufacturer.

👉How Much Does Changing Brake Fluid Cost Over Time?

Cost vs. Safety

While the cost of changing brake fluid may seem like an unnecessary expense, it’s important to weigh this against the potential cost of brake failure. The safety of you and your passengers should always be the top priority. Spending a little money on regular brake fluid changes can help you avoid more significant expenses and risks in the future.

Comparing Costs with Other Maintenance

When compared to other routine maintenance tasks, changing brake fluid is relatively inexpensive. For example, the cost of replacing brake pads or rotors can be several times higher than the cost of changing brake fluid. By keeping up with your brake fluid changes, you can reduce the likelihood of needing these more costly repairs.

💬Final Thoughts

Understanding how often to change brake fluid and how often should you change brake fluid is essential for maintaining the safety and performance of your vehicle. While the general recommendation is to change your brake fluid every 2 to 3 years or every 30,000 to 45,000 miles, your specific needs may vary based on your vehicle and driving conditions.

When considering how much brake fluid change will cost, it’s important to factor in the make and model of your vehicle, your location, and whether you choose to do the job yourself or hire a professional. On average, how much does it cost to change brake fluid is between $70 and $150.

Regular brake fluid changes are an essential part of vehicle maintenance. They help ensure your brakes work correctly, prevent costly repairs, and keep you safe on the road. Don’t wait until there’s a problem to address your brake fluid. By staying on top of this critical maintenance task, you’ll enjoy peace of mind knowing that your vehicle is in good hands.

Always remember to consult your vehicle’s owner manual for the most accurate information regarding your specific car. And if in doubt, don’t hesitate to seek the advice of a professional mechanic who can provide personalized recommendations based on your driving habits and the condition of your vehicle’s braking system. Safe driving starts with a well-maintained braking system, so make brake fluid changes a regular part of your car care routine.


Want more videos all about auto?
Subscribe to our YouTube channel ðŸ‘‰Cartech Home
Textual description of firstImageUrl

Brake Issues Troubleshooting Guide: Causes and Solutions

All About Auto Image

On this page of All about auto, you will find information about brake issues. The car brake issues information indicated on this page is a basic guide from previous experiences from working in an automotive company. Scroll down below to look at different brake issues your car may have been encounter.

Why Your Brake Pedal Feels Soft: Causes and Fixes Explained

Learn why your brake pedal feels soft, common causes, and solutions to fix it. Ensure safe driving by diagnosing and addressing brake issues today. Learn more » Why Your Brake Pedal Feels Soft: Causes and Fixes Explained

Squealing Brakes: Causes, Consequences, and Fixes Explained

Learn the causes of squealing brakes, their impact on safety, and practical solutions to stop brake noise and keep your vehicle safe on the road. Learn more » Squealing Brakes: Causes, Consequences, and Fixes Explained

ABS Warning Light: What Does It Mean and Why It Stays On?

ABS warning light stays on? Learn what it means, common causes, and how to fix ABS issues to ensure your car's braking system works properly. Learn more » ABS Warning Light: What Does It Mean and Why It Stays On?

Brake Cylinder Master: Function and Troubleshooting

Learn about the brake cylinder master, its function, symptoms of failure, maintenance tips, and troubleshooting to ensure safe vehicle braking. Learn more » Brake Cylinder Master: Function and Troubleshooting

Brake Warning Light is On: What You Need to Know

Discover the causes of brake warning light issues and effective solutions to keep your car safe. Learn common fixes and prevention tips. Learn more » Brake Warning Light is On: What You Need to Know

How to Tell if Brake Caliper Is Bad: Symptoms of Brake Caliper Failure

Learn how to tell if a brake caliper is bad with these symptoms. Discover brake caliper failure signs and get your vehicle checked today! Learn more » How to Tell if Brake Caliper Is Bad: Symptoms of Brake Caliper Failure

Worn Out Brake Pads Symptoms

Learn the key symptoms of worn out brake pads, how to identify them early, and why timely replacement is crucial for your vehicle's safety. Learn more » Worn Out Brake Pads Symptoms

Guide to Changing Brake Fluid: Everything You Need to Know

Learn how to change brake fluid, the costs involved, and when to flush it. Ensure your vehicle's safety with this step-by-step brake fluid guide. Learn more » Guide to Changing Brake Fluid: Everything You Need to Know

Leaking Brake Fluid from Rear Wheel: Causes and Solutions

Learn about the causes, symptoms, and solutions for leaking brake fluid from the rear wheel, and how to prevent this critical brake system issue. Learn more » Leaking Brake Fluid from Rear Wheel: Causes and Solutions

Spongy Brakes: Causes, Solutions, and Prevention

Discover the causes, diagnosis, and solutions for spongy brakes. Ensure your vehicle's safety by understanding and preventing brake issues. Learn more » Understanding Spongy Brakes: Causes, Solutions, and Prevention

Spongy Brakes No Air in Lines : Causes and Fixes

Discover causes and solutions for spongy brakes with no air in lines. Learn how to diagnose and fix this issue for safer driving. Learn more » Spongy Brakes No Air in Lines : Causes and Fixes

Grinding Sound When Braking: Causes, Dangers, and Solutions

Learn the causes, dangers, and solutions for a grinding sound when braking. Discover how to prevent brake issues and ensure your vehicle's safety. Learn more » Grinding Sound When Braking: Causes, Dangers, and Solutions

Loud Grinding Noise When Braking: Causes, and Solutions

Learn about the causes, risks, and solutions for a loud grinding noise when braking. Discover why this noise occurs and how to fix it quickly. Learn more » Loud Grinding Noise When Braking: Causes, and Solutions

Signs of Warped Rotors: What You Need to Know

Signs of warped rotors include brake vibrations, squealing noises, soft pedal, uneven pad wear, longer stopping distances, and visible damage. Learn more » Signs of Warped Rotors: What You Need to Know

Car Pulls to the Left When Braking: Causes and Solutions

Discover the causes and solutions when your car pulls to the left when braking. Learn how to diagnose and fix this common issue for safer driving. Learn more » Car Pulls to the Left When Braking: Causes and Solutions

Symptoms of Low Brake Fluid Every Car Owner Needs to Know

Understanding the symptoms of low brake fluid can help you identify problems early and take action before your braking system fails. Learn more » Car Pulls to the Left When Braking: Causes and Solutions

Car Shakes When Braking Causes, Solutions, and Prevention

Car shakes when braking can be caused by warped rotors, unbalanced tires, worn brake pads, or suspension issues. Address promptly for safety. Learn more » Car Shakes When Braking Causes, Solutions, and Prevention

Car Shakes When Braking Downhill: Causes and Solutions

Learn the common causes of a car shaking when braking downhill and discover effective solutions to fix the problem on our detailed guide. Learn more » Car Shakes When Braking Downhill: Causes and Solutions

Mesothelioma the Asbestos Exposure Risk in Brakes

Mesothelioma is a devastating disease, and its primary cause—exposure to asbestos—makes it largely preventable. Learn more » Mesothelioma the Asbestos Exposure Risk in Brakes

Mesothelioma Compensation for Family Members

Learn how to secure mesothelioma compensation for family members, including types of claims, filing steps, and factors affecting compensation. Learn more » Mesothelioma Compensation for Family Members

How Often to Change Brake Fluid: A Comprehensive Guide

Learn how often to change brake fluid, signs it needs changing, costs involved, and why regular maintenance is crucial for safe driving. Learn more » How Often to Change Brake Fluid: A Comprehensive Guide


Want more videos Cartech?
Subscribe to our YouTube channel👉All About Auto
Textual description of firstImageUrl

Leaking Brake Fluid from Rear Wheel: Causes and Solutions

All about auto image

Experiencing a leaking brake fluid from the rear wheel of your vehicle is a serious issue that demands immediate attention. This problem not only compromises the effectiveness of your braking system but also poses significant safety risks. In this comprehensive guide, we will explore the causes, symptoms, and solutions for leaking brake fluid from the rear wheel. Understanding these aspects will help you maintain your vehicle’s safety and performance, and it will also provide insight into when to seek professional assistance.

👉Understanding Brake Fluid and Its Importance

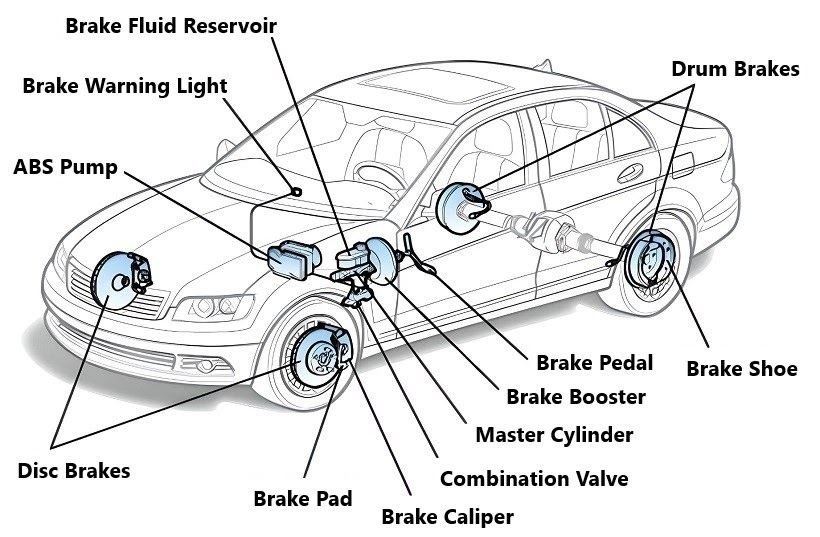
Before diving into the specifics of leaking brake fluid from the rear wheel, it’s essential to understand what brake fluid is and why it’s critical to your vehicle's braking system. Brake fluid is a hydraulic fluid that transfers force from the brake pedal to the brake components at each wheel. It plays a crucial role in the overall functioning of your brakes, ensuring that your vehicle stops safely and efficiently.

👉The Role of Brake Fluid

• Hydraulic Pressure: When you press the brake pedal, brake fluid is forced through the brake lines to the brake calipers or wheel cylinders, which in turn apply pressure to the brake pads or shoes, slowing the vehicle down.

• Heat Absorption: Brake fluid is designed to withstand the high temperatures generated by friction between the brake pads and rotors or the brake shoes and drums. It helps prevent the brake system from overheating and losing efficiency.

• Lubrication: The fluid also lubricates the moving parts within the braking system, reducing wear and tear.

👉Types of Brake Fluid

There are different types of brake fluid, primarily distinguished by their chemical composition:

• DOT 3: Glycol-based, commonly used in older vehicles.

• DOT 4: Glycol-based with a higher boiling point than DOT 3, suitable for modern vehicles.

• DOT 5: Silicone-based, used in specialty vehicles where moisture absorption is a concern.

• DOT 5.1: Glycol-based with a high boiling point, used in high-performance vehicles.

👉The Dangers of Brake Fluid Leaks

Leaking brake fluid from the rear wheel or any other part of the braking system is a critical problem that can lead to:

• Reduced Braking Power: Without sufficient brake fluid, the hydraulic pressure necessary for effective braking diminishes, making it harder to stop the vehicle.

• Brake Failure: In severe cases, a complete loss of brake fluid can result in total brake failure, leading to potentially catastrophic accidents.

• Damage to Brake Components: Brake fluid leaks can cause damage to other parts of the braking system, including brake pads, rotors, and lines, leading to costly repairs.

👉Causes of Leaking Brake Fluid from Rear Wheel

Several factors can contribute to brake fluid leaking from the rear wheel. Identifying the root cause is essential for effective repairs.

1. Worn-Out Wheel Cylinders. Wheel cylinders are part of drum brake systems, typically found on the rear wheels of many vehicles. They contain pistons that press the brake shoes against the drum to create friction and stop the vehicle. Over time, the seals within the wheel cylinders can wear out, leading to brake fluid leaks.

All about auto image

• Symptoms: A soft or spongy brake pedal, fluid around the rear wheels, or brake fluid on the inside of the wheel.

• Solution: The wheel cylinders need to be rebuilt or replaced.

2. Damaged Brake Lines. Brake lines carry brake fluid from the master cylinder to the brakes at each wheel. These lines are typically made of steel, but they can corrode or be damaged by road debris, leading to leaks.

• Symptoms: Visible brake fluid on the ground near the rear wheel, a drop in brake fluid levels, or a spongy brake pedal.

• Solution: The damaged brake line must be repaired or replaced.

3. Faulty Brake Calipers. In vehicles with disc brakes on the rear wheels, brake calipers squeeze the brake pads against the rotor to stop the vehicle. If the caliper seals wear out or the caliper itself becomes damaged, it can lead to brake fluid leaks.

All about auto image

• Symptoms: Fluid around the brake caliper, uneven braking, or a loss of braking power.

• Solution: Replace the faulty brake caliper.

4. Worn Brake Hoses. Brake hoses connect the rigid brake lines to the brake calipers or wheel cylinders. These hoses are flexible to accommodate the movement of the wheels. However, they can wear out over time, leading to cracks and leaks.

• Symptoms: Fluid leaking near the rear wheel, a soft brake pedal, or reduced braking effectiveness.

• Solution: The worn brake hose needs to be replaced.

5. Loose or Damaged Bleeder Valves. Bleeder valves are small screws found on brake calipers or wheel cylinders. They are used to release air from the brake system. If these valves are not tightened properly or become damaged, they can cause brake fluid to leak.

• Symptoms: Fluid around the bleeder valve, air in the brake lines, or a spongy brake pedal.

• Solution: Tighten or replace the bleeder valve as needed.

6. Faulty Master Cylinder. The master cylinder is the heart of the braking system, responsible for pressurizing the brake fluid and sending it to the brakes at each wheel. If the master cylinder is faulty, it can cause leaks that may show up near the rear wheels.

All about auto image

• Symptoms: Brake fluid leaking from the rear of the vehicle, a sinking brake pedal, or a complete loss of braking power.

• Solution: Replace the master cylinder.

7. Overfilled Brake Fluid Reservoir. While not a common cause, overfilling the brake fluid reservoir can lead to excess fluid being pushed out through the brake lines, potentially causing leaks.

• Symptoms: Brake fluid leaking from the rear wheels after recent brake fluid addition.

• Solution: Correct the fluid level in the reservoir.

8. Corroded Brake Components. Corrosion is a common issue, especially in areas where road salt is used. Corroded brake lines, calipers, or wheel cylinders can lead to leaks.

• Symptoms: Rust or corrosion on brake components, fluid leaks, or reduced braking performance.

• Solution: Replace the corroded components and consider rust-proofing to prevent future issues.

👉Symptoms of Leaking Brake Fluid from Rear Wheel

Recognizing the symptoms of a brake fluid leak from the rear wheel is crucial for timely intervention. Early detection can prevent further damage and ensure your safety on the road.

1. Soft or Spongy Brake Pedal. A soft or spongy brake pedal is often one of the first signs of a brake fluid leak. This occurs because the brake system is unable to maintain proper hydraulic pressure, leading to a reduction in braking power.

2. Visible Fluid Leaks. Brake fluid leaks are often visible around the rear wheels. The fluid may appear as a light yellow or brownish liquid, depending on its age. If you notice fluid on the ground or on the inside of your wheels, it’s a clear sign of a leak.

3. Low Brake Fluid Levels. If you regularly check your brake fluid levels and notice they are consistently low, it could be a sign of a leak somewhere in the system, potentially from the rear wheel.

4. Brake Warning Light. Many modern vehicles are equipped with a brake warning light that illuminates when there’s a problem with the braking system. A leak in the rear wheel could trigger this warning.

5. Unusual Noises. If air enters the brake lines due to a leak, you might hear unusual noises when pressing the brake pedal, such as a hissing sound or grinding noises from the rear wheels.

6. Uneven Braking. If one of your rear wheels is leaking brake fluid, you might experience uneven braking, where one side of the vehicle brakes more effectively than the other. This can cause the vehicle to pull to one side during braking.

7. Brake Pedal Sinks to the Floor. In severe cases, a significant brake fluid leak can cause the brake pedal to sink to the floor when pressed. This indicates a serious issue that requires immediate attention.

👉Diagnosing the Cause of a Brake Fluid Leak

Diagnosing the exact cause of a brake fluid leak from the rear wheel requires a systematic approach. Here’s a step-by-step guide:

1. Visual Inspection. Start by visually inspecting the area around the rear wheels. Look for signs of fluid leaks, such as wet spots on the ground or on the wheel itself. Check the brake lines, hoses, wheel cylinders, and calipers for visible damage or wear.

2. Check Brake Fluid Levels. Open the brake fluid reservoir and check the fluid level. If it’s low, it could indicate a leak. However, don’t just top it off; investigate further to find the source of the leak.

3. Examine the Wheel Cylinder or Caliper. If your vehicle has drum brakes, remove the drum to inspect the wheel cylinder for leaks. If you have disc brakes, check the brake caliper for any signs of fluid around the seals or bleeder valves.

4. Inspect the Brake Lines and Hoses. Follow the brake lines and hoses from the master cylinder to the rear wheels. Look for any signs of corrosion, cracks, or other damage that could lead to leaks.

5. Bleed the Brakes. Bleeding the brakes can help you determine if there’s air in the system, which may indicate a leak. It can also help identify if the bleeder valves are the source of the leak.

6. Check the Master Cylinder. If you’ve ruled out other potential causes, inspect the master cylinder. Look for leaks around the unit and check if it’s functioning properly.

👉Solutions for Leaking Brake Fluid from Rear Wheel

Once you’ve diagnosed the cause of the leak, the next step is to address the issue. Here are some common solutions based on the cause:

1. Replace Worn-Out Wheel Cylinders. If the wheel cylinders are the source of the leak, they will need to be rebuilt or replaced. This involves removing the drum, disconnecting the brake lines, and installing a new or rebuilt cylinder.

2. Repair or Replace Damaged Brake Lines. Damaged brake lines must be repaired or replaced. This might involve bending and flaring new lines to fit your vehicle or using pre-made lines that match your vehicle’s specifications.

3. Install New Brake Calipers. If the brake calipers are leaking, they will need to be replaced. This involves removing the old caliper, installing a new one, and bleeding the brakes to remove any air from the system.

4. Replace Worn Brake Hoses. Replacing worn brake hoses is a straightforward process. The old hose is disconnected, a new one is installed, and the brakes are bled to ensure proper function.

5. Tighten or Replace Bleeder Valves. If the bleeder valves are the source of the leak, they should be tightened or replaced. Afterward, the brake system should be bled to remove any trapped air.

6. Replace the Master Cylinder. A faulty master cylinder should be replaced by a professional. This involves disconnecting the brake lines, removing the old master cylinder, installing a new one, and bleeding the entire brake system.

7. Correct the Brake Fluid Level. If overfilling the brake fluid reservoir caused the leak, simply correct the fluid level. Be sure to check for any residual leaks that might have occurred due to the excess pressure.

8. Rust-Proofing Brake Components. If corrosion caused the leak, replace the affected parts and consider applying rust-proofing products to protect the new components from future corrosion.

👉Preventive Maintenance Tips

Preventing brake fluid leaks from the rear wheel is possible with regular maintenance and careful attention to your vehicle’s braking system. Here are some tips to keep your brakes in top condition:

1. Regular Brake Inspections. Schedule regular brake inspections to catch potential issues before they become serious. A mechanic can check for signs of wear and tear, corrosion, and leaks.

2. Brake Fluid Replacement. Brake fluid absorbs moisture over time, which can lead to corrosion and a reduction in braking efficiency. Regularly replace your brake fluid according to your vehicle’s maintenance schedule.

3. Keep an Eye on Brake Performance. If you notice any changes in your vehicle’s braking performance, such as a soft pedal or unusual noises, have your brakes inspected immediately.

4. Avoid Harsh Driving Conditions. Avoiding harsh driving conditions, such as frequent stops and starts, can reduce the wear and tear on your brake components, helping to prevent leaks.

5. Use Quality Brake Components. When replacing brake components, always use high-quality parts that meet or exceed the manufacturer’s specifications. This ensures better performance and longevity.

👉When to Seek Professional Help

While some brake repairs can be done at home by experienced DIYers, a leaking brake fluid from the rear wheel is a serious issue that often requires professional attention. If you’re not confident in diagnosing and fixing the problem yourself, it’s best to take your vehicle to a trusted mechanic. They have the tools and expertise to accurately diagnose the issue and make the necessary repairs to ensure your safety.

💬Final Thoughts

Leaking brake fluid from the rear wheel is a critical problem that should never be ignored. It compromises the safety and efficiency of your vehicle’s braking system, potentially leading to severe accidents. By understanding the causes, symptoms, and solutions for this issue, you can take proactive steps to address it and maintain your vehicle’s performance. Regular maintenance and prompt attention to any signs of brake fluid leaks will help keep you and your passengers safe on the road.


Want more videos all about auto?
Subscribe to our YouTube channel ðŸ‘‰Cartech Home